
Creating a professional-looking website doesn’t require advanced technical skills or expensive tools. With Google Sites, anyone can build a functional, visually appealing website in under an hour. Integrated with Google Workspace, it’s free, secure, and accessible from any device with internet access. Whether you're launching a personal portfolio, a school project, or a small business site, Google Sites offers an intuitive drag-and-drop interface that simplifies the entire process—from layout to publishing.
Why Choose Google Sites?
Google Sites stands out for its seamless integration with other Google services like Drive, Docs, Sheets, and Calendar. It’s designed for collaboration, making it ideal for teams, educators, and individuals who want real-time editing and instant sharing. Unlike traditional website builders, there are no domain fees, hosting charges, or complex setup procedures. Everything is hosted on Google’s secure infrastructure, so updates go live instantly without needing to manage servers or FTP clients.
The platform automatically ensures mobile responsiveness, meaning your site will look good on phones, tablets, and desktops without manual adjustments. For users already in the Google ecosystem, this tool removes friction and accelerates deployment.
“Google Sites lowers the barrier to entry for digital presence. You don’t need to be a developer to publish something meaningful online.” — Dr. Lena Patel, Digital Literacy Educator
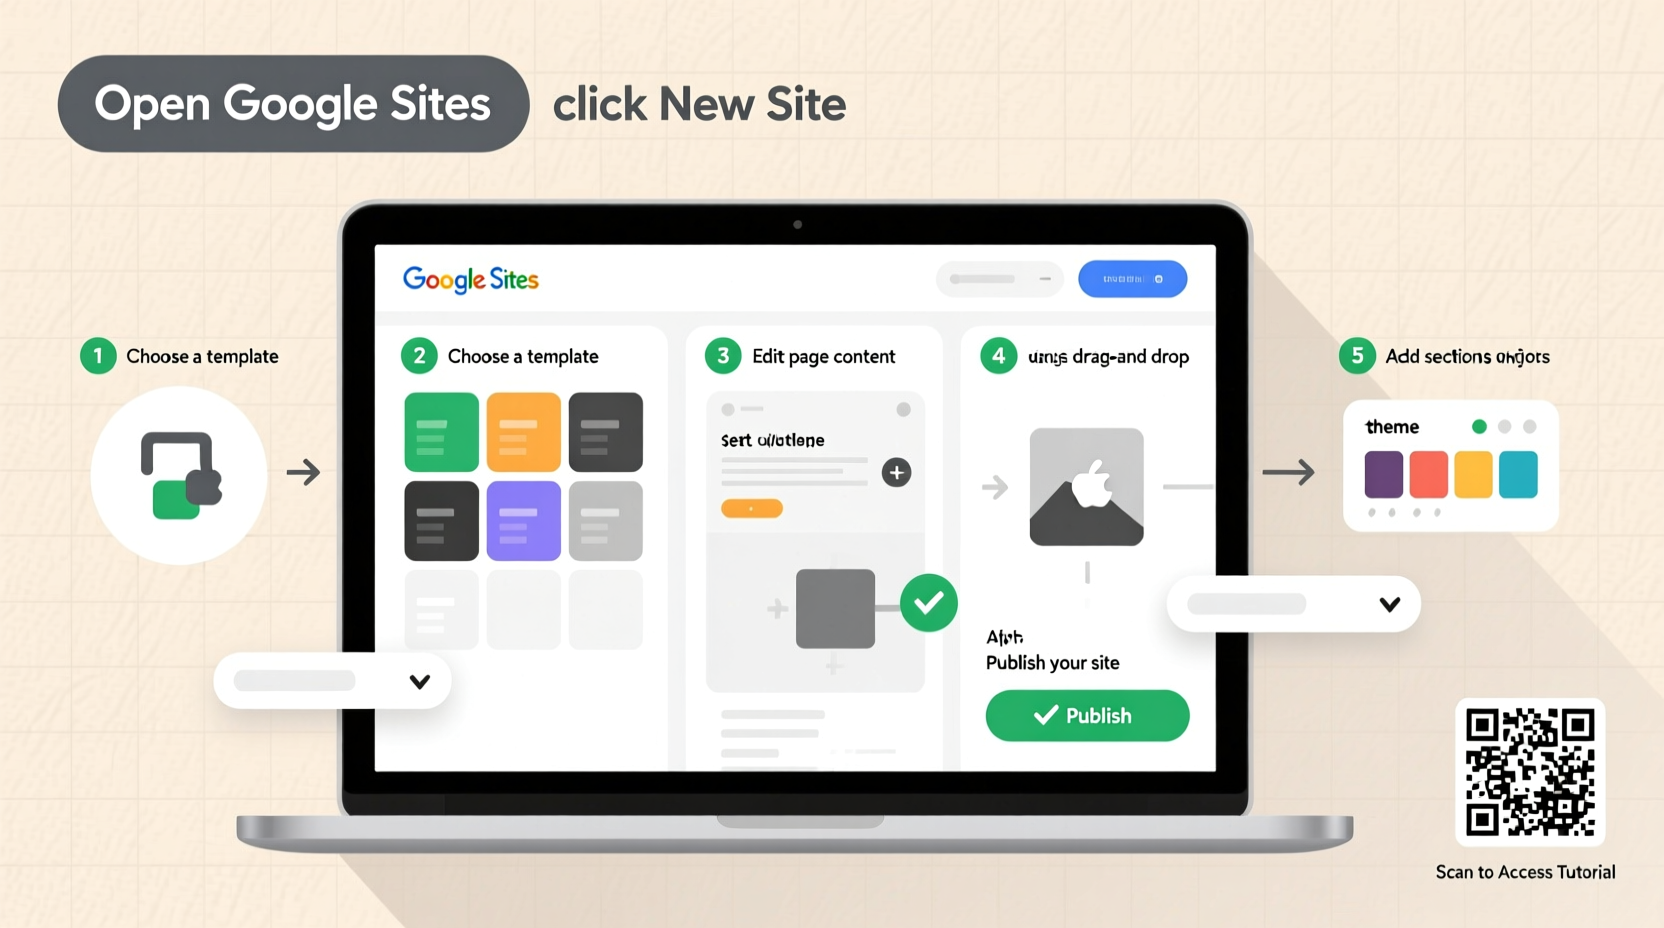
Step-by-Step Guide to Building Your Website
Follow this structured timeline to launch your site efficiently. Each step builds upon the last, ensuring clarity and consistency throughout the development process.
- Sign in to Google Sites: Go to sites.google.com and sign in with your Google account. If you don’t have one, create it at no cost.
- Create a New Site: Click the “+” button to start a blank site or choose from available templates (e.g., \"Classroom,\" \"Team Project,\" \"Personal Resume\").
- Name Your Site: Enter a clear title at the top. This becomes both the page tab label and part of your web address (e.g.,
sites.google.com/view/your-site-name). - Customize the Layout: Use the right-side panel to add sections: text boxes, images, embedded files, videos, buttons, and navigation menus. Drag and drop elements where needed.
- Add Content: Replace placeholder text with your own. Insert headings, paragraphs, lists, and links. Embed Google Docs, Sheets, Forms, or YouTube videos directly by pasting URLs or using the insert menu.
- Adjust Theme & Styling: Click “Theme” in the right panel to change colors, fonts, and background images. Stick to consistent branding—limit yourself to two primary colors and one font family for readability.
- Set Up Navigation: Organize pages using the left-hand menu. Add new pages via the “+” icon next to “Pages.” Rename them descriptively (e.g., Home, About, Contact, Portfolio).
- Preview on Mobile: Click the phone/tablet icon in the editor to see how your site appears on smaller screens. Adjust spacing or image sizes if content overlaps.
- Share and Publish: Click “Publish” in the top-right corner. Choose a custom URL (if desired), set viewing permissions, then hit “Publish.” Share the link via email, social media, or QR code.
Essential Features and How to Use Them
Google Sites excels in simplicity, but understanding key features helps maximize impact. Here’s how to use them effectively:
- Embedding Google Files: Instead of uploading documents, embed Google Docs, Sheets, or Slides directly. They update in real time, so visitors always see the latest version.
- Collaboration Tools: Invite others to edit by clicking “Share” > “Add editors.” Assign roles: Editor (can modify), Commenter (can suggest), or Viewer (read-only).
- Access Control: Decide who sees your site—anyone with the link, specific people, or public search engines. Ideal for private team hubs or public-facing portfolios.
- Version History: Accidentally deleted a section? Use “File” > “See revision history” to restore previous versions of your site.
- Integration with Google Analytics: While not native, you can paste tracking codes using the “Embed” option with HTML gadgets (requires Google Workspace admin access in some cases).
| Feature | Best For | Limitations |
|---|---|---|
| Drag-and-Drop Editor | Beginners, quick edits | Limited customization compared to WordPress |
| Real-Time Collaboration | Teams, classrooms, remote work | No offline editing capability |
| Mobile Optimization | Public websites, client access | Less control over responsive breakpoints |
| Free Hosting & SSL | Budget-conscious users | No custom domains unless using Google Workspace |
Checklist: Launch-Ready Website Preparation
Before hitting publish, ensure your site meets these criteria:
- ✅ All text is proofread and free of spelling errors
- ✅ Images are optimized (not too large, properly captioned)
- ✅ Links open correctly and point to valid destinations
- ✅ Contact information (email, form, phone) is clearly visible
- ✅ Navigation is logical and consistent across pages
- ✅ Privacy settings match intended audience (public/private)
- ✅ Mobile preview looks clean and readable
- ✅ Title and description reflect the site’s purpose
Real Example: A Teacher Builds a Classroom Hub
Sarah Kim, a middle school science teacher, needed a central place for students to access assignments, lab reports, and announcements. She used Google Sites to create a classroom website linked to her Google Classroom.
She started with the “Education” template, renamed pages to “Syllabus,” “Weekly Agenda,” “Lab Resources,” and “Contact.” She embedded her class schedule from Google Calendar, added a Google Form for assignment submissions, and uploaded PDFs of study guides from Drive. By setting view permissions to her school district’s domain, only enrolled students could access materials.
Within two hours, she had a fully functional hub that reduced repetitive questions and improved student engagement. Parents appreciated the transparency, and administrators praised its organization during evaluations.
Frequently Asked Questions
Can I use my own domain name with Google Sites?
Yes—but only if you have Google Workspace (formerly G Suite). Free Google accounts use the default sites.google.com/view/yoursitename URL. With Workspace, you can connect a custom domain like www.yoursite.com.
Is Google Sites SEO-friendly?
It has basic SEO capabilities. Page titles and descriptions are indexable, and content is crawlable by search engines when set to public. However, it lacks advanced features like meta tags, schema markup, or XML sitemaps, limiting high-level optimization.
Can I track visitor analytics?
Not natively. Standard Google Sites does not include built-in analytics. But if your organization uses Google Workspace, admins may enable third-party integrations or use Google Tag Manager via embedded HTML to add tracking scripts.
Conclusion: Start Building Today
Building a website with Google Sites is faster and more accessible than ever. You don’t need prior experience, a budget, or weeks of planning. From concept to publication, the entire process can take less than a day—and the results are professional, reliable, and instantly shareable.
Whether you’re showcasing a resume, organizing a community event, or supporting student learning, your digital presence starts with a single click. Take advantage of Google’s ecosystem, collaborate in real time, and publish with confidence. The web isn’t just for developers anymore—your voice belongs online.


 浙公网安备
33010002000092号
浙公网安备
33010002000092号 浙B2-20120091-4
Comments
No comments yet. Why don't you start the discussion?