
Flat tires happen. Whether it’s from a sharp object on the road, worn tread, or sudden pressure loss, being stranded with a deflated tire can feel overwhelming—especially if you’ve never changed one before. But knowing how to change a tire isn’t just a useful skill; it’s a confidence booster and a potential time- and money-saver. With the right preparation and a calm approach, any beginner can handle this task safely and efficiently.
This comprehensive guide walks you through every stage of changing a car tire, from recognizing when you have a flat to driving away safely after the fix. No prior mechanical knowledge is required—just attention to detail and a willingness to learn.
Recognizing a Flat Tire: What to Look and Feel For
Before attempting a tire change, confirm that your tire is actually flat. Common signs include:
- A noticeable dip or bulge in the sidewall
- Hearing a loud pop followed by a wobbling sensation
- Your vehicle pulling sharply to one side
- A rhythmic thumping sound while driving
- The tire pressure warning light illuminating on your dashboard
If you suspect a flat, do not slam on the brakes. Ease off the accelerator, grip the steering wheel firmly, and signal to move safely off the roadway. Find a level, stable surface away from traffic—ideally a parking lot or wide shoulder. Avoid inclines, gravel, or soft ground, as these can make jacking unstable and dangerous.
Tools and Equipment You’ll Need
Most vehicles come equipped with a basic toolkit stored in the trunk. Before you begin, gather the following items:
- Spare tire – Check that it’s properly inflated and in good condition.
- Car jack – Usually a scissor or hydraulic jack included with your vehicle.
- Lug wrench – Used to loosen and tighten wheel nuts.
- Wheel wedges or bricks – To prevent the car from rolling.
- Torque wrench (optional but recommended) – Ensures lug nuts are tightened correctly.
- Gloves and flashlight – For grip and visibility, especially at night.
Inspect your spare tire regularly. Some compact “donut” spares are designed only for temporary use and have speed and distance limits (usually 50 mph and 50 miles). Know your spare’s limitations.
| Tool | Purpose | Pro Tip |
|---|---|---|
| Spare Tire | Replaces the flat tire temporarily | Check air pressure monthly |
| Car Jack | Lifts the vehicle off the ground | Use only on reinforced lift points |
| Lug Wrench | Removes and installs lug nuts | Break loose nuts before lifting |
| Wheel Wedges | Prevents vehicle roll | Place opposite the flat tire |
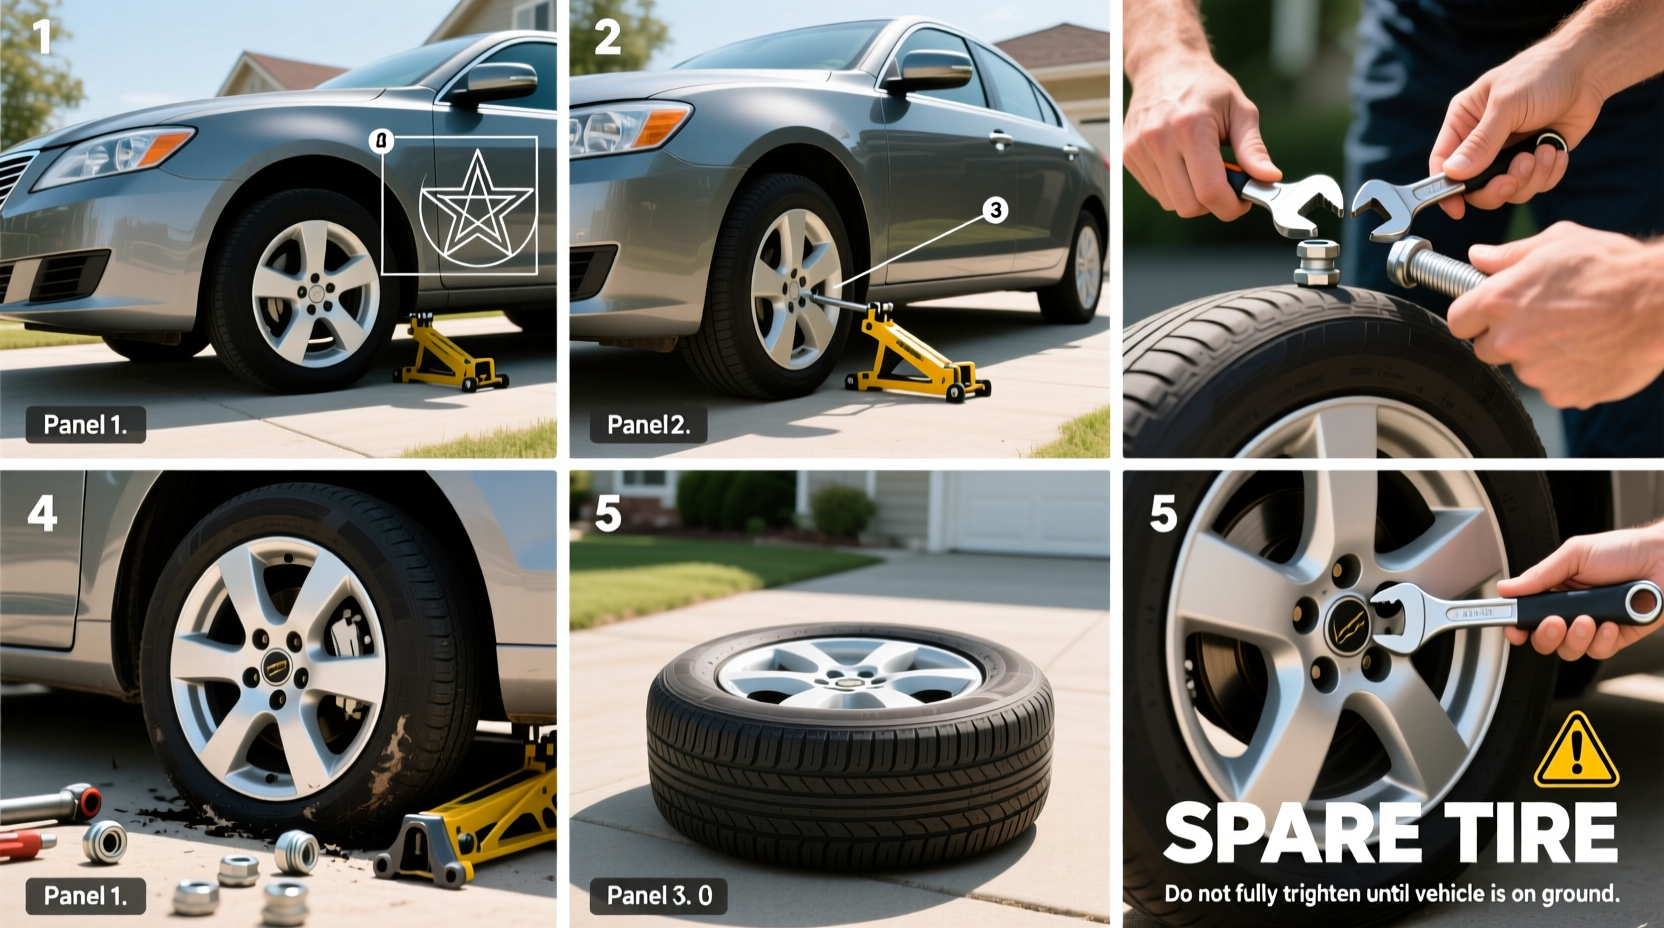
Step-by-Step Guide to Changing a Tire Safely
Follow these steps carefully. Rushing increases risk. Take your time, even if traffic is nearby.
- Turn on hazard lights and engage the parking brake. This alerts other drivers and prevents unwanted movement.
- Place wheel wedges behind the tires opposite the flat. If changing a front tire, wedge the rear wheels. For a rear flat, wedge the front.
- Use the lug wrench to slightly loosen the lug nuts. Turn counterclockwise. Loosen them now while the tire is still on the ground to prevent spinning.
- Position the jack under the vehicle’s designated lift point. Consult your owner’s manual—this is typically a reinforced metal section near the wheel well. Never jack on plastic, suspension parts, or frame edges.
- Raise the vehicle until the flat tire is about 6 inches off the ground. Ensure the jack is stable and vertical. Do not place any body part under the car.
- Remove the loosened lug nuts and set them aside in a safe place. Use a small container or cloth to avoid losing them.
- Take off the flat tire and lay it flat on its side. This keeps it out of the way and prevents rolling.
- Align the spare tire with the wheel studs and slide it into place. Push gently until it sits flush against the hub.
- Hand-tighten the lug nuts in a star pattern. This ensures even pressure. Don’t fully tighten yet.
- Lower the vehicle slowly using the jack. Once the tire touches the ground, remove the jack completely.
- Fully tighten the lug nuts with the wrench, again using a star pattern. If you have a torque wrench, follow the manufacturer’s specification (typically 80–100 lb-ft).
- Stow all tools, the flat tire, and the jack back in your vehicle. Double-check nothing is left behind on the road.
What to Do After the Change
After installing the spare, take a moment before driving. Walk around the vehicle and verify:
- All tools are secured
- The flat tire is properly stowed
- No loose lug nuts or debris remain
Drive cautiously. Temporary spares limit speed and handling. Get the flat tire repaired or replaced as soon as possible. Even if the puncture seems minor, internal damage may not be visible. A professional inspection is essential.
“Changing a tire is one of the most empowering skills a driver can learn. It turns helplessness into control.” — Carlos Mendez, ASE-Certified Automotive Technician
Common Mistakes Beginners Make (And How to Avoid Them)
Even with good intentions, mistakes happen. Here are frequent errors and how to prevent them:
| Mistake | Why It’s Dangerous | How to Avoid It |
|---|---|---|
| Loosening lug nuts after lifting the car | Wheel can spin, making removal difficult | Always break them loose while the car is on the ground |
| Using the wrong jack point | Can damage the vehicle or cause collapse | Refer to your owner’s manual for correct lift points |
| Forgetting to tighten lug nuts after lowering | Wheel may come loose while driving | Double-check tightness once the car is on the ground |
| Driving too fast on a donut spare | Increases blowout risk and reduces control | Never exceed 50 mph or 50 miles on a temporary spare |
Mini Case Study: Sarah’s First Tire Change
Sarah, a 28-year-old teacher, was returning home from work when she heard a loud pop and felt her car veer to the right. She pulled over safely and called a friend who talked her through the process. Though nervous, she remembered seeing a YouTube video on tire changes. Using her owner’s manual, she found the jack point and followed each step slowly.
She made one mistake: she fully removed the lug nuts before lifting the car, causing the wheel to wobble. Her friend reminded her to only loosen them first. After correcting it, she completed the change in about 25 minutes. The experience gave her lasting confidence. “I used to fear breakdowns,” she said. “Now I know I can handle them.”
Essential Checklist: Never Skip These Steps
Print or memorize this checklist for quick reference during emergencies:
- ✅ Pull over safely and turn on hazards
- ✅ Engage parking brake
- ✅ Place wheel wedges
- ✅ Loosen lug nuts (before jacking)
- ✅ Position jack at correct lift point
- ✅ Lift car until tire clears ground
- ✅ Remove lug nuts and flat tire
- ✅ Mount spare and hand-tighten nuts
- ✅ Lower vehicle and fully tighten nuts in star pattern
- ✅ Stow all equipment and check surroundings
- ✅ Drive to a repair shop for permanent fix
Frequently Asked Questions
Can I drive on a spare tire indefinitely?
No. Most spare tires, especially compact “donut” types, are designed for temporary use only. They lack the tread depth and structural integrity of full-size tires. Limit your speed to 50 mph and travel no more than 50 miles. Replace or repair the original tire as soon as possible.
What if my lug nuts are stuck or rusted?
Apply steady force with the lug wrench. If they won’t budge, try spraying a penetrating lubricant like WD-40 around the base and wait 5–10 minutes. Avoid using excessive leverage (like a pipe extension), as this can snap the stud. If unsuccessful, call roadside assistance.
Is it safe to change a tire on a slope?
No. Changing a tire on an incline is extremely dangerous. The vehicle can shift or roll, and the jack may fail. If you get a flat on a hill, drive slowly to the nearest flat area if possible. If not, stay in the car and call for professional help.
Stay Prepared, Stay Confident
Changing a car tire might seem intimidating at first, but it’s a straightforward process when broken down into manageable steps. With the right tools, a calm mindset, and this guide as your reference, you’re fully capable of handling a flat tire on your own. More importantly, you’ll gain peace of mind knowing you’re not helpless when trouble strikes.
Don’t wait for an emergency to learn this skill. Inspect your spare today, locate your jack, and familiarize yourself with your vehicle’s manual. Practice in your driveway if you can. Preparation transforms anxiety into action.


 浙公网安备
33010002000092号
浙公网安备
33010002000092号 浙B2-20120091-4
Comments
No comments yet. Why don't you start the discussion?