
A sump pump is a critical defense against basement flooding, especially in areas prone to heavy rainfall or high groundwater levels. Over time, pumps wear out, become less efficient, or fail entirely. Replacing a sump pump isn’t just about swapping units—it’s about ensuring long-term reliability, proper installation, and safety around electricity and water. Done correctly, the process takes a few hours and can prevent thousands in water damage. This guide walks you through each phase with precision, offering practical advice, checklists, and real-world insights to make your replacement project smooth and effective.
Why Replace Your Sump Pump?
Sump pumps typically last 7 to 10 years. Signs it’s time for a replacement include:
- Frequent cycling without removing much water
- Loud grinding or humming noises
- Visible rust or corrosion on the motor or housing
- Failure to activate during testing
- Water accumulation in the pit despite operation
Ignoring these signs risks basement flooding, mold growth, and structural damage. Proactive replacement before the rainy season or snowmelt ensures peace of mind.
“Homeowners often wait until failure, but preventive replacement of aging sump pumps reduces emergency risks by over 60%.” — David Lin, Certified Plumbing Technician, National Flood Defense Association
Preparation: Tools and Safety Measures
Before touching any equipment, gather the necessary tools and prioritize safety. Water and electricity are a dangerous combination. Always disconnect power at the circuit breaker, not just the outlet.
Tools and Materials Checklist
- New sump pump (match horsepower and head pressure to your needs)
- Adjustable wrench or pliers
- Screwdrivers (Phillips and flathead)
- Hacksaw or PVC pipe cutter (if modifying discharge piping)
- Shop vacuum or bucket (to remove water from pit)
- Utility knife
- Teflon tape or pipe thread sealant
- Rubber gloves and eye protection
- Measuring tape
- Bucket or tarp (for wet components)
Safety First
- Turn off power at the main electrical panel. Confirm it’s off using a voltage tester.
- Wear rubber-soled shoes and avoid standing in water during work.
- Never use extension cords as permanent power solutions for sump pumps.
- Ensure the area is well-ventilated, especially if working with adhesives or sealants.
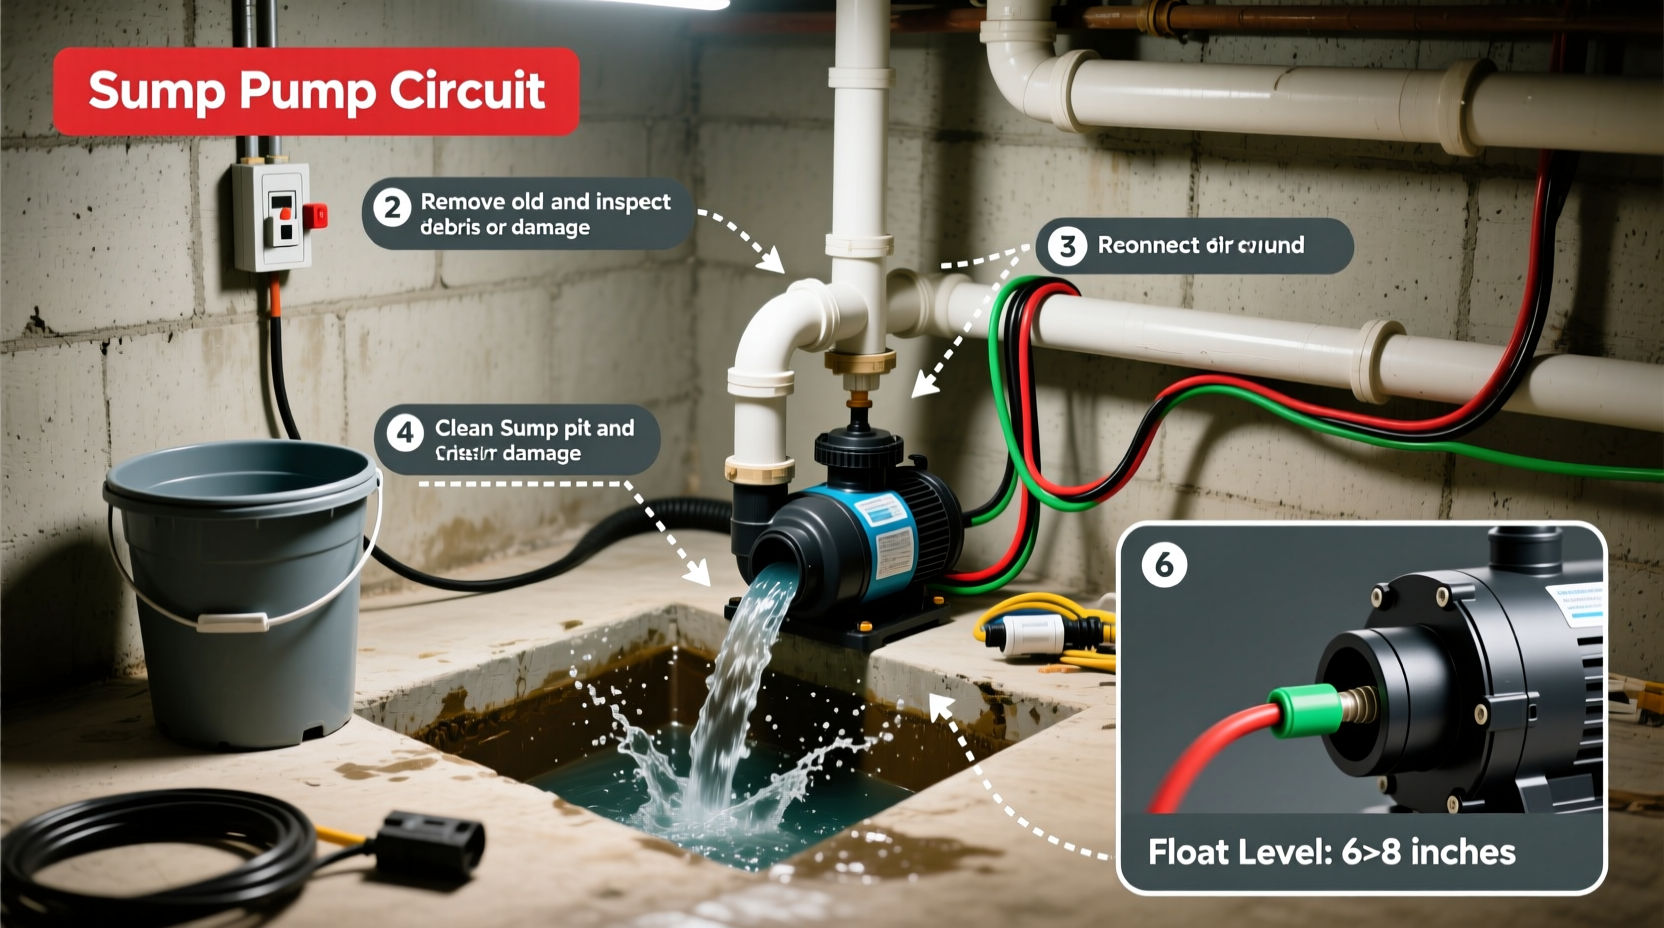
Step-by-Step Replacement Process
Follow this sequence to replace your sump pump efficiently and safely. Allow 2–4 hours depending on experience and setup complexity.
- Drain the sump pit. Use a shop vacuum or bail water into a bucket until the pit is nearly dry. This gives clear access to connections.
- Disconnect the discharge pipe. Loosen the hose clamp or union connecting the pump’s discharge tube to the vertical drain line. Set aside carefully.
- Unplug the pump and detach the float switch. If hardwired, turn off the breaker and disconnect wires using wire nuts. Label them if needed.
- Remove the old pump. Lift it straight out. Inspect for debris, sediment buildup, or obstructions in the pit.
- Clean the sump pit. Remove sludge and gravel. A clean pit improves efficiency and prevents premature clogging.
- Prepare the new pump. Attach the discharge tubing per manufacturer instructions. Use Teflon tape on threaded fittings to prevent leaks.
- Set the new pump in the pit. Position it upright on the bottom, away from the sides to allow free movement of the float switch.
- Reconnect the discharge line. Secure with clamps. Ensure the pipe slopes upward to prevent backflow.
- Plug in or wire the pump. If plugging in, ensure the outlet is GFCI-protected. For hardwired units, connect matching wires with wire nuts and insulate properly.
- Test the system. Pour water into the pit until the float rises and activates the pump. Confirm water discharges outside and the pump shuts off when water level drops.
Choosing the Right Replacement Pump
Not all sump pumps are equal. Selecting the right model prevents underperformance or unnecessary expense.
| Pump Type | Best For | Lifespan | Considerations |
|---|---|---|---|
| Submersible | Quiet operation, larger basements | 8–10 years | Sealed motor, fully immersed in water |
| pedestal | Shallow pits, tight spaces | 5–7 years | Noisy but easier to service |
| Battery Backup | Power outages, high-risk zones | 3–5 years (battery) | Pair with primary pump for redundancy |
| Water-Powered | No electricity needed | Indefinite (with water supply) | Requires municipal water, higher utility cost |
For most homeowners, a 1/2 HP submersible pump with a vertical float switch offers the best balance of power, quietness, and durability.
Real-World Example: Preventing Basement Flooding in Spring
Mark R., a homeowner in Pittsburgh, PA, replaced his 9-year-old sump pump every October as part of his seasonal maintenance routine. Last year, after installing a new submersible unit with a battery backup, his area experienced record spring rainfall. While neighbors dealt with flooded basements, Mark’s system ran continuously for 36 hours without issue. The new pump handled 40% more water volume than the old one, thanks to improved impeller design and better float responsiveness.
“I used to panic during storms,” Mark said. “Now I get alerts from my smart pump app and know everything’s under control.”
Common Mistakes to Avoid
Even experienced DIYers make errors that compromise pump performance. Steer clear of these pitfalls:
- Incorrect float positioning: Ensure the float moves freely without snagging on walls or pipes.
- Discharge line pointing downward: This causes back-siphoning. Always maintain upward slope.
- Ignoring check valves: Install a check valve on the discharge line to prevent water from flowing back into the pit after shutdown.
- Using undersized piping: 1.25-inch diameter is standard. Smaller pipes restrict flow and overwork the pump.
- Skipping the test: Never assume it works. Always simulate operation with water.
Frequently Asked Questions
How do I know which pump size I need?
Pump capacity depends on the depth of your basement, average rainfall, and pit size. A 1/3 HP pump suits homes with minimal water issues. For deeper basements or frequent storms, choose 1/2 HP or higher. Consult a pump performance chart showing gallons per hour at various lift heights.
Can I install a sump pump myself?
Yes, if you’re comfortable with basic plumbing and electrical work. However, local codes may require permits or licensed electricians for hardwired installations. When in doubt, hire a professional.
Should I install a battery backup system?
If you live in an area with frequent power outages or heavy storms, yes. Battery backups provide critical protection during emergencies. Pair a primary AC pump with a DC backup for full coverage.
Final Steps and Ongoing Maintenance
After successful installation, schedule regular maintenance to extend the life of your new pump:
- Test monthly by pouring water into the pit.
- Clean the inlet screen every 3 months.
- Inspect the discharge line for blockages in spring and fall.
- Replace backup batteries every 2–3 years.
Conclusion
Replacing a sump pump is a manageable task that pays long-term dividends in home protection and peace of mind. By following a systematic approach, using the right tools, and prioritizing safety, you can complete the job efficiently and confidently. Whether you're preparing for storm season or replacing a failing unit, proactive maintenance today prevents costly damage tomorrow. Take action now—your basement will thank you.


 浙公网安备
33010002000092号
浙公网安备
33010002000092号 浙B2-20120091-4
Comments
No comments yet. Why don't you start the discussion?