
Changing a watch strap isn’t just about refreshing your style—it’s also a practical skill that extends the life of your timepiece. Whether you’re switching from leather to metal, upgrading for comfort, or replacing a worn band, doing it yourself saves money and gives you full control over fit and aesthetics. With the right tools and technique, anyone can master this task in under 15 minutes. No trip to the jeweler required.
Why You Should Change Your Watch Strap Yourself
Most people assume watch strap replacement is best left to professionals. While jewelers do it well, they often charge $20–$50 per service—sometimes more for high-end brands. Yet the process is straightforward once you understand the mechanics. Learning to do it yourself empowers you to rotate straps seasonally, customize your look daily, and respond immediately when a spring bar fails or a link breaks.
Moreover, frequent strap changes reduce wear on individual bands. Leather lasts longer when rotated with a nylon NATO strap; metal bracelets benefit from occasional removal to clean sweat and grime buildup underneath. Taking ownership of these small maintenance tasks preserves both your watch and its accessories.
“Confidence with basic watch maintenance separates casual wearers from true enthusiasts.” — Daniel Reyes, Horology Technician & Watch Restorer
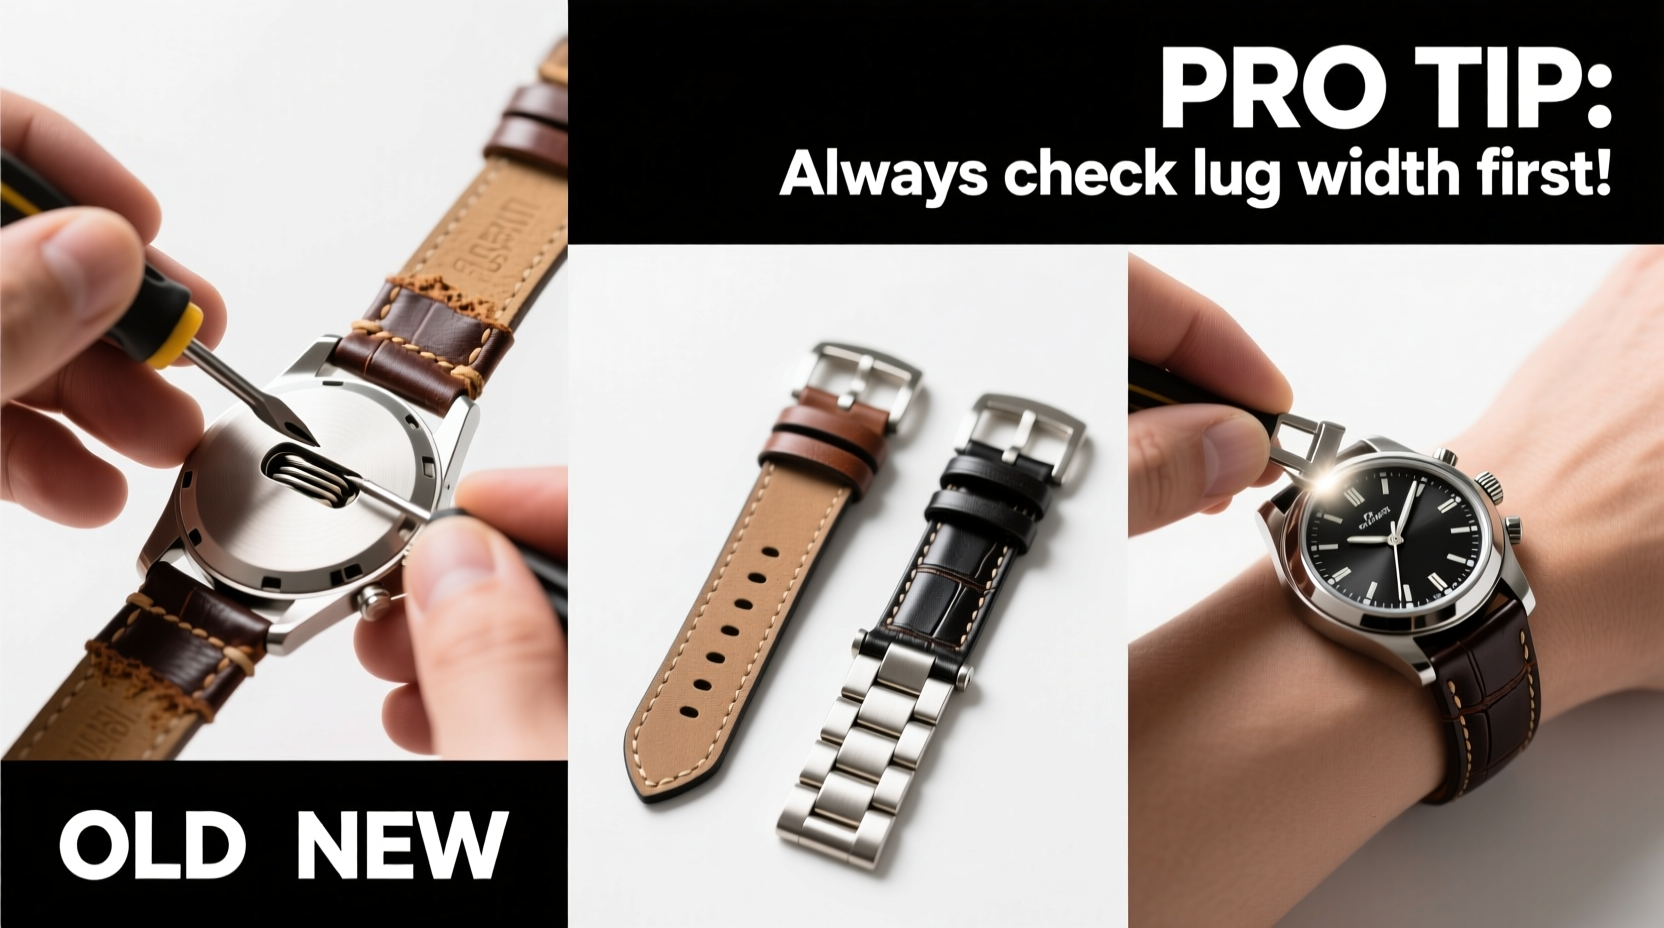
Essential Tools You’ll Need
The key to a smooth, scratch-free strap change lies in using the correct tools. Avoid makeshift solutions like paperclips or knives—they damage cases and spring bars. Invest in a simple toolkit designed for watches:
- Spring bar removal tool (also called a strap removal tool): A thin, forked metal device that compresses spring bars safely.
- Soft microfiber cloth: Protects your watch face and case during handling.
- Magnifying glass or loupe (optional but helpful): Makes it easier to see tiny components.
- New watch strap with matching lug width: Measure your current strap or check manufacturer specs.
- Small container or tray: Keeps spring bars from getting lost.
Step-by-Step Guide to Removing and Replacing Your Watch Strap
Follow this sequence carefully to avoid damaging your watch case or losing internal components. The method applies to most wristwatches with spring bars, including analog, digital, smartwatches, and dive models.
- Prepare your workspace: Lay down a soft cloth. Place your watch gently on top, dial-side up.
- Identify the spring bar ends: Look between the lugs (the protrusions on either side of the case). You’ll see small holes where the spring bar pins are inserted.
- Insert the removal tool: Position one prong of the tool into the hole, pressing against the spring bar pin. Apply gentle inward pressure to compress the bar toward the center of the watch.
- Slide the strap off: As the spring bar retracts slightly, push the strap away from the case. It should release easily. Repeat on the other side.
- Remove the old spring bars (if replacing): Some users replace worn or rusted spring bars. Use pliers if necessary, but never force them out dry.
- Insert new spring bar into new strap: Slide one end of the spring bar into the lug hole of the new strap. Compress the other end and align it with the second lug hole.
- Attach the strap to the watch: Hold the strap steady and insert one side into the watch lugs. Compress the exposed spring bar end and slide it into the opposite lug until it clicks.
- Test the connection: Gently tug on the strap to ensure it’s secure. There should be minimal lateral movement.
Tightening Metal Bracelets: Adjusting Link Count
If you're installing a metal bracelet, you may need to remove links to achieve a perfect fit. Most bracelets come with removable links and alignment arrows on the underside.
- Use a pin pusher tool to eject pins in the direction indicated by the arrow.
- Remove excess links symmetrically from both sides for balance.
- Reassemble using remaining pins or half-pins depending on design.
- Ensure all pins are fully seated and the clasp operates smoothly.
Common Mistakes to Avoid
Even experienced users make errors that lead to broken spring bars, scratched cases, or loose straps. Steer clear of these pitfalls:
| Mistake | Why It’s Bad | How to Prevent It |
|---|---|---|
| Using excessive force | Bends spring bars or damages lug holes | Apply steady, even pressure—never hammer or pry |
| Not checking lug width compatibility | Strap won’t fit or will gap at the lugs | Verify width (e.g., 18mm, 20mm) before purchase |
| Leaving tools near magnets | Spring bars can become magnetized, affecting watch accuracy | Store tools away from magnetic sources |
| Forgetting to test the crown and buttons | New strap might obstruct function | Ensure no part of the strap blocks the crown or pushers |
Real Example: Upgrading a Daily Wearer
Consider Sarah, a graphic designer who wears her stainless steel chronograph every day. After six months, the original leather strap cracked due to constant exposure to hand sanitizer and sweat. Instead of paying $40 at a boutique for a replacement, she bought a $22 perforated Italian leather strap online and changed it herself.
Using a $12 spring bar tool she purchased once, she completed the swap in nine minutes. She now owns three straps—leather, rubber, and NATO—and rotates them weekly. Not only does her watch look fresh, but each strap lasts nearly twice as long thanks to reduced continuous wear.
Checklist: Before You Begin
- ✔ Confirm the new strap matches your watch’s lug width
- ✔ Gather tools: spring bar tool, microfiber cloth, container for small parts
- ✔ Work in a clean, well-lit area
- ✔ Inspect spring bars for corrosion or deformation
- ✔ Double-check strap orientation (tapered end toward buckle)
- ✔ Test fit before finalizing attachment
Frequently Asked Questions
Can I change a watch strap without special tools?
Technically yes, but not safely. Paperclips or tweezers risk scratching the case or breaking inside the lug. A proper spring bar tool costs less than $15 and pays for itself after one use.
How tight should the strap feel once installed?
The strap should allow one finger to slide comfortably between the band and your wrist. On metal bracelets, there should be slight flex but no excessive play. Over-tightening stresses spring bars and lugs.
Are all spring bars the same size?
No. Spring bars vary by diameter (typically 1.8mm, 2.0mm) and length (to match lug width). Using the wrong size can result in a loose fit or damage. When in doubt, measure your existing bar or consult your watch manual.
Final Thoughts: Master a Simple Skill with Lasting Value
Changing a watch strap is one of the easiest yet most impactful maintenance tasks you can perform at home. Once mastered, it becomes second nature—like tying a shoe or charging a phone. Beyond convenience, it deepens your relationship with your timepiece. You begin to notice details: how different materials affect comfort, how color coordination elevates an outfit, how proper fit improves daily wearability.
With minimal investment in tools and attention to detail, you gain independence from service centers and unlock endless customization options. Whether you own a vintage Omega, a modern Apple Watch, or a classic Seiko diver, this skill applies universally.


 浙公网安备
33010002000092号
浙公网安备
33010002000092号 浙B2-20120091-4
Comments
No comments yet. Why don't you start the discussion?