
Replacing a damaged or inefficient window doesn’t always require hiring a professional. With the right tools, preparation, and attention to detail, homeowners can successfully install a new window themselves. Whether you're upgrading for energy efficiency, replacing a cracked pane, or improving curb appeal, a DIY window replacement can save hundreds of dollars. However, improper installation can lead to air leaks, water damage, or structural issues. This comprehensive guide walks through every stage—from measuring and selecting the right window to sealing and finishing—with expert-backed advice to help you get it right the first time.
Essential Tools and Materials
Before removing the old window, gather all necessary tools and supplies. Having everything on hand prevents delays and ensures a smooth workflow. Most items are standard in a homeowner’s toolkit, but a few specialized tools make the job safer and more precise.
- Caulking gun
- Silicone or exterior-grade sealant
- Tape measure (preferably 25 feet)
- Utility knife
- Flat pry bar and hammer
- Level (4-foot recommended)
- Carpenter’s square
- Power drill with screwdriver bits
- Shims (wood or composite)
- Insulation (spray foam or fiberglass)
- Safety goggles and work gloves
- New replacement window (pre-measured and ordered)
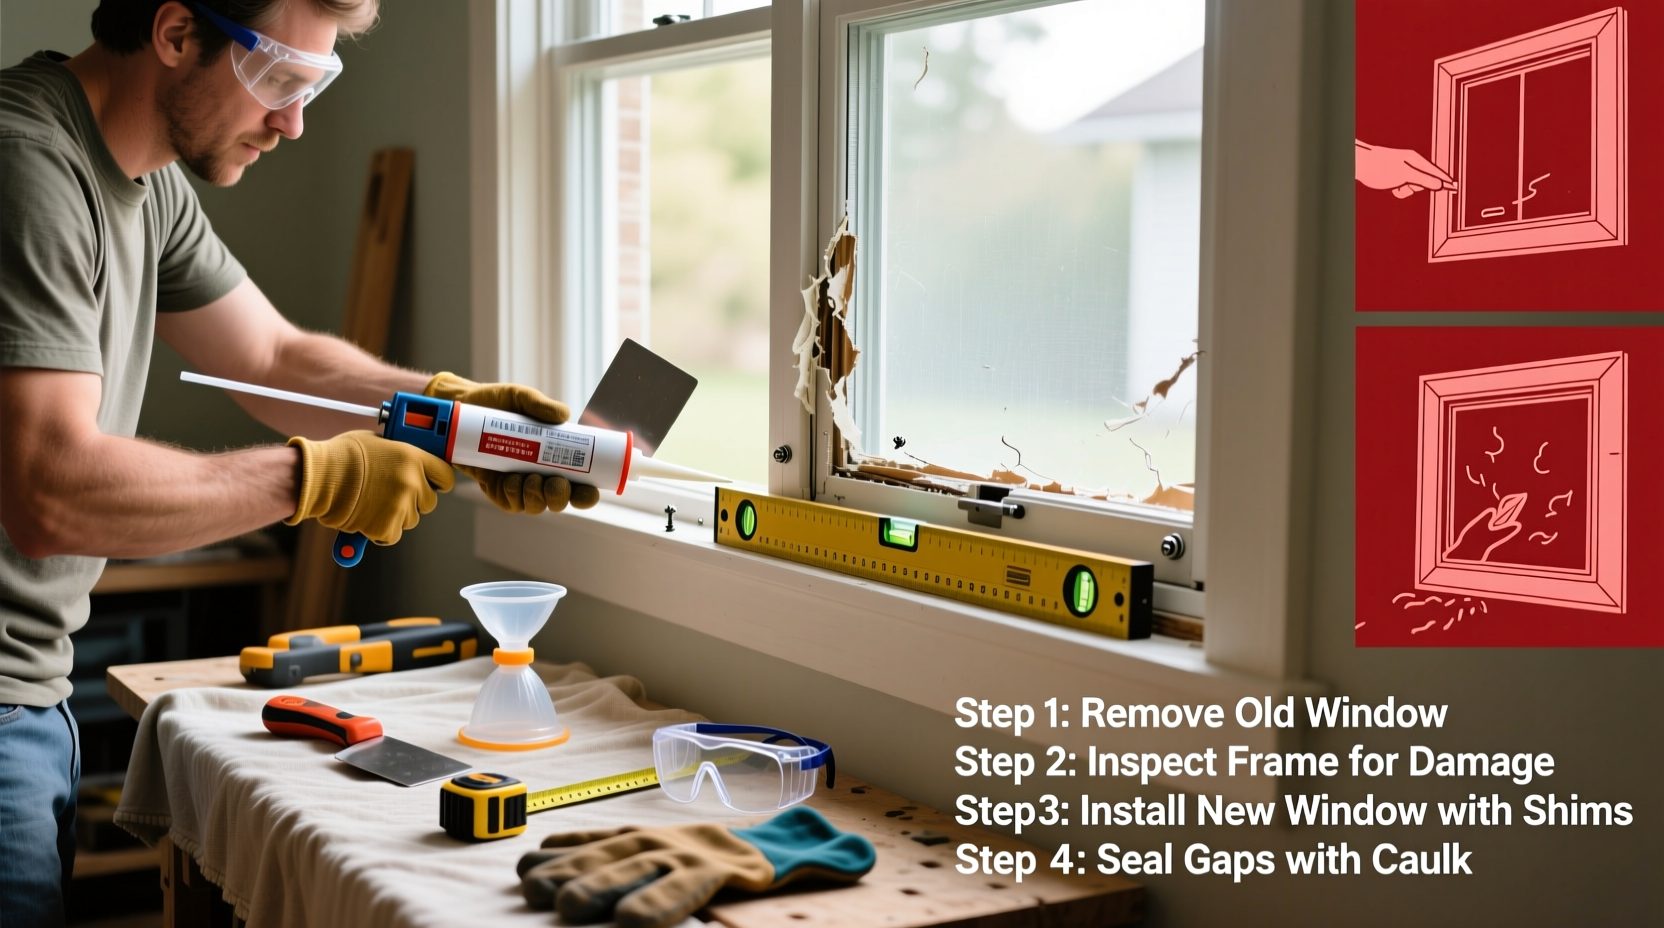
Step-by-Step Installation Process
Follow this sequence carefully to ensure a secure, weather-tight installation. Rushing any step can compromise performance and longevity.
- Remove interior trim and exterior siding around the window. Use a utility knife to cut through paint or caulk along the edges. Gently pry off trim boards with a flat bar, preserving them if reuse is planned.
- Take out the old window unit. If it's a double-hung, remove sashes first. Unscrew or cut fasteners securing the frame. Work from top to bottom to avoid sudden drops.
- Inspect the rough opening. Check for rot, moisture damage, or insect infestation in the sill, jambs, and header. Replace any compromised wood before proceeding.
- Dry-fit the new window. Place the replacement unit into the opening without fastening. Confirm it fits snugly with even gaps (about 1/4 inch) on all sides.
- Apply flashing tape to the sill. Start with waterproof membrane or self-adhering flashing tape across the bottom and up the sides. This prevents water intrusion behind the unit.
- Insert the window and level it. Set the unit into place, then use a 4-foot level across the sill and jambs. Insert shims at corner points and where manufacturer specifies fastening.
- Secure the window according to manufacturer instructions. Typically, screws go through pre-drilled holes in the side jambs into the framing. Do not overtighten—this can warp the frame.
- Seal all exterior gaps. Apply exterior-grade sealant around the perimeter between the window frame and house wrap. Avoid sealing the drainage weep holes at the bottom of the unit.
- Install insulation. Fill gaps between the window frame and stud cavity with low-expansion spray foam. Standard expanding foam can distort the frame.
- Reinstall trim and siding. Reattach interior casing and exterior cladding. Caulk all exterior joints to prevent water entry.
Common Mistakes to Avoid
Even experienced DIYers make errors when installing windows. These missteps often go unnoticed until months later, when drafts, condensation, or leaks appear.
| Mistake | Why It’s a Problem | How to Avoid |
|---|---|---|
| Using high-expansion foam | Expands too much, warping the window frame | Use low-expansion spray foam designed for windows |
| Skipping flashing | Allows water to penetrate walls, leading to rot | Apply self-adhering flashing tape to sill and jambs |
| Over-tightening screws | Distorts frame, making operation difficult | Tighten only until snug; follow manufacturer specs |
| Incorrect leveling | Causes binding, poor sealing, and premature wear | Check level across sill and vertically on jambs |
| Ignoring air leaks post-install | Reduces energy efficiency and comfort | Perform a draft test with incense or smoke pencil |
“Proper flashing and sealing are more critical than the window itself. A $500 window installed poorly performs worse than a $300 one done correctly.” — Mark Reynolds, Building Envelope Consultant
Real-World Example: A Basement Window Upgrade
Homeowner Lisa M. in Portland replaced three aging basement windows after noticing persistent dampness and cold spots. She measured each opening herself, ordering vinyl replacement units online. During removal, she discovered rotted sill material due to years of undetected leakage. After cutting out the decayed wood and replacing it with pressure-treated lumber, she applied butyl flashing tape and used low-expansion foam. One window initially wouldn’t close smoothly—she realized she had over-tightened the mounting screws. Loosening them slightly restored proper operation. Six months later, humidity levels dropped significantly, and heating costs decreased by an estimated 12%.
Pre-Installation Checklist
Use this checklist to prepare thoroughly before removing the old window:
- ☑ Measure the rough opening (width, height, depth)
- ☑ Confirm window type (double-hung, casement, etc.) matches existing
- ☑ Purchase the correct size and model based on measurements
- ☑ Verify compatibility with your wall thickness and siding
- ☑ Acquire all tools and safety gear
- ☑ Schedule work during dry weather (avoid rain within 24 hours)
- ☑ Protect indoor flooring near the work area
- ☑ Remove curtains, blinds, or security sensors temporarily
Frequently Asked Questions
Can I replace a window in winter?
Yes, but only if the work can be completed in a single day and temperatures are above freezing. Cold weather affects sealant curing and increases discomfort indoors. Plan for minimal exposure time and use temporary plastic sheeting if needed.
How long does a DIY window replacement take?
An experienced DIYer can typically complete one window in 3–5 hours. First-timers may take 6–8 hours, especially if repairing structural damage or learning techniques mid-job.
Do replacement windows come pre-glazed?
Yes, most modern replacement windows are fully assembled and glazed at the factory. Never attempt to remove or re-glaze a sealed unit unless specifically designed for service.
Final Thoughts and Next Steps
Changing a window yourself is a rewarding project that enhances both comfort and value. When done correctly, it improves insulation, reduces noise, and eliminates drafts. The key lies in precision—not speed. Take time to measure accurately, follow manufacturer guidelines, and prioritize weatherproofing over convenience. Small oversights like skipping flashing or using the wrong foam can undo the benefits of a high-quality window.
If you’ve successfully replaced a window, consider documenting the process for future reference or sharing insights with neighbors tackling similar projects. For larger jobs—such as multiple windows or historical homes—consulting a professional may still be the wisest choice.


 浙公网安备
33010002000092号
浙公网安备
33010002000092号 浙B2-20120091-4
Comments
No comments yet. Why don't you start the discussion?