
Doro is renowned for producing user-friendly mobile phones tailored for seniors and individuals who value simplicity without sacrificing functionality. Whether you’ve just purchased a new Doro phone, traveled across time zones, or noticed your device displaying the wrong time, adjusting the clock settings is essential for accurate calls, alarms, and calendar alerts. While many modern smartphones update time automatically, Doro phones—especially basic models—may require manual input. This comprehensive guide walks you through every method available to change the time on any Doro mobile phone, regardless of model or firmware version.
Understanding Time Settings on Doro Phones
Doro offers a range of mobile phones, from simple feature phones like the Doro 6030 and Doro 7050 to more advanced smartphones such as the Doro 8040. The process for changing the time varies slightly depending on whether your device runs on a proprietary OS or Android. However, all models provide options to either set the time automatically via network signals or manually adjust it through the settings menu.
Automatic time synchronization is typically enabled by default, meaning your phone pulls time data from the cellular network. But if you're in an area with weak signal, have disabled this feature, or are using your phone offline, manual adjustment becomes necessary.
Step-by-Step Guide to Manually Change the Time
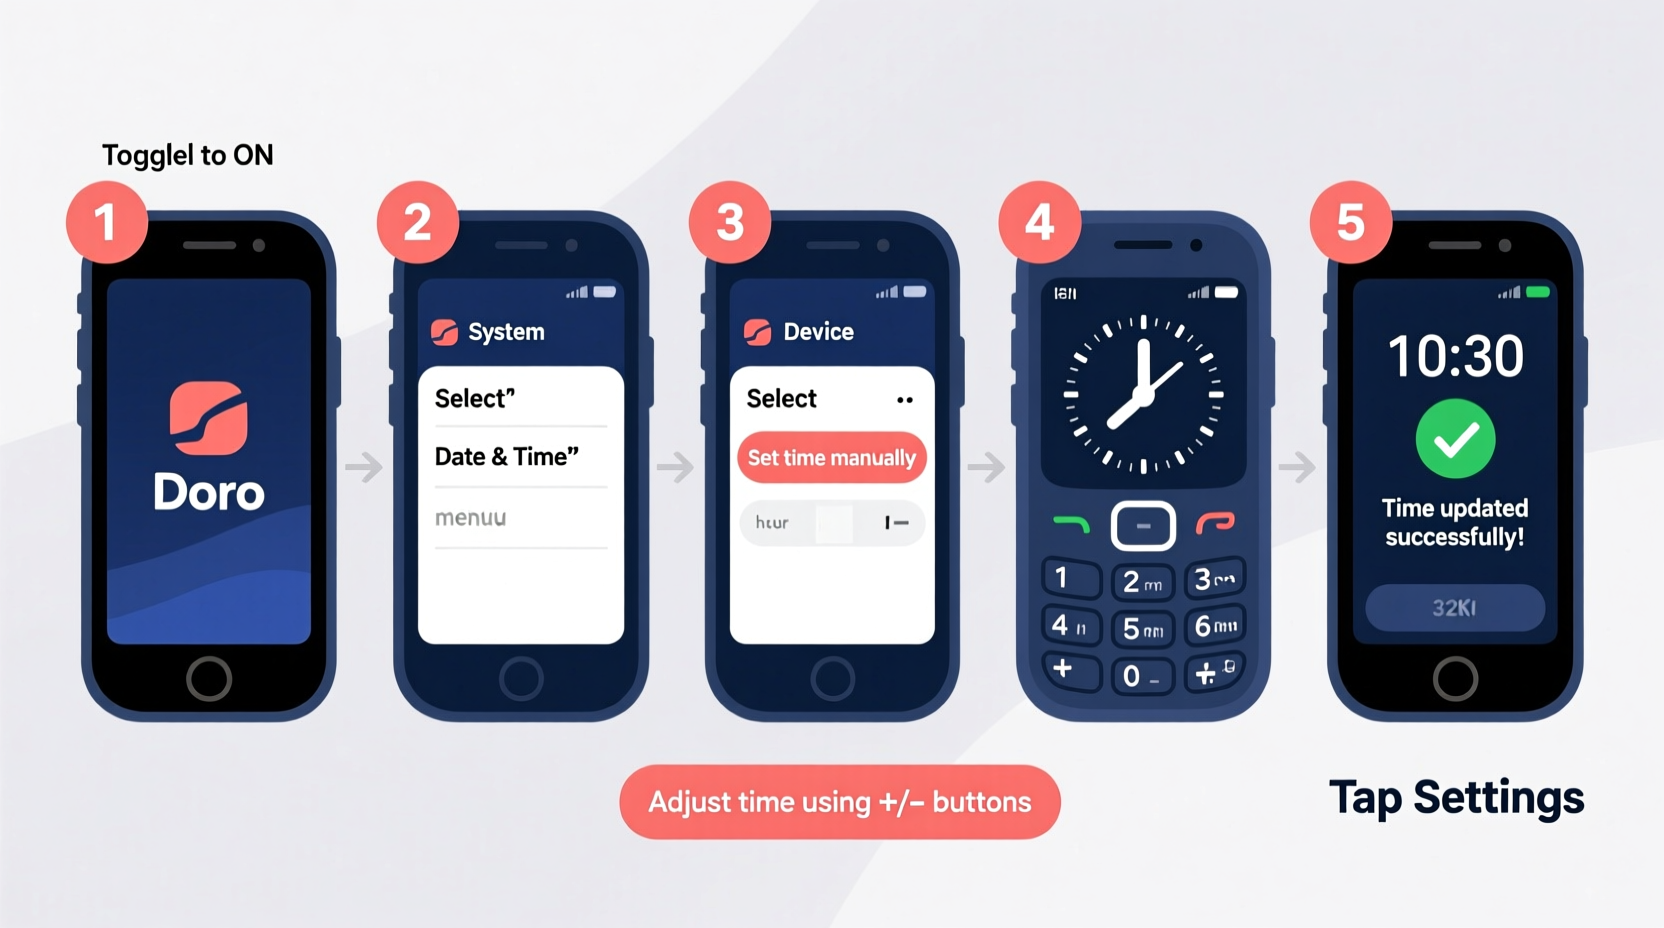
If your Doro phone isn’t updating the time correctly, follow these universal steps to set it manually. These instructions apply to most Doro models released since 2018, including both feature phones and smartphones.
- Turn on your Doro phone and ensure it’s unlocked and at the home screen.
- Navigate to the Menu. On feature phones, press the center button or “Menu” key. On touchscreen models, tap the app drawer or home screen menu icon.
- Select \"Settings\". This may appear as a gear icon or labeled directly as “Settings.”
- Scroll down and choose \"Date and Time\" (or “Clock & Time” on some models).
- Disable \"Automatic Date/Time\" or \"Network-provided time\" if it’s currently enabled. This allows manual input.
- Tap on \"Set Time\" and use the keypad or touchscreen to enter the correct hours and minutes.
- Adjust the date by selecting “Set Date” and entering the current day, month, and year.
- Choose your time format: Select between 12-hour (AM/PM) or 24-hour (military) format based on preference.
- Confirm all changes and exit the menu. The new time will now be active.
After completing these steps, verify the time by returning to the home screen or checking the status bar. Alarms, calendars, and call logs will now reflect the updated time.
Using Automatic Time Sync for Hassle-Free Updates
To avoid frequent manual adjustments, especially after daylight saving changes or international travel, enabling automatic time sync is highly recommended.
How to Enable Automatic Time Setting
- Go to Settings > Date and Time.
- Toggle on \"Automatic Date/Time\" or \"Use Network-provided Time\".
- Ensure your phone has an active SIM card and signal connection.
- For Android-based Doro phones (e.g., Doro 8040), also enable \"Use Location Services\" to improve accuracy.
Once activated, your Doro phone will synchronize its clock with the carrier’s atomic time server each time it connects to the network. This ensures precision within milliseconds and eliminates seasonal adjustment errors.
“Over 90% of time-related complaints on senior-friendly phones stem from disabled auto-sync features. Re-enabling them resolves most issues instantly.” — Lars Nielsen, Senior Mobile Support Technician at Nordic Telecom
Model-Specific Variations and Compatibility Table
While core functions remain consistent, interface layouts differ across Doro models. Below is a comparison of common Doro phones and their time-setting paths.
| Model | Type | Path to Time Settings | Auto-Time Available? |
|---|---|---|---|
| Doro 6030 | Feature Phone | Menu → Settings → Date & Time | Yes |
| Doro 7050 | Smart Feature Phone | Settings → System → Date & Time | Yes |
| Doro 8040 | Android Smartphone | Settings → System → Date & Time | Yes (with GPS sync) |
| Doro Libero 180 | Basic Phone | Menu → Clock Settings → Set Time | No (manual only) |
| Doro Secure 580 | Safety-Focused Phone | Settings → Device → Date/Time | Yes |
Note: The Doro Libero 180 does not support automatic time updates due to its simplified operating system. Users must manually adjust the time, particularly during daylight saving transitions.
Troubleshooting Common Time-Setting Issues
Even with clear menus, users sometimes encounter obstacles when changing the time. Here are frequent problems and how to resolve them:
- Grayed-out time settings: This usually means “Automatic Date/Time” is enabled. Disable it first before attempting manual changes.
- Time resets after reboot: A failing internal battery or outdated firmware could cause this. Check for software updates under Settings > About Phone > System Update.
- Incorrect time zone: Ensure the time zone is correctly selected alongside manual time entry. For example, setting London time while in New York causes a 5-hour discrepancy.
- Keypad unresponsive during input: Clean the keypad gently and restart the phone. If persistent, contact Doro customer support.
Mini Case Study: Helping a Senior User Adjust Time Post-Travel
Margaret, a 72-year-old retiree, returned from a trip to Spain with her Doro 7050. She noticed her morning medication reminder alarm went off six hours early. Confused, she called her son, who guided her through disabling automatic time settings (which had failed to update upon re-entering the UK network). He helped her navigate to Settings > System > Date & Time, turn off network-provided time, and manually reset the clock to British Summer Time. Within five minutes, the alarm function corrected itself. This real-world example underscores the importance of understanding manual time adjustment—even when auto-sync is preferred.
Essential Checklist for Changing Time on Your Doro Phone
Before you begin, use this checklist to ensure a smooth process:
- ✅ Confirm your phone is charged above 20%
- ✅ Know the exact current time and time zone
- ✅ Decide between manual or automatic setting
- ✅ Have your PIN ready if settings are locked
- ✅ Test an alarm or timer after adjustment
Frequently Asked Questions
Can I change the time format from 24-hour to 12-hour?
Yes. In the “Date and Time” menu, look for “Time Format” or “Clock Format.” You can switch between 12-hour (with AM/PM) and 24-hour display. This change does not affect the actual time—only how it appears on screen.
Why doesn’t my Doro phone update time automatically?
If automatic time isn’t working, check that: (1) Airplane mode is off, (2) a valid SIM card is inserted, (3) network signal is present, and (4) “Use Network-provided Time” is toggled on. If issues persist, restart the phone or contact your service provider to confirm network time services are active.
Do I need internet to set the time?
No. Feature phones use cellular network signals—not Wi-Fi or data—to obtain time information. Only Android-based Doro smartphones use internet-connected NTP servers when Wi-Fi is available, but they default to network time otherwise.
Final Thoughts and Action Steps
Changing the time on your Doro mobile phone doesn’t need to be complicated. Whether you’re supporting an elderly relative or managing your own device, knowing how to adjust the clock—manually or automatically—ensures reliability in daily routines. Most models offer intuitive menus designed for clarity, and with this guide, you now have a reliable reference for any situation.
Take a moment today to review your Doro phone’s time settings. If you're still using manual mode, consider switching to automatic synchronization to prevent future discrepancies. And if you found this guide helpful, share it with someone who might benefit—especially those less familiar with mobile technology.


 浙公网安备
33010002000092号
浙公网安备
33010002000092号 浙B2-20120091-4
Comments
No comments yet. Why don't you start the discussion?