
Mechanical keyboards are prized for their tactile feedback, durability, and customizability. However, with daily use comes the inevitable buildup of dust, crumbs, oils from fingertips, and debris that can affect performance and hygiene. Cleaning a mechanical keyboard isn’t just about appearance—it’s essential for maintaining responsiveness and extending its lifespan. The challenge lies in doing so without harming sensitive components like switches and PCBs. Unlike membrane keyboards, mechanical models have exposed switches that require careful handling. This guide provides a thorough, safe method to deep-clean your keyboard while preserving its integrity.
Why Regular Cleaning Matters
A dirty keyboard doesn’t just look unprofessional—it can degrade typing accuracy, increase key chatter, and even lead to switch failure over time. Skin oils and sweat seep into gaps around keycaps and down into the switch housings, attracting dust and forming conductive grime that interferes with electrical contacts. In extreme cases, corrosion may occur on the printed circuit board (PCB), especially if liquid spills aren't addressed promptly.
Regular cleaning helps prevent these issues before they escalate. It also improves ergonomics; sticky or unresponsive keys disrupt workflow and strain fingers. For gamers and typists alike, a well-maintained keyboard delivers consistent actuation force and travel distance—critical factors in precision tasks.
“Many users don’t realize how much debris accumulates under keycaps until they remove them. A single crumb can cause intermittent registration, mimicking hardware failure.” — Daniel Park, Peripheral Engineer at KeyTech Labs
Tools and Supplies You’ll Need
Before beginning, gather all necessary materials. Using improper tools—like wet cloths or compressed air cans held too close—can do more harm than good. Here's what you should have ready:
- Keycap puller – Plastic is preferred over metal to avoid scratching keycaps.
- Soft-bristled brush – A small paintbrush or dedicated keyboard brush works well.
- Compressed air canister – Use short bursts to dislodge particles without forcing moisture into components.
- Isopropyl alcohol (70% minimum, 90% ideal) – Effective at cutting grease and evaporates quickly.
- Cotton swabs or microfiber cloth – For precise cleaning around switches and edges.
- Bowl of warm, soapy water – Only for removable keycaps—never submerge the keyboard itself.
- Towel or drying rack – To lay out parts safely during drying.
- Anti-static wrist strap (optional) – Helps prevent electrostatic discharge when handling internal components.
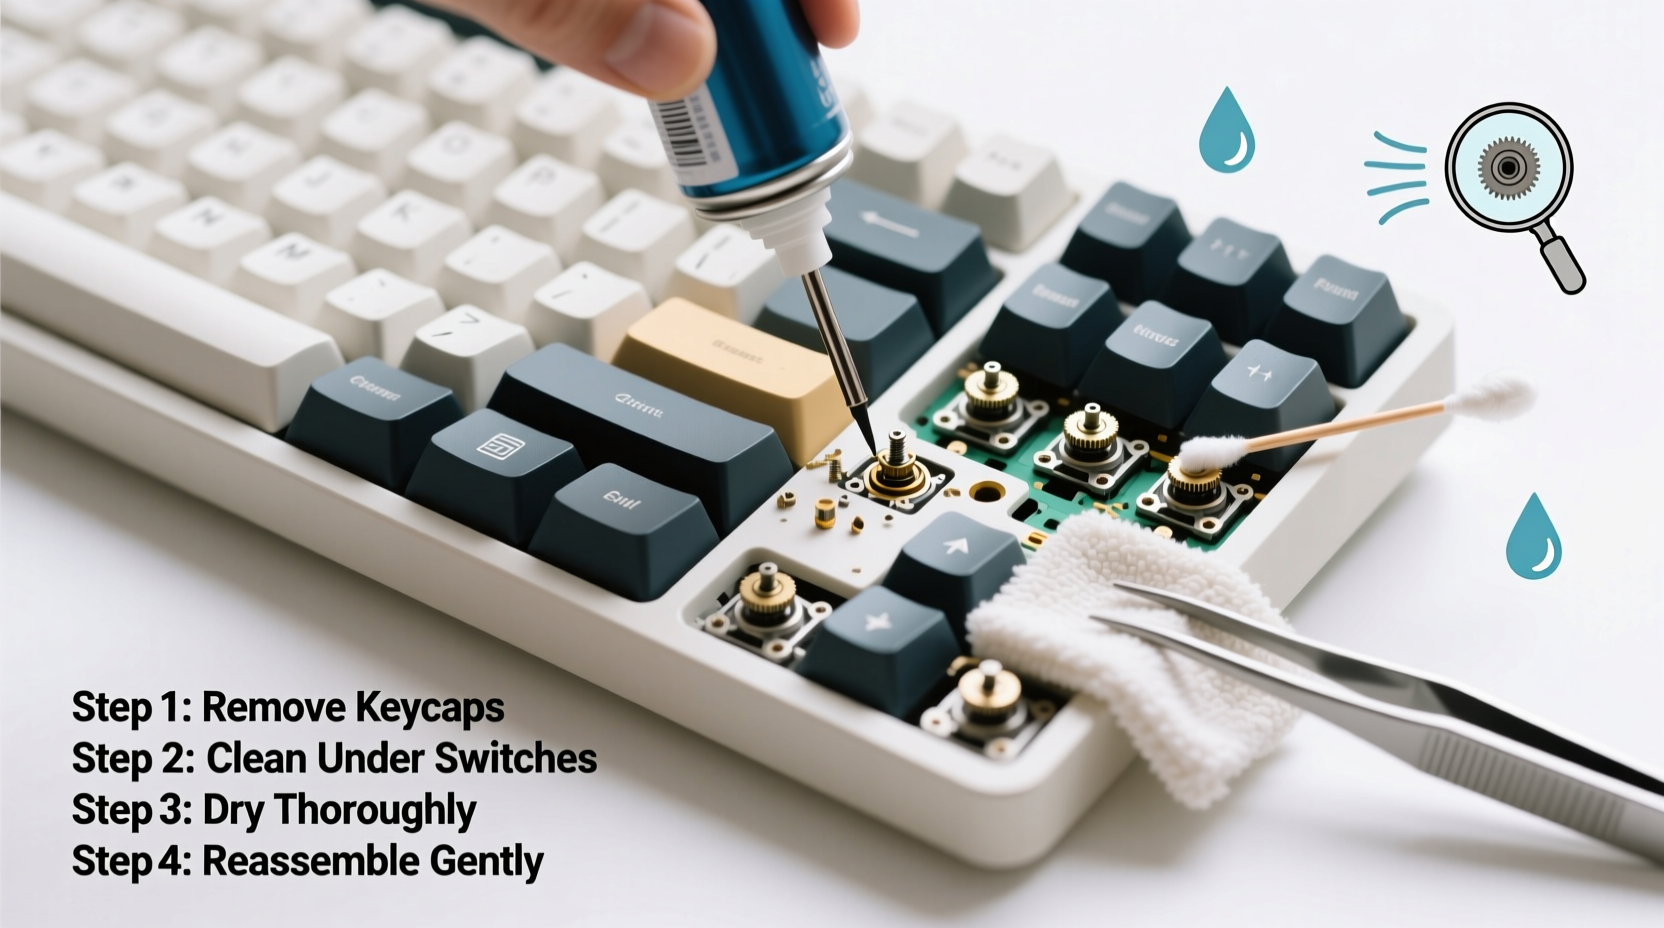
Step-by-Step Cleaning Process
Cleaning a mechanical keyboard involves several stages: preparation, disassembly, deep cleaning, reassembly, and testing. Follow this sequence carefully to ensure no component is damaged.
- Power Down and Unplug
Disconnect the keyboard from your computer. If it’s wireless, turn it off and remove batteries if possible. This prevents accidental input signals and protects circuits during cleaning. - Remove Keycaps Safely
Using a plastic keycap puller, gently lift each keycap straight upward. Start with smaller keys (ASDF, JKL) then move to larger ones like spacebar and shift. Be cautious with stabilizers on wide keys—apply even pressure on both sides to avoid breaking clips. - Initial Debris Removal
Hold the keyboard upside down and shake lightly to dislodge loose debris. Then use short bursts of compressed air between switches at a 45-degree angle. Avoid prolonged spraying, which can condense moisture inside the housing. - Soak and Clean Keycaps
Place removed keycaps in lukewarm, soapy water (mild dish soap). Let soak for 10–15 minutes. Scrub gently with a soft brush to remove stains. Rinse thoroughly and lay flat on a towel to dry completely—this may take 6–12 hours depending on humidity. - Spot-Clean the Switch Plate and PCB
Dampen a cotton swab or microfiber cloth with isopropyl alcohol. Wipe around each switch stem and along the plate surface. Do not pour liquid directly onto the board. Focus on areas with visible residue or discoloration. - Address Stubborn Grime
For sticky spots near switches, wrap a swab in a thin strip of cloth, dip slightly in alcohol, and carefully rotate it around the base. Allow any applied moisture to fully evaporate before powering on. - Reassemble Methodically
Once keycaps are bone-dry, begin replacing them. Refer to a keycap layout chart if unsure of positioning. Press down firmly but evenly until each cap clicks into place. Double-check large keys with stabilizers—they should feel smooth when pressed anywhere along the top. - Final Test
Reconnect the keyboard and open a text editor. Press every key systematically to confirm proper registration. Use an online keyboard tester if available. Listen for unusual sounds or resistance.
Timeline Summary
| Stage | Time Required | Notes |
|---|---|---|
| Preparation & Disconnection | 2 minutes | Ensure device is powered off |
| Keycap Removal | 10–15 minutes | Depends on number of keys |
| Debris Blowing | 5 minutes | Use short air bursts |
| Keycap Soaking & Drying | 6–12 hours | Drying is critical—do not rush |
| Switch Area Cleaning | 10–20 minutes | Work slowly to avoid spills |
| Reassembly & Testing | 10–15 minutes | Verify all keys function |
Do’s and Don’ts When Cleaning Mechanical Keyboards
To protect your investment, follow these guidelines based on industry standards and user experience.
| Do | Don’t |
|---|---|
| Use 70–90% isopropyl alcohol for disinfecting surfaces | Pour liquids directly onto the PCB or switches |
| Let keycaps dry completely before reattaching | Reinstall damp keycaps—moisture causes shorts |
| Clean every 3–6 months, or more often in dusty environments | Wait until keys become sticky or unresponsive |
| Store spare keycaps in anti-static bags | Use metal tools near electronics—risk of scratches or ESD |
| Label unusual layouts before removal | Remove all keycaps at once without reference |
Real Example: Recovering a Neglected Keyboard
Mark, a freelance writer, used his mechanical keyboard daily for two years without cleaning. Over time, the spacebar began registering double inputs, and the ‘E’ key occasionally failed to respond. Assuming hardware failure, he considered buying a replacement. Instead, he followed a structured cleaning process.
After removing the keycaps, he discovered a thick layer of compacted dust beneath the spacebar stabilizer and greasy buildup around frequently used keys. He soaked the caps overnight, cleaned the plate with alcohol-dipped swabs, and blew out residual particles with compressed air. Upon reassembly, all keys worked flawlessly. The cost? Less than $10 in supplies and one evening of effort. His keyboard regained its original responsiveness, saving him over $80 on a new model.
This case illustrates how routine maintenance can prevent premature replacement. What appears to be irreparable damage is often just accumulated grime.
Expert Tips for Long-Term Maintenance
Prevention is far simpler than repair. Integrate these habits into your routine to minimize future cleaning needs.
- Wash hands before use – Reduces oil transfer significantly.
- Use a keyboard cover when not in use – Especially effective in shared or high-dust spaces.
- Tap rather than slam keys – Excessive force accelerates wear on switch springs and housings.
- Keep food and drinks away – Spills are the leading cause of sudden keyboard failure.
- Perform monthly quick cleans – Use a dry brush or compressed air to clear surface debris.
“Most switch failures I’ve diagnosed weren’t due to manufacturing defects, but neglect. A five-minute monthly check-up doubles a keyboard’s functional life.” — Lena Torres, Hardware Technician at InputCare Services
Frequently Asked Questions
Can I clean a mechanical keyboard without removing keycaps?
Yes, for light cleaning. Use compressed air to blow out debris and wipe the tops of keycaps with a slightly damp microfiber cloth. However, deep cleaning requires keycap removal to access hidden grime around switches.
Is it safe to use 99% isopropyl alcohol?
While effective, 99% IPA is highly volatile and can dry out certain plastics over time. 70–90% is generally safer and still potent enough for disinfection. Always apply via cloth or swab—not sprayed directly.
Will cleaning void my warranty?
It depends on the manufacturer. Most warranties exclude damage from liquid exposure or user disassembly. Check your product terms first. Non-invasive methods like using a keycap puller usually don’t void coverage, but submerging the PCB might.
Checklist: Complete Keyboard Cleaning Routine
- ✅ Disconnect and power off the keyboard
- ✅ Remove all keycaps with a plastic puller
- ✅ Shake out loose debris and use compressed air
- ✅ Soak keycaps in soapy water, scrub, rinse, and dry
- ✅ Spot-clean switch area with alcohol-dampened swab
- ✅ Ensure all components are fully dry
- ✅ Reattach keycaps securely
- ✅ Test every key for registration and smoothness
Conclusion: Maintain Performance Through Prevention
Your mechanical keyboard is more than a tool—it’s an extension of your digital presence. Whether you're coding, gaming, or writing, its condition directly impacts efficiency and comfort. Cleaning doesn’t need to be complex or risky when approached with care and the right knowledge. By following this guide, you preserve not only functionality but also the tactile pleasure that makes mechanical switches desirable.
Set a calendar reminder to clean your keyboard every few months. Keep your tools handy. Share this guide with fellow enthusiasts who might overlook maintenance until it’s too late. A little attention goes a long way in protecting your gear and enhancing your daily experience.


 浙公网安备
33010002000092号
浙公网安备
33010002000092号 浙B2-20120091-4
Comments
No comments yet. Why don't you start the discussion?