
Memory foam mattress toppers enhance sleep comfort by adding a plush, supportive layer to your bed. Over time, they absorb sweat, body oils, dead skin cells, and allergens, which can degrade both hygiene and performance. While many assume these toppers are difficult or risky to clean, a careful, methodical approach allows for safe and effective maintenance. This guide provides a complete, expert-backed process to deep-clean your memory foam topper without compromising its structure or longevity.
Why Cleaning Your Memory Foam Topper Matters
A memory foam topper is an investment in better sleep. However, unlike sheets or pillowcases, it’s not washed weekly. As a result, it becomes a breeding ground for dust mites, bacteria, and mold—especially if exposed to moisture from spills or humidity. Odors develop, support diminishes, and allergic reactions may increase. Regular cleaning extends the life of the topper, preserves its pressure-relieving properties, and ensures a healthier sleeping environment.
“Memory foam is porous and retains moisture easily. If not cleaned properly, it can harbor allergens and degrade faster than expected.” — Dr. Lena Patel, Sleep Health Researcher at the National Sleep Foundation
What You’ll Need: Essential Supplies
Before starting, gather all necessary tools. Using improper products or techniques can ruin the foam’s cell structure or leave behind residue that attracts more dirt. The following items are safe and effective for most memory foam toppers:
- Mild liquid detergent (fragrance-free, non-bleach)
- White vinegar (natural deodorizer and disinfectant)
- Baking soda (for odor absorption)
- Clean microfiber cloths or sponges
- Spray bottle
- Vacuum with upholstery attachment
- Fan or dehumidifier (for drying)
- Large towel (preferably absorbent, like cotton)
- Gloves (to protect hands from cleaning agents)
Avoid harsh chemicals such as bleach, ammonia, or strong solvents—they break down the polyurethane in memory foam. Also, never machine-wash or submerge the topper; waterlogged foam takes days to dry and risks permanent damage.
Step-by-Step Cleaning Process
Cleaning a memory foam topper requires patience and precision. Rushing the process or skipping steps can lead to mildew, warping, or lingering odors. Follow this detailed timeline to ensure a thorough, safe clean.
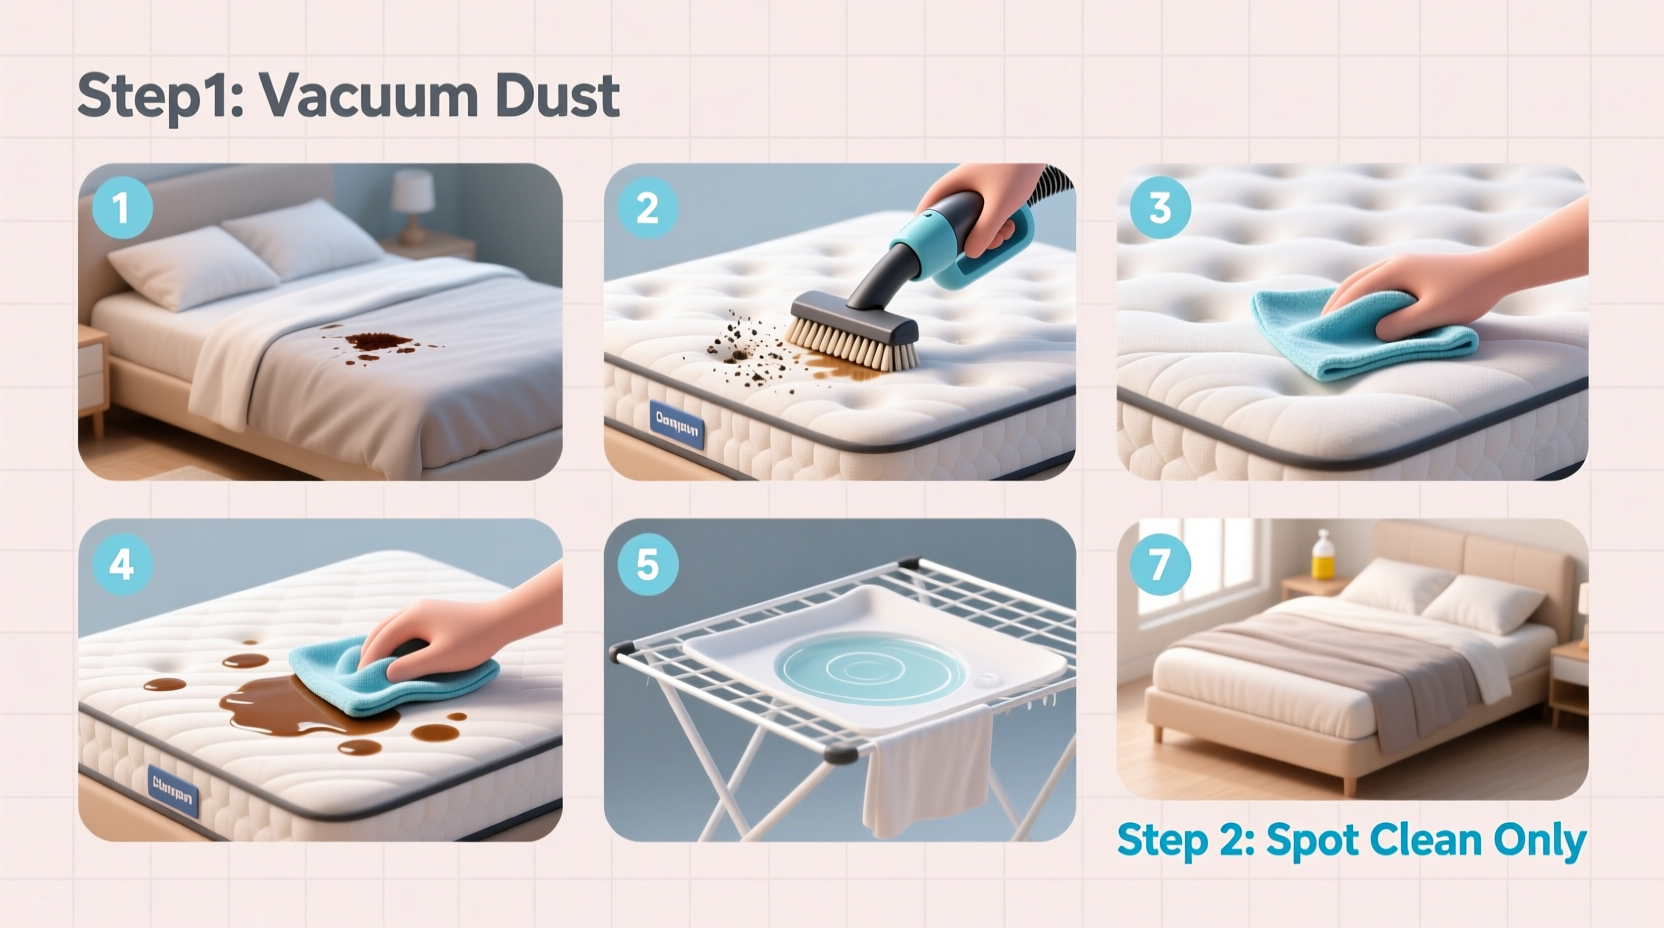
- Vacuum the surface: Remove loose debris, hair, and dust using the upholstery attachment. Go over both sides thoroughly, especially along seams and edges where particles accumulate.
- Treat stains immediately: For localized spots (e.g., sweat, urine, or food), mix 1 tablespoon of mild detergent with 2 cups of cool water. Dip a cloth into the solution, wring well, and gently blot the stain. Do not scrub aggressively—it can tear the foam.
- Prepare a cleaning spray: In a spray bottle, combine ½ cup white vinegar, ½ cup cool water, and 1 teaspoon of mild detergent. Shake lightly to mix. This solution lifts grime and neutralizes odors without residue.
- Spray and wipe gently: Lightly mist one side of the topper—never soak it. Use a damp microfiber cloth to wipe in circular motions. Focus on high-contact areas like the shoulder and hip zones. Repeat for the other side once the first dries.
- Deodorize with baking soda: Sprinkle a thin, even layer of baking soda over the entire surface. Let it sit for at least 30 minutes (up to 2 hours for strong odors). Then vacuum thoroughly to remove all powder.
- Dry completely: Place the topper upright or flat in a well-ventilated area, away from direct sunlight. Use fans or a dehumidifier to speed up drying. Flip every few hours to ensure both sides dry evenly. Total drying time typically ranges from 12 to 24 hours.
- Reassemble your bed: Only place the topper back on the mattress once it’s 100% dry. Cover with a waterproof protector to prevent future soiling.
Do’s and Don’ts: Critical Guidelines
To avoid irreversible damage, follow these best practices. Memory foam is sensitive to moisture, heat, and mechanical stress. A single mistake can compromise its integrity.
| Do’s | Don’ts |
|---|---|
| Use cool or lukewarm water only | Never use hot water—it breaks down foam cells |
| Blot liquids immediately after spills | Don’t let spills sit for hours |
| Vacuum monthly to reduce buildup | Don’t skip routine maintenance |
| Allow full air-drying before reuse | Don’t sleep on a damp topper—mold risk increases |
| Use a removable, washable cover | Don’t machine-wash the topper itself |
Real-Life Example: Recovering a Soiled Topper
Sarah, a mother of two, noticed her memory foam topper had developed a musty smell after her toddler spilled juice on it. She initially ignored it, thinking airing it out would suffice. After weeks of discomfort and restless nights, she consulted a mattress care specialist. Following the seven-step process outlined above—especially the vinegar-baking soda treatment and extended drying—she restored the topper to near-new condition. “I was ready to throw it out,” she said. “But after cleaning it properly, the smell vanished and it felt just as supportive.”
This case illustrates how timely intervention and correct technique can salvage a seemingly ruined topper, saving money and reducing waste.
Preventative Maintenance Tips
The best way to extend the life of your memory foam topper is through consistent prevention. Deep cleaning should be a periodic event, not a rescue mission. Incorporate these habits into your home routine:
- Use a protective cover: A breathable, waterproof mattress protector blocks spills, sweat, and allergens while allowing airflow.
- Rotate the topper quarterly: Even weight distribution prevents premature sagging in high-pressure zones.
- Air it out monthly: Remove bedding and let the topper breathe for a few hours, ideally near an open window or fan.
- Spot-clean promptly: Address small stains within 24 hours to prevent setting.
- Keep pets off when possible: Pet nails can puncture foam, and their dander adds to allergen load.
FAQ: Common Questions Answered
Can I use a steam cleaner on my memory foam topper?
No. Steam cleaners introduce excessive moisture deep into the foam, which cannot be removed easily. Trapped water promotes mold and weakens the material. Stick to light surface cleaning with minimal liquid.
How long does a memory foam topper last with proper care?
With regular cleaning and protection, most high-density memory foam toppers last 5 to 7 years. Lower-density versions may degrade in 3–4 years, especially without maintenance.
Is it safe to use hydrogen peroxide for stain removal?
In small amounts, diluted hydrogen peroxide (mixed 1:1 with water) can help with organic stains like blood. However, it’s slightly bleaching and should be used sparingly and rinsed carefully. Always test on a hidden edge first.
Final Checklist: Safe Memory Foam Topper Cleaning
Use this concise checklist to ensure you don’t miss any critical steps during your next cleaning session:
- Strip the bed and remove all linens
- Vacuum both sides of the topper thoroughly
- Pretreat stains with a mild detergent solution
- Spray cleaning mixture lightly—never saturate
- Wipe gently with a damp microfiber cloth
- Apply baking soda for odor removal (optional)
- Vacuum again after deodorizing
- Dry completely in a ventilated space (12–24 hrs)
- Inspect for dampness before reassembling the bed
- Install a fresh mattress protector
Conclusion: Protect Your Investment and Sleep Better
Your memory foam mattress topper deserves the same attention as your pillows or sheets. With the right care, it remains hygienic, supportive, and comfortable for years. By following this step-by-step guide, you eliminate health hazards, maintain structural integrity, and maximize value. Cleaning doesn’t have to be daunting—just deliberate and consistent. Take action today: inspect your topper, gather supplies, and give it the refresh it needs.


 浙公网安备
33010002000092号
浙公网安备
33010002000092号 浙B2-20120091-4
Comments
No comments yet. Why don't you start the discussion?