
Setting up a Network Attached Storage (NAS) device can seem intimidating at first, but with the right guidance, it becomes a straightforward process. The Synology NAS is one of the most user-friendly and powerful storage solutions available today, ideal for backing up files, streaming media, or even hosting personal cloud services. The first and most essential step? Connecting it properly to your local network. This guide walks you through each phase—physically, technically, and securely—so you can get your Synology NAS online with confidence.
What You’ll Need Before Starting
Before powering on your device, gather the necessary components. A missing cable or outdated router can delay setup unnecessarily. Here’s what you should have ready:
- Synology NAS unit (e.g., DS220+, DS423+, etc.)
- Compatible hard drives (installed or ready for installation)
- Ethernet cable (Cat 5e or higher recommended)
- Power adapter and power outlet
- A computer or mobile device connected to the same local network
- Router with available LAN port and DHCP enabled (standard in most homes)
Step-by-Step: Connecting Your Synology NAS to the Network
Follow these steps carefully to ensure a smooth and error-free setup.
- Install Hard Drives (if not pre-installed): Open the drive bay, insert your SATA hard drives securely, and close the enclosure. Most Synology models support tool-less installation.
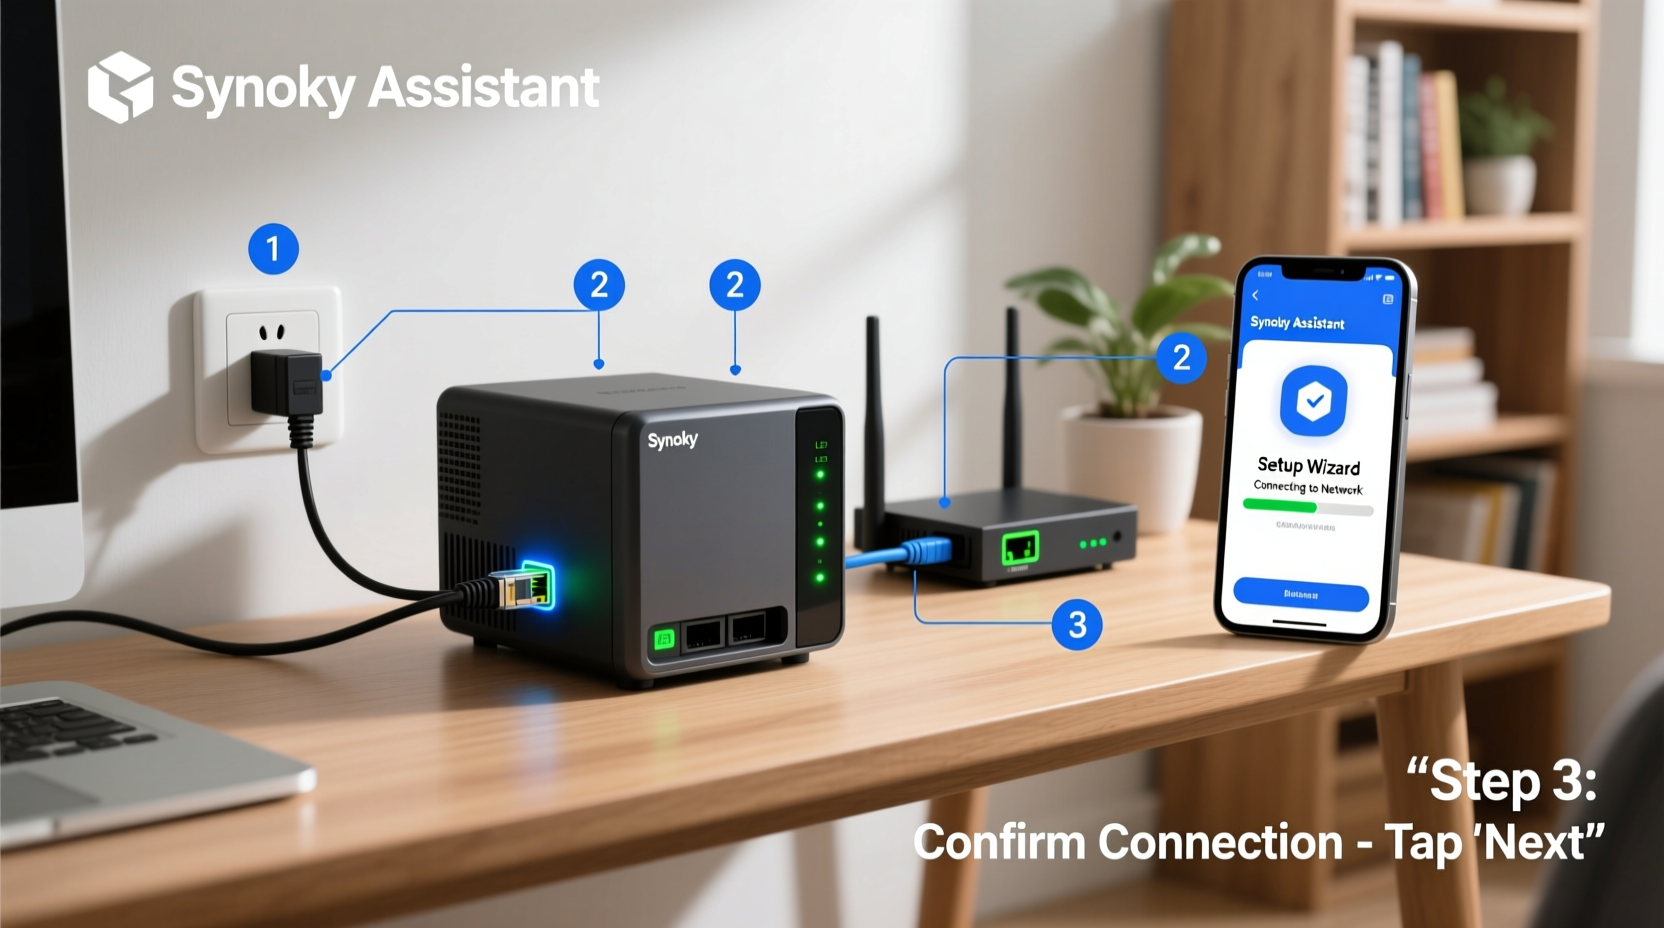
- Connect the NAS to Power: Plug the power adapter into the NAS and connect it to a reliable power source. Avoid using extension cords with unstable voltage.
- Link via Ethernet: Use an Ethernet cable to connect the NAS’s LAN port directly to a free port on your router or network switch. Do not rely on Wi-Fi unless you have a model with built-in wireless (rare).
- Power On the Device: Press the power button. The status LED will blink as the system boots—this may take 2–3 minutes.
- Prepare Your Computer: Ensure your PC or laptop is connected to the same network (via Wi-Fi or Ethernet). Open a modern web browser (Chrome, Firefox, Edge).
- Use Synology Assistant: Download “Synology Assistant” from synology.com if you’re on Windows or macOS. This tool detects NAS devices on your network.
- Locate Your NAS: Run Synology Assistant. It will scan and display your NAS by model and IP address once detected.
- Launch Setup Wizard: Double-click the device in the assistant, then click “Set Up” to begin configuration.
Configuring the NAS Using DSM (DiskStation Manager)
After launching the setup wizard, you’ll be guided through DiskStation Manager (DSM), Synology’s intuitive operating system.
- You’ll create an admin account (default username is
admin; set a strong password). - Select a time zone and enable automatic updates for security patches.
- Choose a volume type (for beginners, “Single” or “SHR” — Synology Hybrid RAID — is recommended).
- Format the drives. This erases all data, so confirm only when ready.
Once formatting completes, DSM will restart, and you’ll be prompted to log in. At this point, your NAS is fully connected to the network and operational.
Verifying Network Connectivity
To ensure everything works, perform these quick checks:
| Check | Action | Expected Result |
|---|---|---|
| IP Assignment | View NAS details in Synology Assistant | An IP like 192.168.1.x assigned by your router |
| Ping Test | Open Command Prompt → Type ping [NAS-IP] |
Replies received with low latency |
| Web Access | Type http://[NAS-IP] in a browser |
Redirects to DSM login page |
| File Transfer | Create a shared folder and copy a test file via File Station | File appears and is accessible |
Best Practices for Secure and Stable Network Integration
Getting your NAS online is just the beginning. Long-term reliability depends on smart configuration.
Assign a Static IP (Recommended)
DHCP assigns temporary IPs, which can change after reboots. To avoid losing access, assign a static IP through your router’s settings or within DSM under Control Panel > Network > Network Interface > Edit > IPv4 Settings.
Enable QuickConnect (For Remote Access)
If you want to access your NAS from outside your home, use Synology’s QuickConnect. Go to Control Panel > QuickConnect, enable it, and create a unique ID. No port forwarding required.
Update Firmware Regularly
Synology releases frequent DSM updates that improve performance, fix bugs, and patch vulnerabilities. Enable automatic updates or check monthly under Settings > Update & Restore.
“We recommend assigning static IPs to all critical network devices. It eliminates confusion and ensures consistent access.” — David Lin, Senior Network Engineer at Synology Partner Solutions
Mini Case Study: Home User Successfully Sets Up NAS in Under 30 Minutes
Sarah, a freelance photographer, purchased a Synology DS220+ to back up her growing portfolio. She followed the steps above using her desktop connected via Ethernet to the same router. After inserting two 4TB drives, she powered on the NAS and used Synology Assistant on her Windows PC. Within five minutes, the device appeared on the network. She completed the DSM setup, created a shared folder named “Photos_Backup,” and transferred sample images successfully. By enabling QuickConnect, she later accessed her files from a café using her phone—without needing technical help.
Sarah’s experience reflects how intuitive the process can be when guided correctly. Her only oversight? Not setting a static IP initially, which caused a brief access issue after a router reboot. Once corrected, her system ran flawlessly.
Do’s and Don’ts When Connecting Your Synology NAS
| Do’s | Don’ts |
|---|---|
| Use Cat 6 cables for gigabit speeds | Don’t daisy-chain multiple switches without checking bandwidth limits |
| Label your NAS and network ports | Don’t skip firmware updates |
| Test connectivity before adding critical data | Don’t leave default passwords unchanged |
| Enable encryption for shared folders | Don’t place the NAS in enclosed, poorly ventilated spaces |
FAQ
Can I connect my Synology NAS wirelessly?
Most Synology NAS units do not have built-in Wi-Fi. However, you can use a USB-to-WiFi adapter supported by DSM, though this is not recommended for performance-critical tasks. A wired Ethernet connection remains the standard for stability and speed.
What if my NAS doesn’t appear in Synology Assistant?
First, ensure both the NAS and your computer are on the same subnet. Restart the NAS and your router. Temporarily disable antivirus or firewall software that might block discovery protocols. If still undetected, try accessing it via find.synology.com in your browser.
Is it safe to leave my NAS running 24/7?
Yes. Synology NAS devices are designed for continuous operation. They include advanced power management, temperature monitoring, and drive health checks. Using high-quality, NAS-rated hard drives (like WD Red or Seagate IronWolf) further enhances longevity.
Conclusion: Take Control of Your Data Today
Connecting your Synology NAS to your local network is a simple yet transformative step toward better data management. With proper setup, you gain secure, centralized storage accessible from any device in your home—and beyond. Whether you're safeguarding family photos, managing work documents, or building a private media library, a well-connected NAS becomes the backbone of your digital life.


 浙公网安备
33010002000092号
浙公网安备
33010002000092号 浙B2-20120091-4
Comments
No comments yet. Why don't you start the discussion?