
Creating handmade accessories adds personality and warmth to everyday items. A DIY bread keychain pendant is more than just a quirky charm—it’s a symbol of comfort, creativity, and the joy found in small things. Whether you're making it as a gift, a personal keepsake, or a fun project with kids, this soft-sculpted miniature loaf can be completed in a few hours with basic craft supplies. This guide walks you through every stage—from selecting materials to sealing your finished piece—so you can create a durable, adorable bread keychain that turns heads and sparks smiles.
Gathering Your Materials
The first step in any successful craft project is preparation. For a realistic and long-lasting bread keychain, choose materials that are easy to shape, lightweight, and safe to handle. Most supplies can be found at local craft stores or repurposed from household items.
| Material | Purpose | Recommended Type |
|---|---|---|
| Polymer clay | Main body of the bread loaf | Sandstone, terracotta, or beige tones |
| Acrylic paints | Detailing crust and browning | Burnt umber, raw sienna, white |
| Paintbrushes | Applying paint and details | Fine tip + medium flat brush |
| Oven | Curing polymer clay | Standard home oven (300°F/150°C) |
| Keyring hardware | Attachment for keys | Stainless steel split ring or lobster clasp |
| Liquid clay or varnish | Sealing and shine | Water-based polyurethane or Fimo gloss |
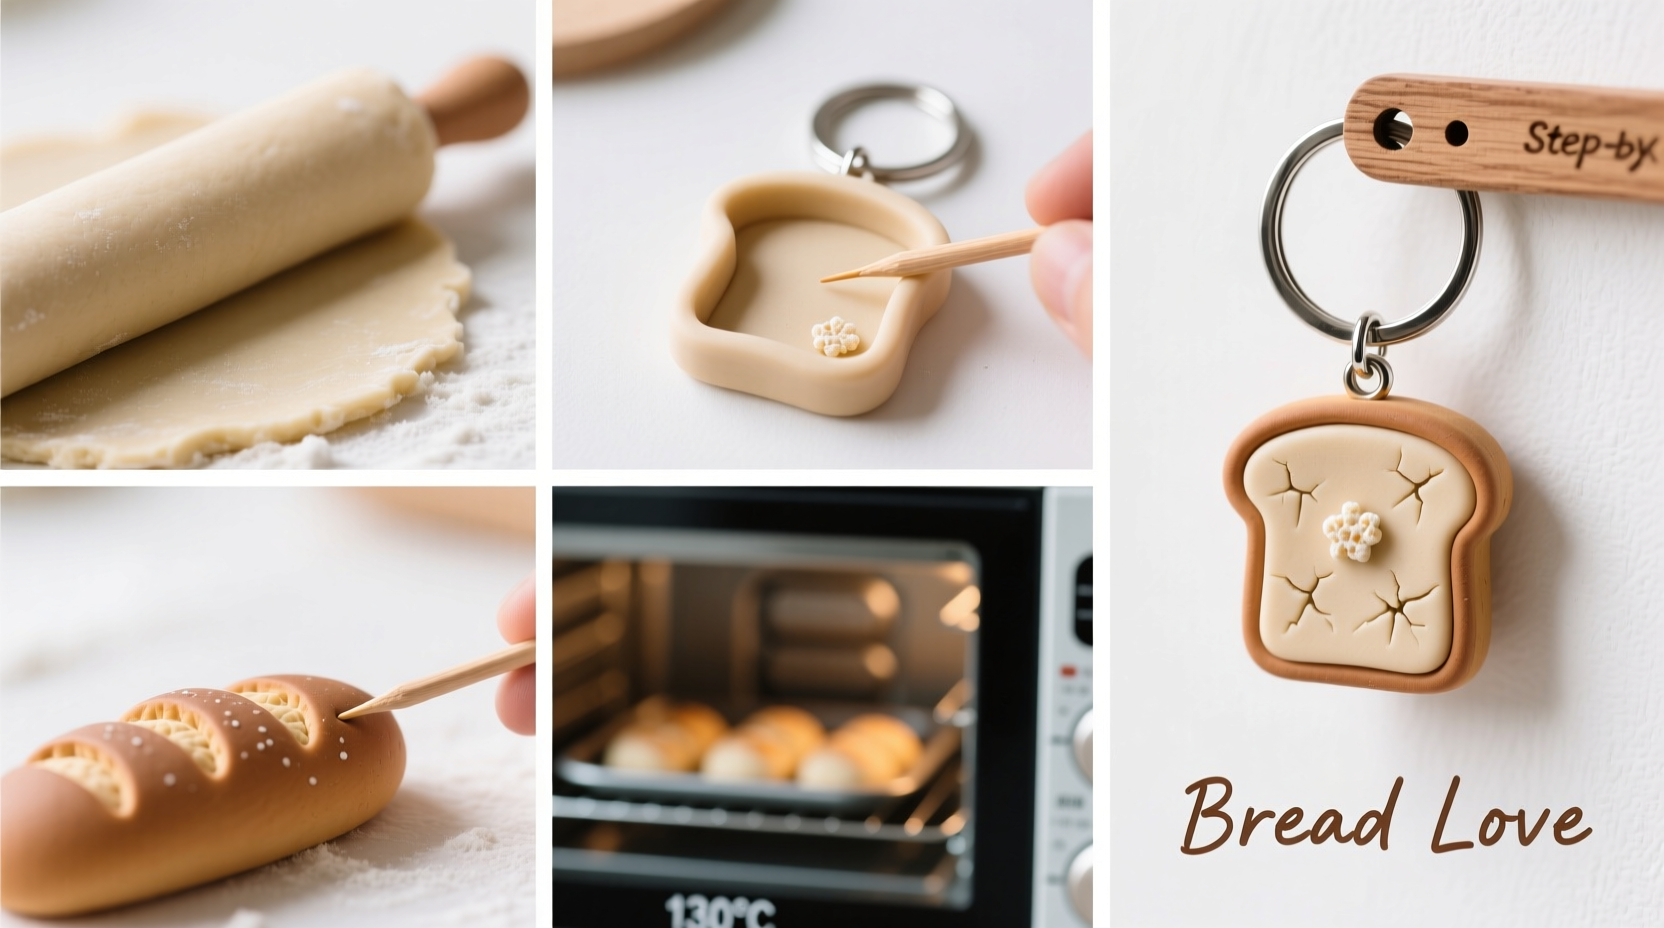
Shaping the Bread Loaf: A Step-by-Step Process
The charm of a bread keychain lies in its realism. Even a simplified version benefits from attention to texture and form. Follow these steps to sculpt a convincing mini loaf:
- Condition the clay: Knead your polymer clay until soft and pliable. This prevents cracking during shaping and baking.
- Form the base: Roll a portion of clay into an oval log about 1.5 inches long. Gently press the ends inward to mimic the rounded shape of a rustic bread loaf.
- Add surface texture: Use a toothpick or fine blade to score diagonal lines across the top, simulating a slashed artisanal crust. Lightly drag the tool in random directions to create natural-looking imperfections.
- Create dimension: Pinch one side slightly upward to give the loaf a subtle “rise” effect, enhancing realism.
- Insert the loop: Press a small metal eye pin or bent paperclip halfway into the top center of the loaf before baking. This will later hold the keyring.
- Bake according to instructions: Place on a ceramic tile or parchment-lined tray. Bake at manufacturer-recommended temperature (usually 265–275°F / 130–135°C) for 15–20 minutes. Let cool completely.
“Miniature food crafts succeed not through perfection, but through suggestion. A few well-placed details trigger recognition.” — Lila Chen, Miniature Artisan & Craft Instructor
Painting and Detailing for Realism
After baking, your bread pendant will look pale and unfinished. Painting brings it to life. The goal is not photorealism but evoking the warm, golden-brown hues of fresh-baked bread.
- Start with a base coat of raw sienna or light tan acrylic paint over the entire loaf.
- Once dry, dry-brush burnt umber along the scored lines and edges to simulate darker crust areas.
- Dab a touch of white or cream paint on raised surfaces to mimic flour dusting.
- For a sourdough-style look, add irregular patches of darker brown using a stippling motion.
- Allow 30 minutes to dry before handling.
Sealing and Attaching the Keyring
To protect your artwork and ensure longevity, sealing is essential. Unsealed polymer clay can absorb oils and fade over time, especially when handled daily.
Apply two thin coats of water-based polyurethane or Fimo gloss varnish using a clean brush. Allow each coat to dry for at least one hour. Once fully cured, remove the temporary wire loop (if used), and attach a small jump ring through the eye pin. Then slide on a stainless steel keyring or lobster clasp for functionality.
Do’s and Don’ts of Sealing
| Do | Don't |
|---|---|
| Work in a well-ventilated area | Use solvent-based sealants unless specified safe for polymer clay |
| Apply thin, even layers | Thickly glob varnish, which can drip and obscure details |
| Let each layer cure fully | Touch the surface before drying to avoid fingerprints |
Real-Life Inspiration: Emma’s Bakery-Themed Gift Set
Emma Rodriguez, a hobbyist crafter from Portland, created a series of bread-themed keychains for her coworkers at a local café. Each pendant matched the type of bread they loved most—baguette, brioche, rye, and sourdough. She packaged them in mini kraft boxes with handwritten tags: “May your day rise like dough.” The gifts became so popular that customers began requesting custom versions. Within three months, Emma launched a small Etsy shop focused on edible-inspired accessories. Her story shows how a simple DIY idea can grow into something meaningful—and even profitable—with heart and consistency.
Frequently Asked Questions
Can I make this without an oven?
Yes. Air-dry clay works as an alternative, though it may be less durable. Follow package instructions for drying time (usually 24–48 hours), and seal thoroughly afterward to prevent chipping.
How small should the bread pendant be?
Aim for 1 to 1.5 inches in length. This size is noticeable enough to appreciate details but compact enough to function as a practical keychain.
Is polymer clay safe to handle after baking?
Once properly baked, polymer clay is non-toxic and safe for regular use. However, tools used for crafting should not be reused for food preparation.
Checklist: Crafting Your Bread Keychain in One Sitting
- ☐ Gather all materials: clay, paints, brushes, varnish, keyring
- ☐ Condition and shape the loaf with texture details
- ☐ Insert eye pin or loop before baking
- ☐ Bake according to brand instructions; cool completely
- ☐ Paint base color and add shading/dusting effects
- ☐ Seal with two coats of varnish, drying between layers
- ☐ Attach jump ring and keyring hardware
- ☐ Test durability by gently tugging the ring
Final Thoughts
A handmade bread keychain is more than a functional accessory—it’s a celebration of craftsmanship, whimsy, and the little joys in life. With patience and attention to detail, you’ve transformed humble clay into a lasting token of creativity. Whether tucked onto your own keys or gifted to someone who loves baking, gardening, or simply smiling at tiny things, this pendant carries warmth in every curve and crackle.


 浙公网安备
33010002000092号
浙公网安备
33010002000092号 浙B2-20120091-4
Comments
No comments yet. Why don't you start the discussion?