
Headbands are more than just fashion accessories—they serve practical purposes, from managing sweat during workouts to keeping hair out of your face while cooking or gardening. While store-bought options exist, creating your own sponge headband allows you to customize fit, comfort, and style. Using common household materials and basic sewing skills, you can craft a soft, absorbent, and breathable headband tailored to your preferences. This guide walks you through the entire process, from material selection to final stitching, ensuring a professional-quality result.
Why Make a DIY Sponge Headband?
Commercial headbands often use synthetic sponges or low-density foam that compresses quickly and loses shape after a few uses. A homemade version lets you choose high-quality, durable materials like dense kitchen sponge or moisture-wicking fabric. You control the width, elasticity, and thickness—ensuring a snug yet pressure-free fit. Additionally, making your own supports sustainability by repurposing scraps and reducing reliance on mass-produced textiles.
“Custom-fit accessories improve both comfort and functionality. When you make your own, you’re not just saving money—you’re solving real problems with thoughtful design.” — Lena Patel, Textile Designer & Craft Educator
Materials and Tools You’ll Need
Before beginning, gather all necessary supplies. Most items can be found at home or purchased affordably at craft or hardware stores.
- Dense kitchen sponge (non-scratch side preferred)
- Soft fabric for outer layer (cotton, jersey knit, or terry cloth)
- Fusible interfacing (optional, for added structure)
- Elastic band (1/4 inch wide, 6–7 inches long)
- Scissors or rotary cutter
- Ruler or measuring tape
- Pins or clips
- Sewing machine or needle for hand stitching
- Iron (if using fusible interfacing)
- Thread matching your fabric
Step-by-Step Construction Process
Follow this detailed sequence to assemble a functional, long-lasting sponge headband. Each stage ensures durability, comfort, and a clean finish.
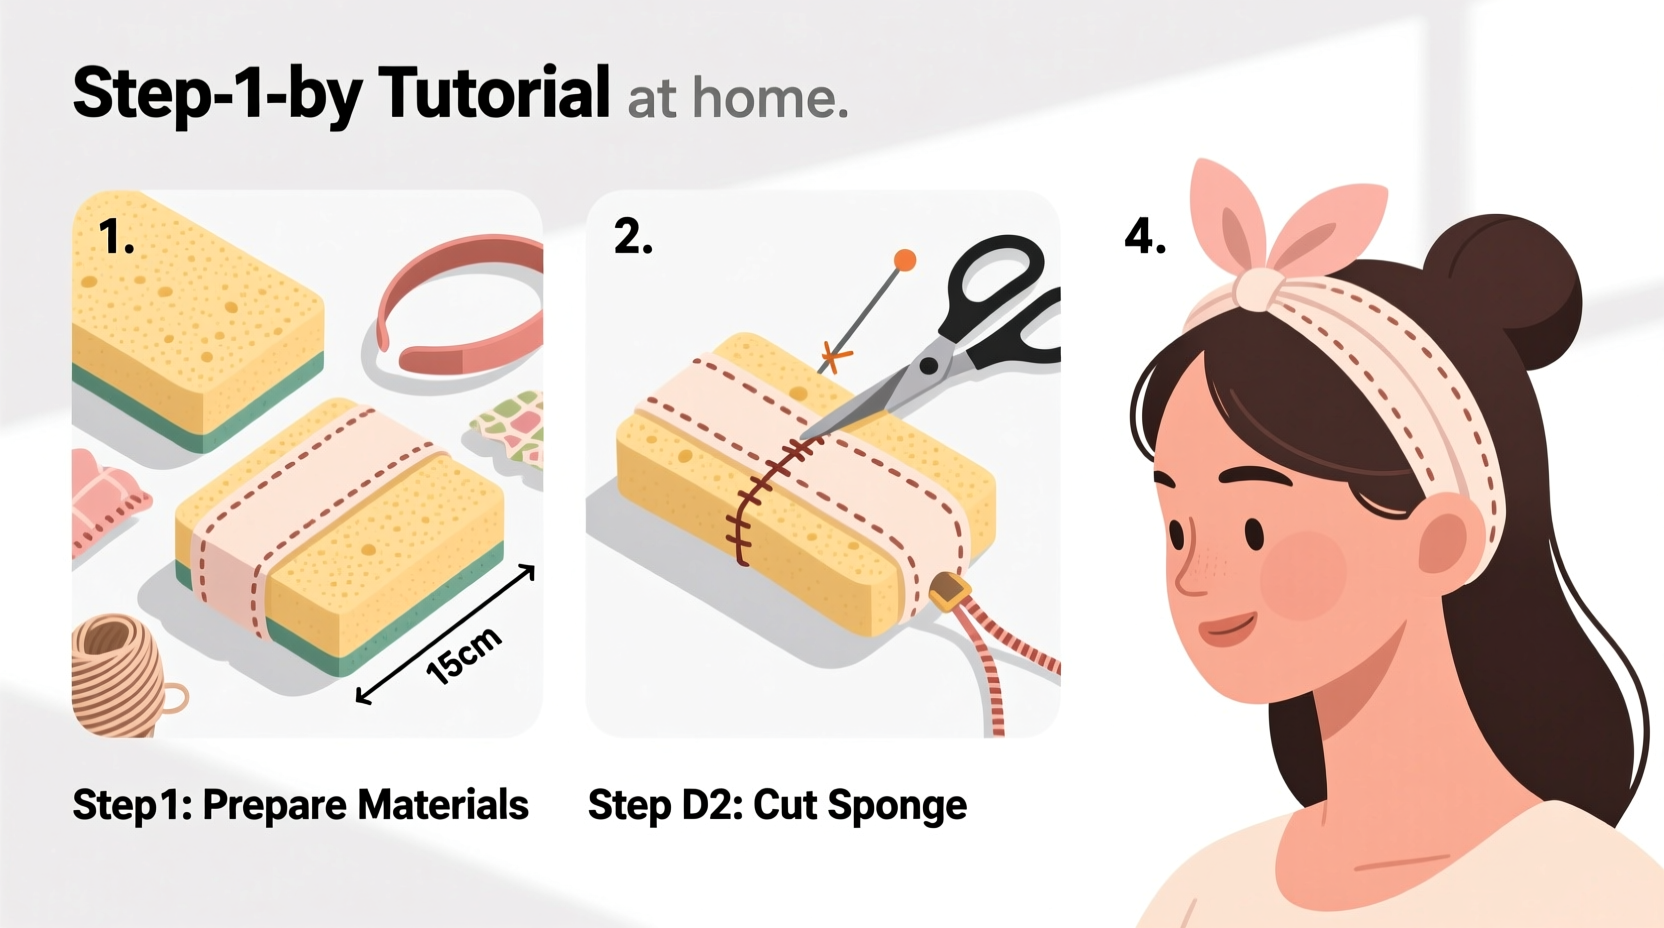
- Measure Your Head: Wrap a soft measuring tape around your forehead, just above the ears and across the widest part of your head. Note the circumference. Subtract 1–2 inches to allow for stretch and secure fit. For most adults, a finished length between 20–22 inches works well.
- Cut the Sponge Core: Using your measurement, cut the sponge into a strip 2 inches wide and the desired length. Ensure edges are straight and smooth to prevent lumps under fabric.
- Prepare the Outer Fabric: Cut two identical fabric strips: 3 inches wide and 1 inch longer than the sponge. This extra length accommodates seam allowances and elastic attachment. If using stretchy fabric like jersey, pre-wash it to prevent future shrinkage.
- Add Interfacing (Optional): For enhanced durability, apply fusible interfacing to the wrong side of one fabric piece. Iron according to manufacturer instructions. This adds slight stiffness without compromising flexibility.
- Pin Sponge Between Fabric Layers: Place the sponge centered between the two fabric pieces, right sides together. Pin or clip all around, leaving one short end open for turning. Avoid pinning too close to edges.
- Sew Around Three Sides: Using a 1/4-inch seam allowance, stitch along both long edges and one short end. Use a zigzag stitch if working with stretch fabric to maintain elasticity. Backstitch at start and end for strength.
- Turn Right Side Out: Carefully turn the tube right side out through the open end. Use a blunt tool like a chopstick to push out corners gently. Avoid tearing the fabric.
- Insert and Attach Elastic: Cut a 6.5-inch piece of elastic. Fold one open end of the headband inward by 1/2 inch and insert the elastic. Sew securely with a square or X-shaped stitch pattern. Repeat on the other end, overlapping the elastic slightly for tension balance.
- Topstitch for Professional Finish: Run a topstitch 1/8 inch from the edge around the entire perimeter. This flattens seams and gives a polished look. For stretch fabrics, use a stretch stitch or narrow zigzag.
Alternative No-Sew Method
If you don’t have access to a sewing machine, fabric glue and heat-activated adhesive can substitute. Use waterproof, flexible glue designed for textiles. Clamp layers together until dry (usually 4–6 hours). Reinforce ends with strong tape or snaps if needed. While less durable than stitched versions, glued headbands work well for occasional use.
Design Variations and Customization Tips
Once you’ve mastered the basic construction, experiment with modifications to suit different needs.
| Variation | Purpose | Recommended Materials |
|---|---|---|
| Narrower Width (1.5\") | Lightweight for indoor use | Thin sponge + cotton voile |
| Wider Band (3\") | Better sweat absorption during exercise | Terry cloth + thick sponge |
| Double-Layer Sponge | Maximum cushioning for sensitive heads | Two sponge strips bonded with spray adhesive |
| Reversible Design | Two looks in one accessory | Different fabrics on each side |
Mini Case Study: Home Fitness Enthusiast’s Solution
Sophie, a yoga instructor from Portland, struggled with standard headbands slipping during hot vinyasa sessions. She tried several brands but found them either too tight or ineffective at absorbing sweat. After learning this DIY method, she crafted a 3-inch-wide headband using recycled terry cloth towels and high-density sponge from an old cleaning pad. By adjusting the elastic tension and adding a non-slip silicone strip inside (glued discreetly), she created a reliable, washable headband that stayed in place throughout 90-minute classes. “It’s now my go-to,” she says. “I even started making them for my students as gifts.”
Care and Maintenance Checklist
To extend the life of your DIY sponge headband, follow these care practices:
- Hand wash after every 2–3 uses with mild detergent
- Rinse thoroughly to remove soap residue
- Air dry flat away from direct sunlight
- Do not wring or twist, as this deforms the sponge
- Inspect stitching monthly for signs of wear
- Replace sponge core if it becomes brittle or discolored
“Moisture-trapping materials like sponge need regular cleaning to prevent bacterial growth. Never leave a damp headband bunched in a gym bag.” — Dr. Amira Chen, Dermatology Consultant
Frequently Asked Questions
Can I wash the headband in a machine?
While hand washing is recommended, you may machine wash on a gentle cycle if the headband is fully secured and turned inside out. Use a mesh laundry bag for protection. However, frequent machine washing may degrade the sponge faster.
What if I don’t have sponge material?
You can substitute with folded layers of flannel, batting, or even pool noodle foam (cut into strips). These alternatives offer cushioning but may absorb less moisture than true sponge.
How long does a DIY sponge headband last?
With proper care, expect 6–12 months of regular use. Signs it’s time to replace include sagging shape, thinning fabric, or reduced elasticity. The sponge core can often be swapped without remaking the entire band.
Final Thoughts and Call to Action
Crafting a DIY sponge headband is a simple, rewarding project that blends utility with creativity. Whether you're looking for a sweat-absorbing workout companion or a cozy accessory for quiet days at home, this handmade solution offers unmatched comfort and personalization. With minimal investment and a little time, you can create something far superior to many off-the-shelf options.


 浙公网安备
33010002000092号
浙公网安备
33010002000092号 浙B2-20120091-4
Comments
No comments yet. Why don't you start the discussion?