
Creating your own pear-shaped bean bag chair isn’t just a fun weekend project—it’s a smart way to customize comfort, save money, and add a personal touch to your living space. Unlike store-bought versions that may compromise on fabric quality or fill density, a DIY bean bag lets you choose every detail: from the outer material to the type of filling. With basic sewing skills and common household tools, you can build a supportive, plush seating solution tailored to your body and décor. This guide walks you through each phase with precision, offering practical tips, material recommendations, and structural insights to ensure your homemade bean bag is both durable and deeply comfortable.
Understanding the Pear Shape Design
The pear-shaped bean bag is designed to mimic natural sitting posture. It features a rounded base for stability and a taller back section that supports the spine and neck. Unlike cylindrical or spherical bean bags, the pear shape encourages proper weight distribution, reducing pressure on hips and lower back. This makes it ideal for lounging, reading, or even light napping.
The key to achieving this form lies in the pattern: two mirrored oval pieces for the sides, a circular base, and a curved top panel that allows the bag to “bulge” slightly where support is needed most. When filled correctly, the shape conforms gently to the body while maintaining enough structure to prevent flattening over time.
“Ergonomic design in seating isn’t just about aesthetics—it’s about how the body interacts with the object. A well-constructed pear-shaped bag supports dynamic postures.” — Dr. Lena Patel, Industrial Designer & Ergonomics Consultant
Materials and Tools Checklist
Before cutting any material, gather everything you’ll need. Using high-quality supplies ensures longevity and comfort. Below is a complete checklist for one standard-sized bean bag (approximately 4 feet tall when filled).
✅ DIY Bean Bag Materials Checklist
- Two yards of heavy-duty fabric (canvas, corduroy, or upholstery-grade microfiber)
- One yard of soft lining fabric (optional, for inner layer)
- Polyester fiberfill (for shaping outer layers)
- Expanded polystyrene (EPS) beads – 350–400 liters (primary filling)
- Heavy-duty thread (polyester or upholstery-grade)
- Size 16 denim needle for sewing machine
- Measuring tape, chalk, scissors, pins
- Sewing machine with adjustable tension
- Zippers (two: 18-inch main fill zipper + 10-inch inner liner zipper)
- Tailor’s chalk or washable marker
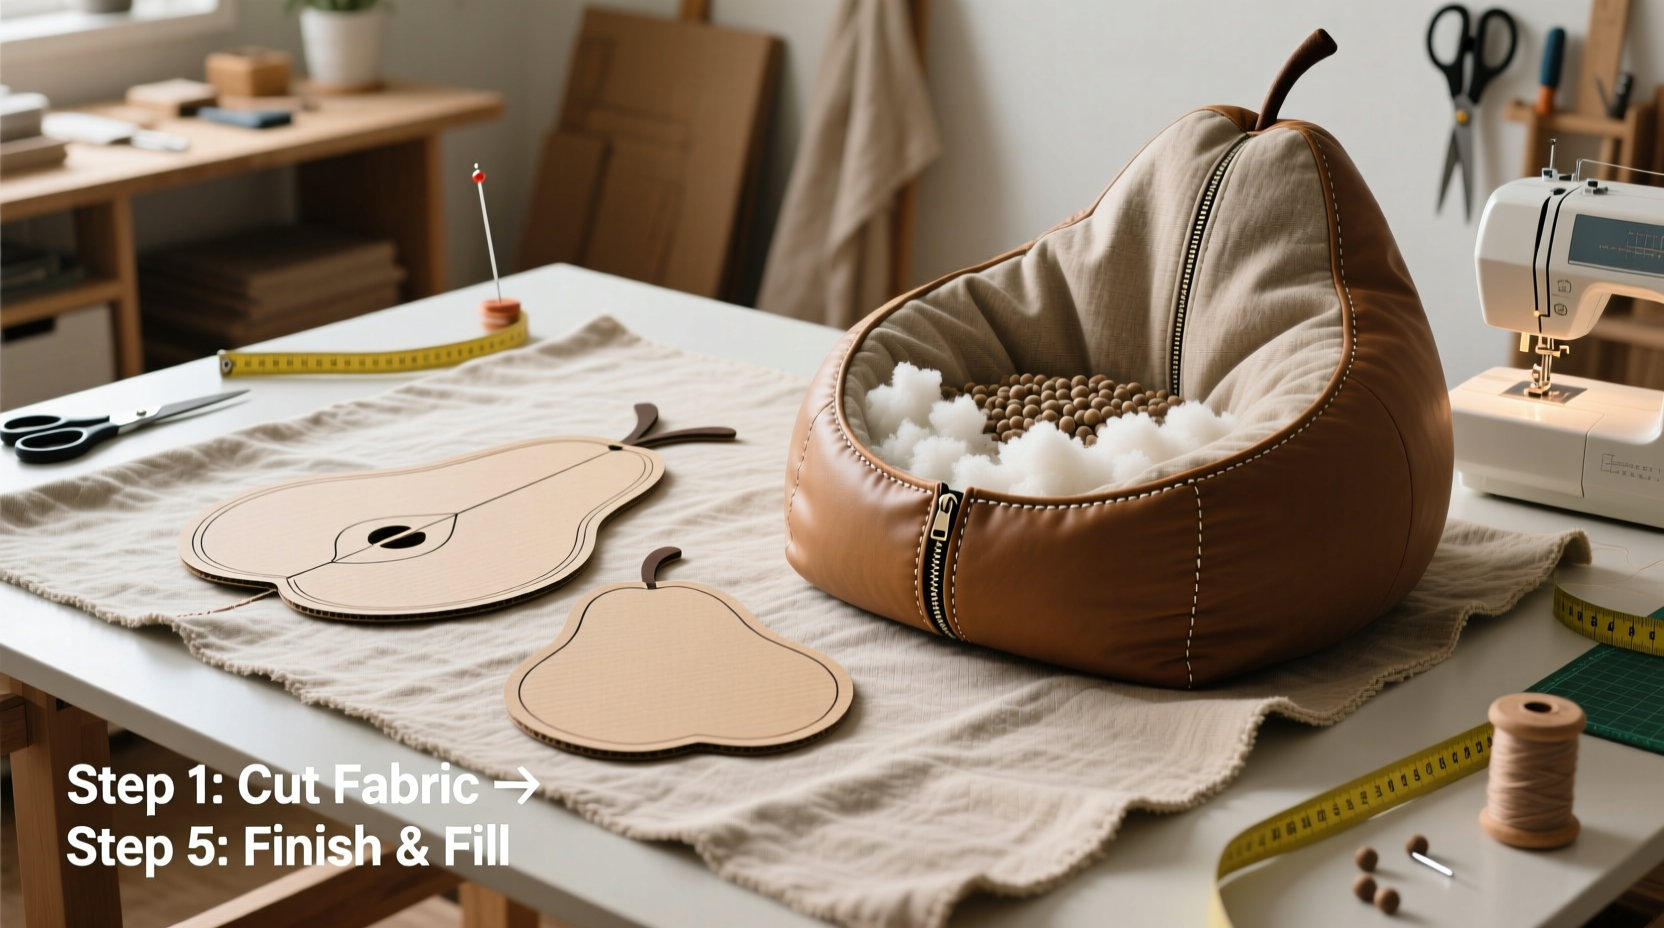
Step-by-Step Construction Guide
Follow this timeline-based process to assemble your bean bag accurately and safely. Allow 6–8 hours over one or two days, depending on your sewing experience.
- Design the Pattern (30 min): Sketch a vertical oval measuring 36 inches high and 28 inches wide. Divide it into three sections: base (circle, 20” diameter), body (two side panels), and crown (smaller oval, 12” high). Cut these shapes from cardboard as templates.
- Cut the Fabric (45 min): Trace the templates onto fabric, adding ½ inch seam allowance around all edges. Cut two side ovals, one base circle, and one crown piece. If using a liner, repeat with lining fabric.
- Sew the Side Panels (1.5 hrs): Place the two oval pieces right sides together. Pin and sew along the long edge using a straight stitch. Reinforce the seam with a zigzag stitch. Press open and insert a 10-inch zipper midway for the inner liner (if using).
- Attach the Base (1 hr): Align the circular base with the bottom curve of the oval. Pin evenly, stretching slightly to match circumference. Sew with reinforced stitching. Repeat for the crown piece at the top.
- Install the Main Zipper (45 min): Along the back seam, replace a 18-inch section with a heavy-duty zipper. This allows refilling and maintenance. Use zipper foot on your sewing machine for precision.
- Add Inner Liner (Optional, 1 hr): Repeat steps 3–5 with lining fabric. The liner contains the beads and protects the outer shell from abrasion.
- Fill Gradually (1 hr): Begin with 50% EPS beads, then add polyester fiberfill in layers to create cushioned contours. Finish with remaining beads. Do not overfill—aim for 70–80% capacity to allow movement and molding.
- Final Inspection (15 min): Check all seams under tension. Sit on the bag gently to test shape retention. Adjust fill level as needed.
Do’s and Don’ts: Fabric and Filling Comparison
| Material Choice | Do’s | Don’ts |
|---|---|---|
| Cotton Canvas | Durable, breathable, accepts dye well | Avoid without waterproof backing in humid areas |
| Microfiber Upholstery | Stain-resistant, soft, holds shape | Don’t use low-thread-count versions—they tear easily |
| Leather/Vegan Leather | Elegant finish, easy to wipe clean | Avoid direct sunlight—can crack over time |
| EPS Beads (1–3mm) | Lightweight, moldable, quiet | Don’t skimp—low-density fills flatten quickly |
| Fiberfill Additive | Softens bead texture, improves contouring | Don’t exceed 20% of total volume—reduces support |
Real-Life Example: Sarah’s Home Theater Upgrade
Sarah, a freelance graphic designer from Portland, wanted cozy seating for her basement home theater but found commercial bean bags too small and flimsy. She followed this guide using navy-blue outdoor-grade microfiber and 380 liters of premium EPS beads. By adding a hidden inner pocket for remotes and building the bag slightly taller than average, she created a custom lounger that supported her posture during long movie nights. After six months of weekly use, she reported no sagging or seam damage. “It cost less than $90,” she said, “and gets compliments every time friends come over.”
Frequently Asked Questions
How long does a DIY bean bag last?
With double-stitched seams, quality fabric, and proper care, a homemade bean bag can last 5–7 years. Refill with fresh beads every 18–24 months to maintain loft and support.
Can I wash the cover?
If you’ve installed a zipper, remove the inner liner first, then hand-wash or machine-wash the outer cover on gentle cycle using cold water. Air dry completely before reassembling.
Is it safe for children?
Yes, provided you use non-toxic EPS beads and secure all zippers with child-safe sliders. Avoid loose buttons or embellishments that could become choking hazards.
Final Thoughts and Next Steps
Building a pear-shaped bean bag at home is more than a craft project—it’s an investment in personalized comfort. You control the size, firmness, color, and environmental impact, from choosing recycled fabrics to sourcing sustainable fills. Once completed, this chair can serve as a centerpiece in a kid’s room, a reading nook favorite, or even temporary guest seating. The skills you gain—pattern drafting, heavy fabric sewing, and ergonomic shaping—are transferable to other furniture projects like floor cushions or ottomans.
Now that you have the blueprint, gather your materials and start cutting. Whether you're a seasoned sewer or a determined beginner, the result will be a functional piece of art made by your hands. Share your finished design online, tag it with #DIYBeanBagGuide, and inspire others to create thoughtfully, not just consume.


 浙公网安备
33010002000092号
浙公网安备
33010002000092号 浙B2-20120091-4
Comments
No comments yet. Why don't you start the discussion?