
Crafting a custom dog bowtie isn’t just about fashion—it’s a way to personalize your pet’s look while ensuring comfort and durability. Whether you're making one for a special occasion or launching a handmade pet accessory line, creating a bowtie from scratch allows full control over materials, sizing, and design. This guide walks through every stage: selecting fabrics, measuring your dog accurately, constructing the bowtie with precision, and adding finishing touches that stand out.
Selecting the Right Materials
The foundation of a high-quality dog bowtie lies in material choice. Unlike human accessories, pet wear must withstand movement, chewing, and frequent washing. Prioritize fabrics that balance aesthetics with resilience.
Common options include:
- Cotton quilting fabric: Lightweight, breathable, and available in endless patterns. Ideal for everyday wear.
- Felt: Slightly stiffer than cotton, holds shape well, and doesn’t fray—great for beginners.
- Denim or twill: Durable and structured, perfect for larger dogs or outdoor events.
- Stretchy knit or jersey: Best used only for the neck strap if comfort is a priority, but avoid using it for the bow itself as it may lose shape.
For internal structure, consider lightweight interfacing to give the bow body without adding bulk. Avoid heavy plastics or rigid foams—they can be uncomfortable and unsafe if chewed.
Measuring Your Dog Accurately
A poorly fitting bowtie slips off or irritates the skin. The key is tailoring it to your dog’s collar size and breed proportions.
- Measure the circumference of your dog’s neck where the collar sits, then add 2 inches for overlap and adjustment.
- Determine the desired bow width based on breed:
- Small breeds (Chihuahua, Pomeranian): 2–3 inches wide
- Medium breeds (Beagle, Cocker Spaniel): 3–4 inches
- Large breeds (Labrador, German Shepherd): 4–5 inches
- Decide on length. Most bowties are 1.5 to 2 times wider than they are tall (e.g., a 3-inch-wide bow might be 2 inches from top to bottom).
Sketch a rough template on paper first. Cut and tape it around the collar to test proportion and symmetry.
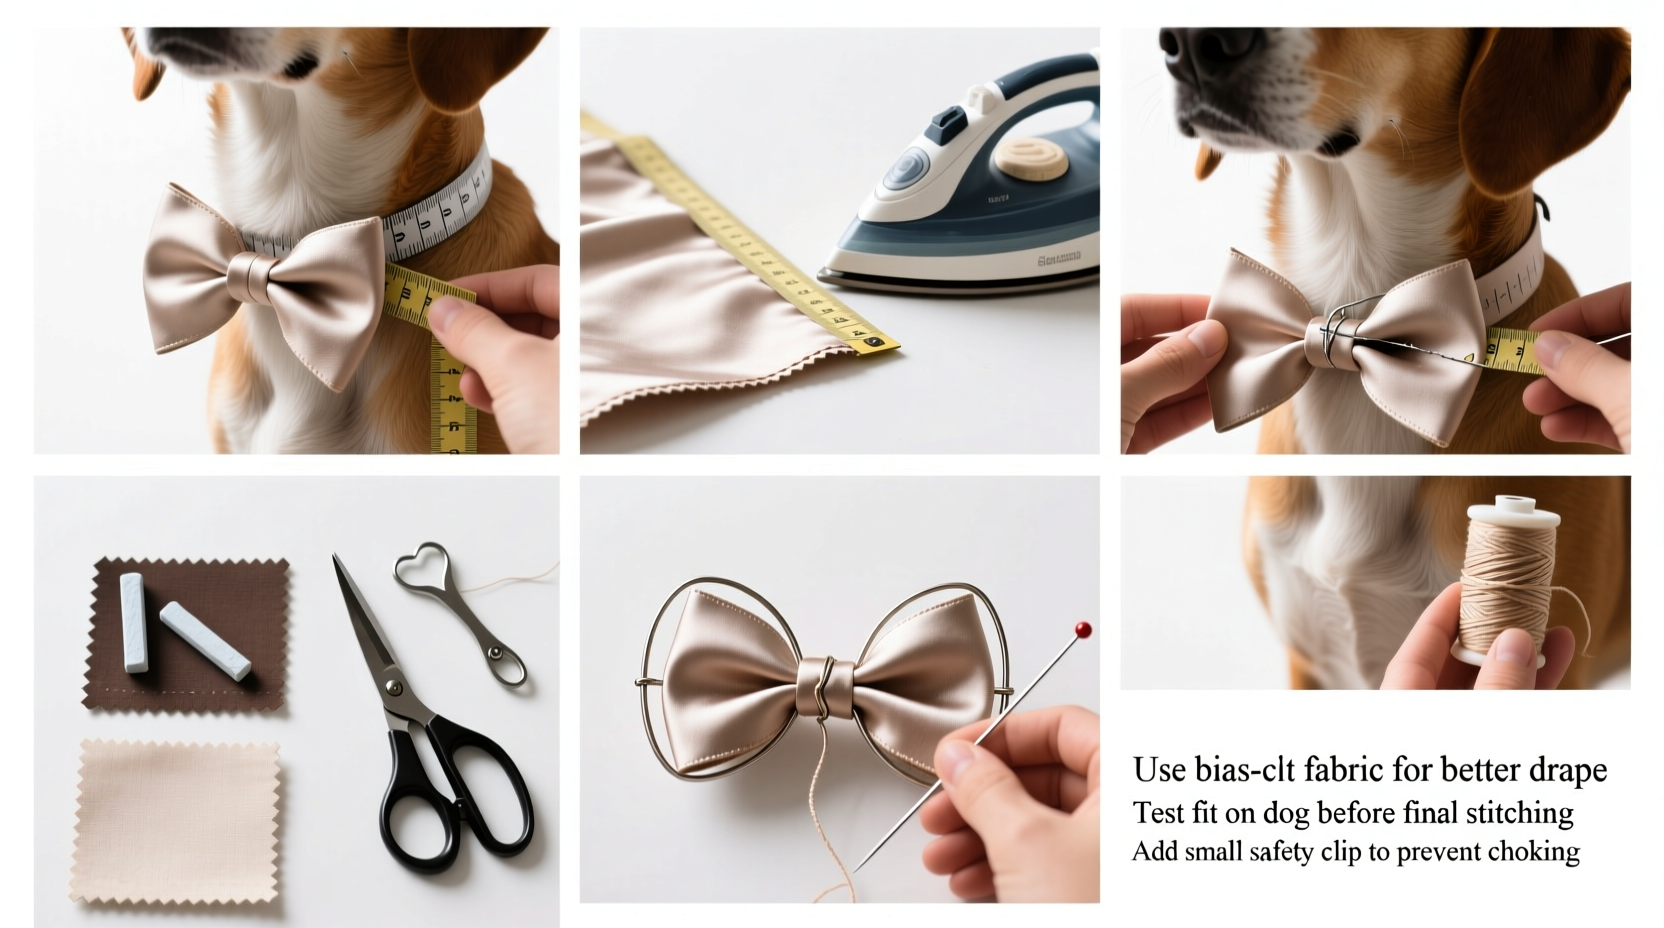
Construction: Step-by-Step Guide
Follow this sequence to assemble a secure, polished bowtie.
- Prepare the pattern: Draw two identical bow shapes on cardboard—one solid piece with rounded edges and a narrow center “waist.” Cut it out as a reusable template.
- Trace and cut: Place the template on your chosen fabric and trace two mirrored pieces. If using interfacing, cut one piece to fuse to the back of the front fabric for added stiffness.
- Fuse and layer: Iron the interfacing to the wrong side of one bow piece. Then place both fabric pieces together, right sides facing.
- Sew the bow: Stitch around the edges with a ¼-inch seam allowance, leaving a 1.5-inch gap at the waist for turning. Trim curves to reduce bulk, clip corners gently.
- Turn and press: Flip the bow right-side out through the gap. Use a blunt tool (like a chopstick) to push out the points. Press flat with an iron on low heat, especially along the edges.
- Topstitch: Sew around the entire perimeter ⅛ inch from the edge to close the gap and create a clean finish.
- Create the center band: Cut a strip of contrasting fabric 1.5 inches wide and 4 inches long. Fold and press the edges inward, then fold in half lengthwise. Sew it vertically down the center of the bow to conceal the waist seam.
- Attach the strap: Cut a nylon webbing or fabric strip to fit your dog’s collar. Slide one end under the center band before stitching it fully in place. Alternatively, sew a loop at each end of the bow to slide onto the collar directly.
Do’s and Don’ts: Fabric & Safety Table
| Do’s | Don’ts |
|---|---|
| Use non-toxic, pet-safe thread and dyes | Use small buttons or beads that could be chewed off |
| Pre-shrink fabrics before sewing | Choose loose weaves that fray easily |
| Add reflective strips for nighttime visibility | Make the bow too large or heavy for small breeds |
| Secure all seams with backstitching | Leave long thread tails or unfinished edges |
Real Example: Crafting for a Wedding Appearance
Sophia, a dog owner in Portland, wanted her Cavalier King Charles Spaniel, Oliver, to match the groomsmen at her sister’s wedding. She chose navy cotton with gold polka dots, pre-washed and fused with lightweight fusible fleece. After measuring Oliver’s 12-inch collar, she crafted a 3-inch-wide bow with a satin center band. To ensure durability during photos and mingling, she double-stitched the attachment points and tested the fit during several walks beforehand. The result was a charming, professional-looking accessory that stayed secure all day—and earned compliments from guests and photographers alike.
Expert Insight on Pet Accessory Design
“The best pet accessories combine form and function. A bowtie should enhance the moment without compromising safety or mobility.” — Lena Torres, Pet Product Designer & Founder of Paws & Thread Studio
Torres emphasizes that many owners overlook ergonomics. “A bowtie shouldn’t extend beyond the dog’s jawline or interfere with sitting or lying down. Keep it centered and low-profile,” she advises.
Checklist: Before You Wear or Sell Your Bowtie
- ✅ Double-check all seams for strength
- ✅ Confirm the fit on your dog’s actual collar
- ✅ Test for snagging on furniture or doorways
- ✅ Wash and dry once to verify colorfastness and shape retention
- ✅ Inspect for loose threads or sharp edges
- ✅ Ensure the dog shows no signs of irritation during trial wear
Frequently Asked Questions
Can I machine wash a homemade dog bowtie?
Yes, if made with pre-washed, colorfast fabrics. Always remove it from the collar and place it in a mesh laundry bag. Use cold water and mild detergent. Air dry flat to preserve shape.
How do I attach the bowtie without sewing?
You can use snap buttons or Velcro dots to make a removable bowtie. Attach one side to a fabric-covered collar and the other to the back of the bow. Ensure fasteners are securely glued or stitched to prevent detachment.
What if my dog tries to chew the bowtie?
Some dogs react negatively to new accessories. Introduce the bowtie gradually with short supervised sessions. If chewing persists, consider wearing it only during brief photo ops or special events. Never leave a dog unattended with any accessory.
Final Thoughts and Encouragement
Crafting a custom dog bowtie from scratch blends creativity with practicality. With careful planning, quality materials, and attention to detail, you can produce a piece that’s both adorable and built to last. Whether you’re dressing up your own pup or creating gifts for fellow pet lovers, each bowtie becomes a testament to thoughtful craftsmanship. These small accessories often spark joy far beyond appearance—they become keepsakes of milestones, adventures, and shared moments.


 浙公网安备
33010002000092号
浙公网安备
33010002000092号 浙B2-20120091-4
Comments
No comments yet. Why don't you start the discussion?