
Crafting your own 3D headphone keychain is an accessible and rewarding project that blends creativity with practicality. Whether you're new to resin casting, 3D printing, or hand modeling, this guide walks you through every stage of creating a miniature, wearable version of your favorite headphones. The result is a unique accessory that doubles as a conversation starter and functional key organizer. With just a few basic tools and materials, you can personalize your design, experiment with colors, and produce a professional-looking piece in under a weekend.
Understanding the Design Concept
A 3D headphone keychain mimics the shape of real over-ear or on-ear headphones but scaled down to fit comfortably on a keyring. The design typically includes ear cups, a headband, and sometimes decorative elements like soundwave patterns or brand logos. The challenge lies in maintaining symmetry and proportion while ensuring structural integrity at a small scale.
Beginners have multiple options for bringing their design to life: sculpting with polymer clay, using a 3D printer, or casting in resin with a mold. Each method has its learning curve, but all are beginner-friendly with proper guidance. The choice depends on your available tools, budget, and desired finish.
Gathering Your Materials and Tools
Before starting, assemble all necessary supplies. Having everything ready prevents interruptions and ensures smooth workflow. Below is a checklist tailored for each crafting method.
General Supplies (All Methods)
- Measuring ruler or caliper
- Fine-grit sandpaper (200–600 grit)
- Needle files or small hobby knife
- Keyring (15–20mm diameter)
- Strong adhesive (E6000 or epoxy glue)
- Protective gloves and workspace cover
Method-Specific Materials
| Method | Required Materials | Estimated Cost |
|---|---|---|
| Polymer Clay | Fimo or Sculpey clay, oven-safe surface, toothpicks | $15–$25 |
| Resin Casting | Silicone mold, two-part epoxy resin, mixing cups, stir sticks | $30–$50 |
| 3D Printing | PLA filament, 3D printer, slicing software (e.g., Cura) | $50+ (printer), $20 (filament) |
If you’re unsure which method to choose, consider starting with polymer clay. It’s forgiving, requires minimal equipment, and allows immediate hands-on shaping without digital modeling.
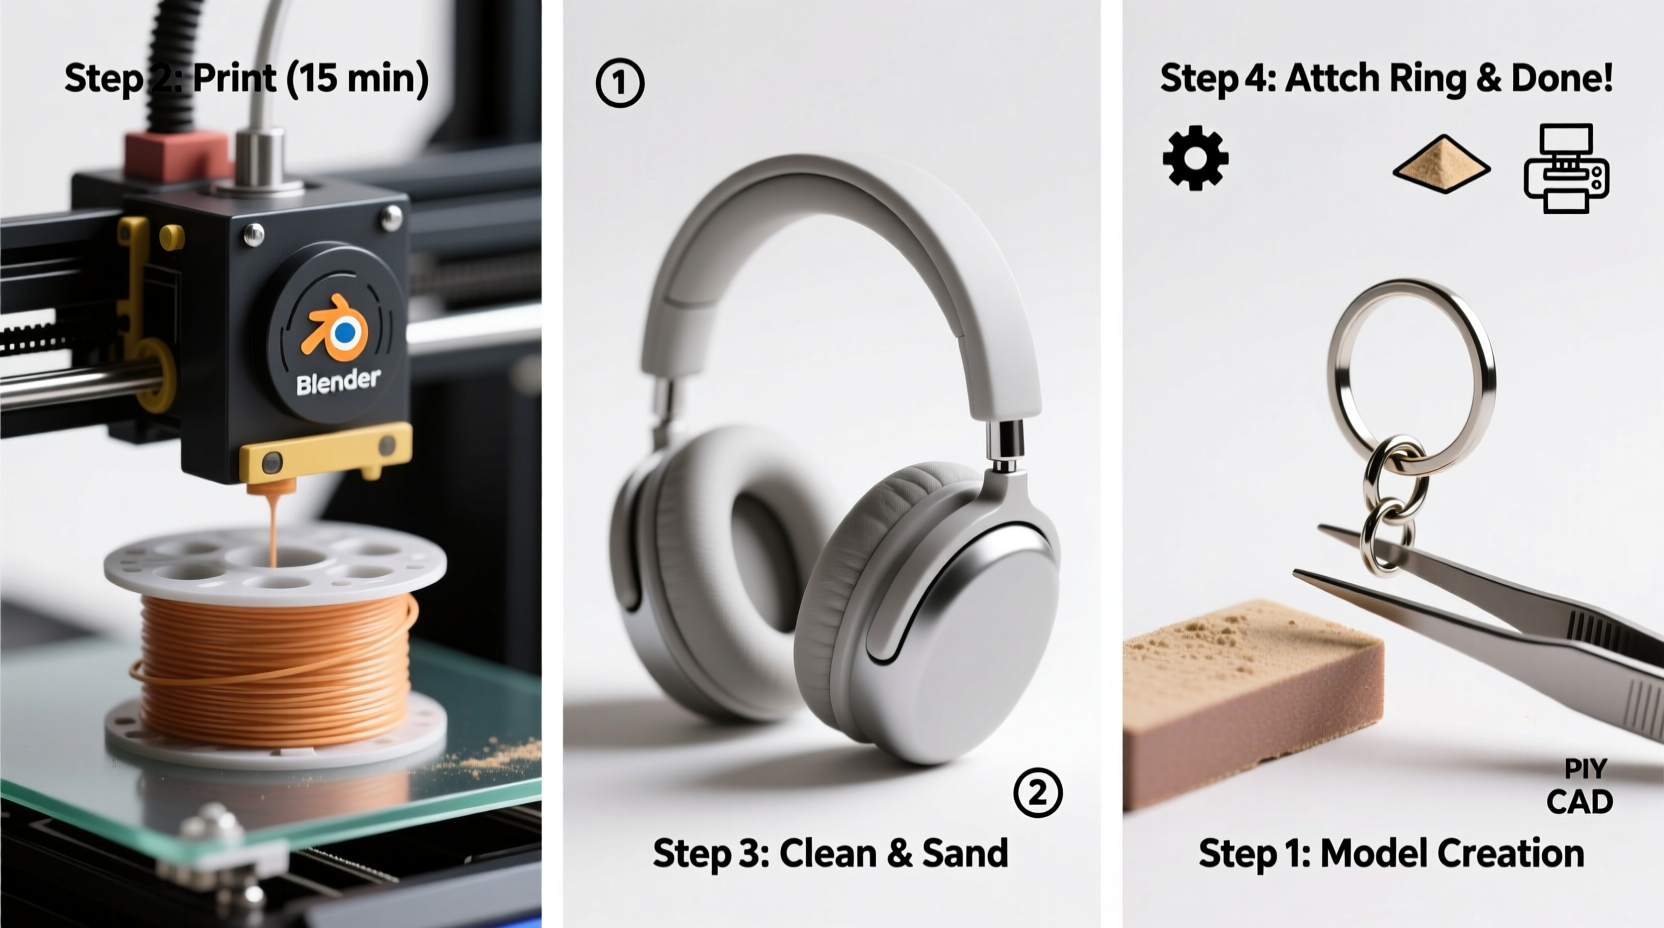
Step-by-Step Construction Process
Follow this detailed timeline to create your keychain from start to finish. This example uses the polymer clay method, ideal for beginners without access to advanced tools.
- Design & Scale: Measure real headphones or use reference images. Decide on final size—ideal dimensions are 1.5 inches wide and 0.75 inches tall.
- Condition the Clay: Knead the polymer clay until soft and pliable. Use separate colors for ear cups, headband, and accents.
- Shape the Ear Cups: Roll two identical oval bases. Press gently into a curved surface (like a spoon) to simulate cup depth. Add smaller circles for padding detail.
- Create the Headband: Roll a thin strip of clay and curve it gently between your fingers. Attach both ends to the ear cups, ensuring even spacing.
- Add Details: Use a needle tool to carve seams, branding, or texture lines. Embed tiny beads or foil for metallic accents.
- Bake According to Instructions: Place on a ceramic tile and bake at 265°F (129°C) for 15 minutes per ¼ inch thickness. Let cool completely.
- Sand & Polish: Lightly sand rough edges. Wipe clean and apply a glossy varnish for durability and shine.
- Attach Keyring: Drill a small hole in the top center of the headband or glue a metal loop securely using E6000.
Customization and Creative Variations
One of the joys of DIY crafting is personalization. Once you’ve mastered the basic structure, experiment with styles that reflect your personality or favorite audio gear.
- Color Themes: Match your favorite headphones (e.g., white with red accents for Beats, matte black for Sony).
- Glow-in-the-Dark: Mix phosphorescent powder into translucent clay or resin for nighttime visibility.
- Miniature Brand Logos: Print tiny decals on waterslide paper and apply post-baking.
- Soundwave Engraving: Use a fine blade to etch waveforms representing a favorite song.
“Handmade accessories gain emotional value when they reflect personal stories. A headphone keychain isn’t just functional—it’s a wearable memory.” — Lena Torres, Craft Designer & Educator
Troubleshooting Common Issues
Even simple projects can encounter hiccups. Here’s how to handle frequent beginner challenges:
| Issue | Root Cause | Solution |
|---|---|---|
| Asymmetrical ear cups | Uneven shaping or pressure | Use templates or trace shapes before molding |
| Cracks after baking | Clay too thick or uneven | Roll evenly; bake in stages if needed |
| Weak attachment to keyring | Insufficient glue or poor anchor point | Reinforce with wire loop embedded during construction |
| Dull finish | Lack of sealing | Apply 2 coats of high-gloss sealer |
Mini Case Study: Sarah’s First Keychain
Sarah, a college student and music enthusiast, wanted a unique gift for her roommate who loved vintage headphones. With no prior crafting experience, she chose polymer clay for its accessibility. After watching one tutorial and sketching a retro-style design, she spent two evenings shaping and refining her piece. Her first attempt had lopsided ear cups, but she remade them using a coin as a template. After baking and glazing, she added a tiny silver “AKG” decal. The finished keychain was praised at her dorm’s craft fair and inspired three friends to start their own projects.
Frequently Asked Questions
Can I make a keychain without a mold or 3D printer?
Absolutely. Polymer clay allows freehand sculpting with no molds required. You only need basic tools and patience to shape small details.
How durable is a handmade headphone keychain?
When properly baked and sealed, polymer clay keychains resist chipping and daily wear. Avoid dropping on hard surfaces or prolonged sun exposure to maximize lifespan.
Is resin safe for beginners to use?
Yes, with precautions. Work in a well-ventilated area, wear nitrile gloves, and follow mixing ratios precisely. Start with small batches to build confidence.
Final Checklist Before You Begin
- ☐ Choose your crafting method (clay, resin, or print)
- ☐ Gather all materials and tools
- ☐ Sketch a simple design with proportions
- ☐ Test clay consistency or resin mix on scrap material
- ☐ Protect your workspace with parchment paper or silicone mat
- ☐ Set aside 2–3 hours for uninterrupted work
Bring Your Vision to Life
Creating a DIY 3D headphone keychain is more than a craft—it's an exercise in precision, patience, and creative expression. Whether you're making one for yourself or as a thoughtful gift, the process builds skills transferable to other small-scale modeling projects. As you gain confidence, consider scaling up to larger audio-themed items like speaker replicas or stylized music player pendants.


 浙公网安备
33010002000092号
浙公网安备
33010002000092号 浙B2-20120091-4
Comments
No comments yet. Why don't you start the discussion?