
Creating your own dog leash from hemp is more than just a DIY project—it’s a sustainable choice that supports both durability and environmental responsibility. Hemp fiber is naturally resistant to mold, UV damage, and abrasion, making it ideal for outdoor pet gear. For beginners, the process may seem daunting at first, but with the right materials and methodical approach, anyone can craft a reliable, hand-made leash in under a few hours. This guide walks you through every stage, from selecting quality hemp cord to finishing with a secure clasp, ensuring your leash is safe, strong, and tailored to your dog’s needs.
Why Choose Hemp for a Dog Leash?
Hemp has been used for centuries in rope-making due to its tensile strength and resilience. Unlike synthetic fibers like nylon or polyester, hemp is biodegradable, chemical-free, and becomes softer with use without sacrificing integrity. When properly braided and finished, a hemp leash can withstand hundreds of pounds of pull—more than sufficient for most dogs.
Additionally, hemp is hypoallergenic and doesn’t retain odors as easily as synthetic materials. For environmentally conscious pet owners, choosing hemp reduces reliance on petroleum-based products and supports regenerative agriculture. As artisanal pet products grow in popularity, a handmade hemp leash also offers a unique, personalized touch that mass-produced items lack.
“Hemp is one of the strongest natural fibers available. When braided correctly, it rivals commercial leashes in durability while being far more sustainable.” — Dr. Lena Torres, Textile Engineer & Sustainable Materials Researcher
Materials and Tools You’ll Need
Before beginning, gather all necessary supplies. Using high-quality materials ensures longevity and safety. Below is a checklist of essentials:
- Hemp cord: 3mm or 4mm diameter, 100% natural hemp (avoid blends with synthetic binders)
- Length: 50 feet (for a standard 6-foot leash with extra for braiding and finishing)
- Spring snap hook: Zinc-coated or stainless steel, rated for at least 500 lbs
- Measuring tape or ruler
- Scissors or cord cutter
- Lighter or candle (for sealing ends)
- Masking tape or clips (to secure work)
- Work surface: Table with edge or clamp setup
Step-by-Step Construction Process
Follow this detailed sequence to create a three-strand twisted braid—a classic design known for strength and simplicity.
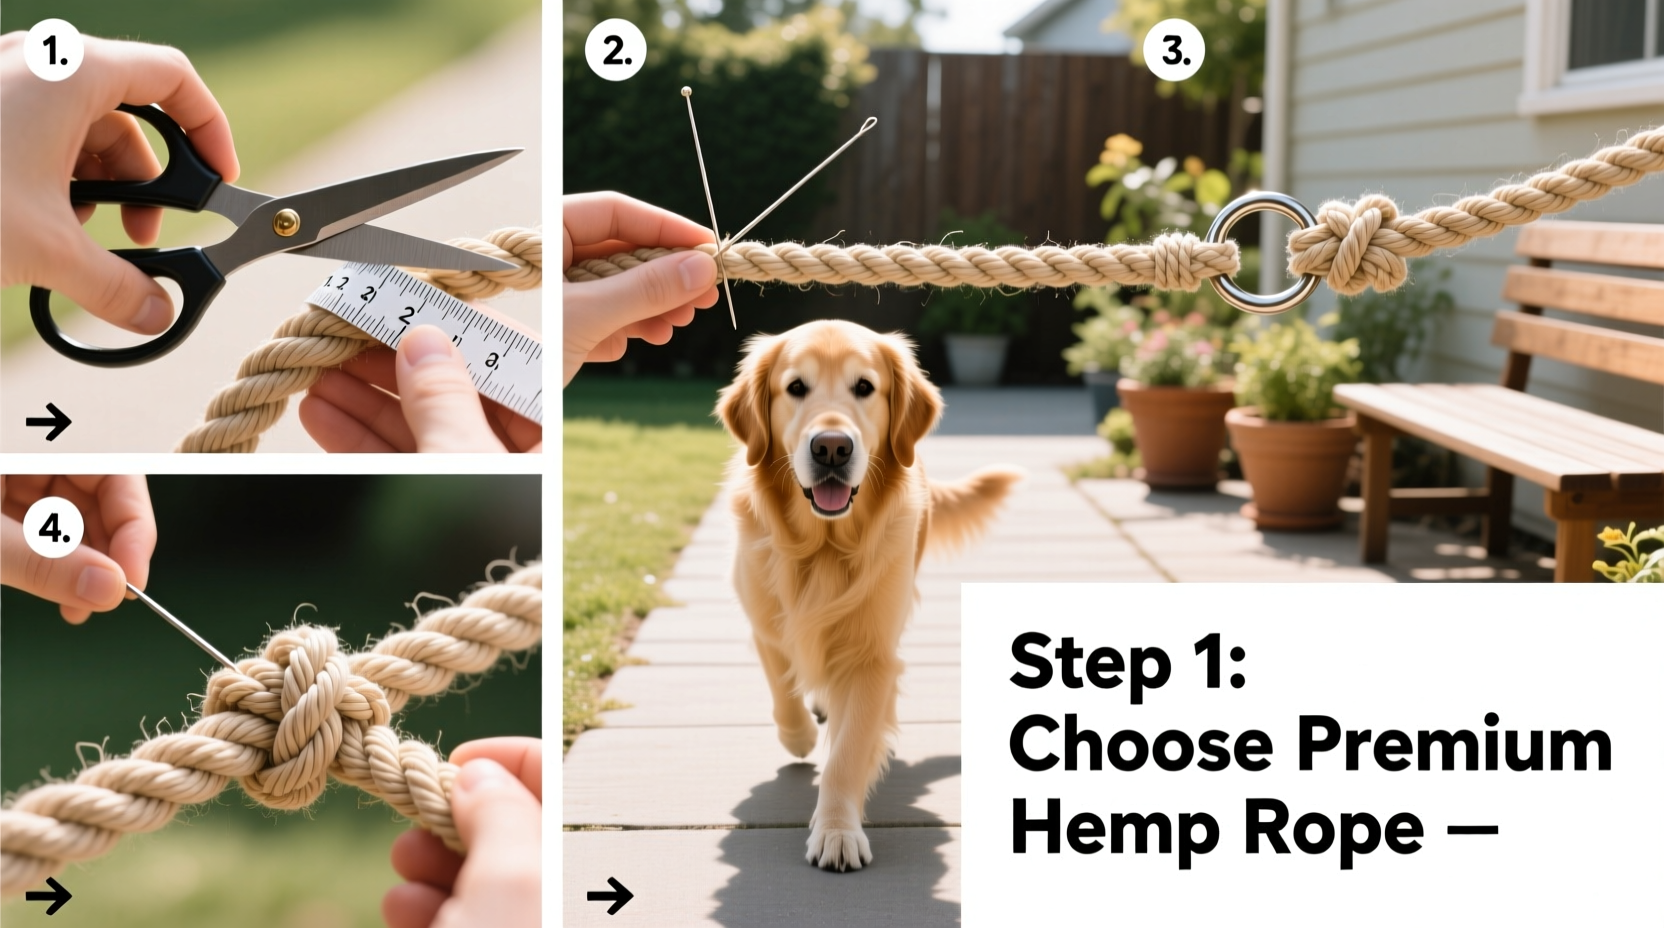
- Cut and prepare three equal strands: Measure three lengths of hemp cord, each 18 feet long. This allows for tapering, knots, and hardware attachment. Trim cleanly and immediately seal the cut ends with a lighter to prevent fraying.
- Anchor the strands: Tape the three ends together and secure them firmly to a table edge or door handle. Ensure the anchor point is stable and won’t shift during braiding.
- Begin the braid: Divide the cords into three separate strands. Hold one in each hand, with the third draped behind your work area. Begin a standard three-strand braid: cross the left strand over the center, then the right over the new center, repeating this pattern down the length.
- Maintain consistent tension: Pull gently after each crossover to keep the braid tight and even. Avoid twisting the strands individually—let the braid form naturally as you go.
- Braid to desired length: Continue braiding until the leash reaches approximately 5.5 feet. Reserve the final 6 inches for attaching the snap hook.
- Secure the end: Once complete, tie a tight overhand knot at the free end to prevent unraveling. Trim excess, leaving about an inch, and melt the tips slightly to fuse the fibers.
Attaching the Snap Hook
The connection between the braid and the metal hardware must be secure. Use a loop-and-glue method for maximum reliability.
- Fold the anchored end (the taped end) back on itself to form a 3-inch loop.
- Insert the snap hook into the loop.
- Wrap the loose ends tightly around the base of the loop for 1.5 inches.
- Apply a small amount of marine-grade epoxy or cyanoacrylate (super glue) to the wrapped section.
- Let dry completely (minimum 4 hours), then trim excess and seal ends.
Do’s and Don’ts of Hemp Leash Crafting
| Do’s | Don’ts |
|---|---|
| Use 100% natural hemp cord without synthetic fillers | Use poly-blend \"hemp-style\" ropes—they weaken faster |
| Seal all cut ends with heat to prevent fraying | Leave raw ends exposed; they will unravel quickly |
| Test the leash with gradual pressure before first use | Allow a puppy or aggressive puller to test it unsupervised |
| Store the leash in a dry, ventilated space | Leave it outdoors or in damp areas for long periods |
| Condition occasionally with natural hemp oil or beeswax | Use silicone sprays or petroleum-based conditioners |
Real-Life Example: Sarah’s First Hemp Leash
Sarah, a dog owner in Oregon, wanted a non-toxic alternative to her dog’s nylon leash, which had begun to irritate his skin. With no prior experience in rope work, she followed a similar guide to this one. She purchased organic hemp cord online and spent a Saturday afternoon braiding a 6-foot leash for her 45-pound Australian Shepherd mix. After applying epoxy to the snap hook joint and letting it cure overnight, she tested it in the backyard with light tugs and praise-based walking. Within a week, the leash had softened comfortably in her hands, and six months later, it shows minimal wear despite daily forest hikes. “It feels stronger than the store-bought ones,” she says, “and I love telling people I made it myself.”
Maintenance and Longevity Tips
A handmade hemp leash can last five years or more with proper care. Unlike synthetic leashes that degrade under UV exposure, hemp actually strengthens initially with moderate sun contact—but prolonged moisture is its main enemy.
- After each use: Wipe down with a dry cloth to remove dirt and moisture.
- Monthly: Condition with a thin coat of hemp seed oil or beeswax balm to maintain flexibility.
- If wet: Hang to air-dry completely away from direct heat sources.
- Inspect regularly: Check for weak spots, loose wraps, or corrosion on the metal hardware.
“Natural fiber leashes aren’t disposable—they’re investments. Treat them well, and they’ll serve you and your dog faithfully.” — Mark Delaney, Artisan Pet Gear Maker
Frequently Asked Questions
Can I make a leash for a large or strong dog using hemp?
Yes. A properly braided 4mm triple-strand hemp leash can support over 600 lbs of static load. For powerful breeds like Huskies or Boxers, consider a four-strand diamond braid or double-wrap attachment at the hardware for added reinforcement.
Is hemp better than nylon for dog leashes?
It depends on priorities. Nylon is lightweight and highly weather-resistant but derived from plastic and prone to fraying. Hemp is eco-friendly, stronger per fiber, and develops a comfortable patina over time. However, it requires more maintenance in wet climates.
How long does it take to make a hemp leash as a beginner?
Allow 2–3 hours for your first attempt, including drying time for adhesive. Most of the time is spent braiding, which becomes faster with practice. Subsequent leashes can be completed in under an hour.
Final Thoughts and Call to Action
Crafting a durable hemp dog leash is a rewarding introduction to sustainable pet ownership. It combines practicality with mindfulness, giving you control over materials, design, and safety. Every tug, walk, and adventure becomes a testament to thoughtful craftsmanship. Whether you’re making it for your own dog or as a gift, this project connects you to a growing movement of eco-conscious pet lovers who value quality over convenience.


 浙公网安备
33010002000092号
浙公网安备
33010002000092号 浙B2-20120091-4
Comments
No comments yet. Why don't you start the discussion?