
Crafting a handmade plush pillow isn’t just about creating something functional—it’s about weaving care, creativity, and comfort into every stitch. A soft plush cherry blossom flower pillow combines delicate beauty with cozy practicality, making it an ideal decorative accent for bedrooms, reading nooks, or gifts for loved ones. Inspired by the fleeting elegance of spring blossoms, this project uses accessible materials and beginner-friendly sewing techniques. Whether you're new to fabric crafts or looking for a mindful weekend activity, this guide walks you through each phase with precision and clarity.
Gathering Your Materials
The success of any craft begins with thoughtful preparation. For a cherry blossom flower pillow that feels soft to the touch and holds its shape over time, selecting the right supplies is essential. This project blends cotton fabrics for the petals, plush fleece for the center cushion, and lightweight stuffing for a gentle, huggable feel.
“Choosing high-quality, skin-safe fabrics ensures both durability and comfort—especially important when making items meant for daily use.” — Lila Nguyen, Textile Artist & Craft Educator
- Fabric: Pink cotton or felt (for petals), light green cotton (for leaves), and white or pale pink fleece (for base and backing)
- Fusible webbing or fabric glue (optional, for securing layers before sewing)
- Polyester fiberfill stuffing
- Embroidery floss (dark pink or red for stamens)
- Needle and thread (matching petal color), sewing machine (optional but recommended)
- Scissors, pins, fabric chalk or pencil
- Cardboard or paper for templates
Creating Petal and Leaf Templates
Consistency in petal shape gives your flower a natural yet polished look. Cherry blossoms typically have five rounded petals with a slight notch at the tip. To replicate this, create a reusable template from cardboard or thick paper.
- Draw a teardrop shape approximately 3 inches long and 1.5 inches wide at the base.
- Make a small indentation at the top tip to mimic the classic sakura silhouette.
- Cut out the shape carefully. Use this as a master template.
- Trace the template onto your pink fabric six times (five petals + one spare in case of error).
- For leaves, sketch a slender oval with a pointed end and a central vein line. Cut two leaf shapes from green fabric.
Arrange the cut pieces on a flat surface to visualize spacing before assembly. Overlapping petals slightly enhances dimensionality.
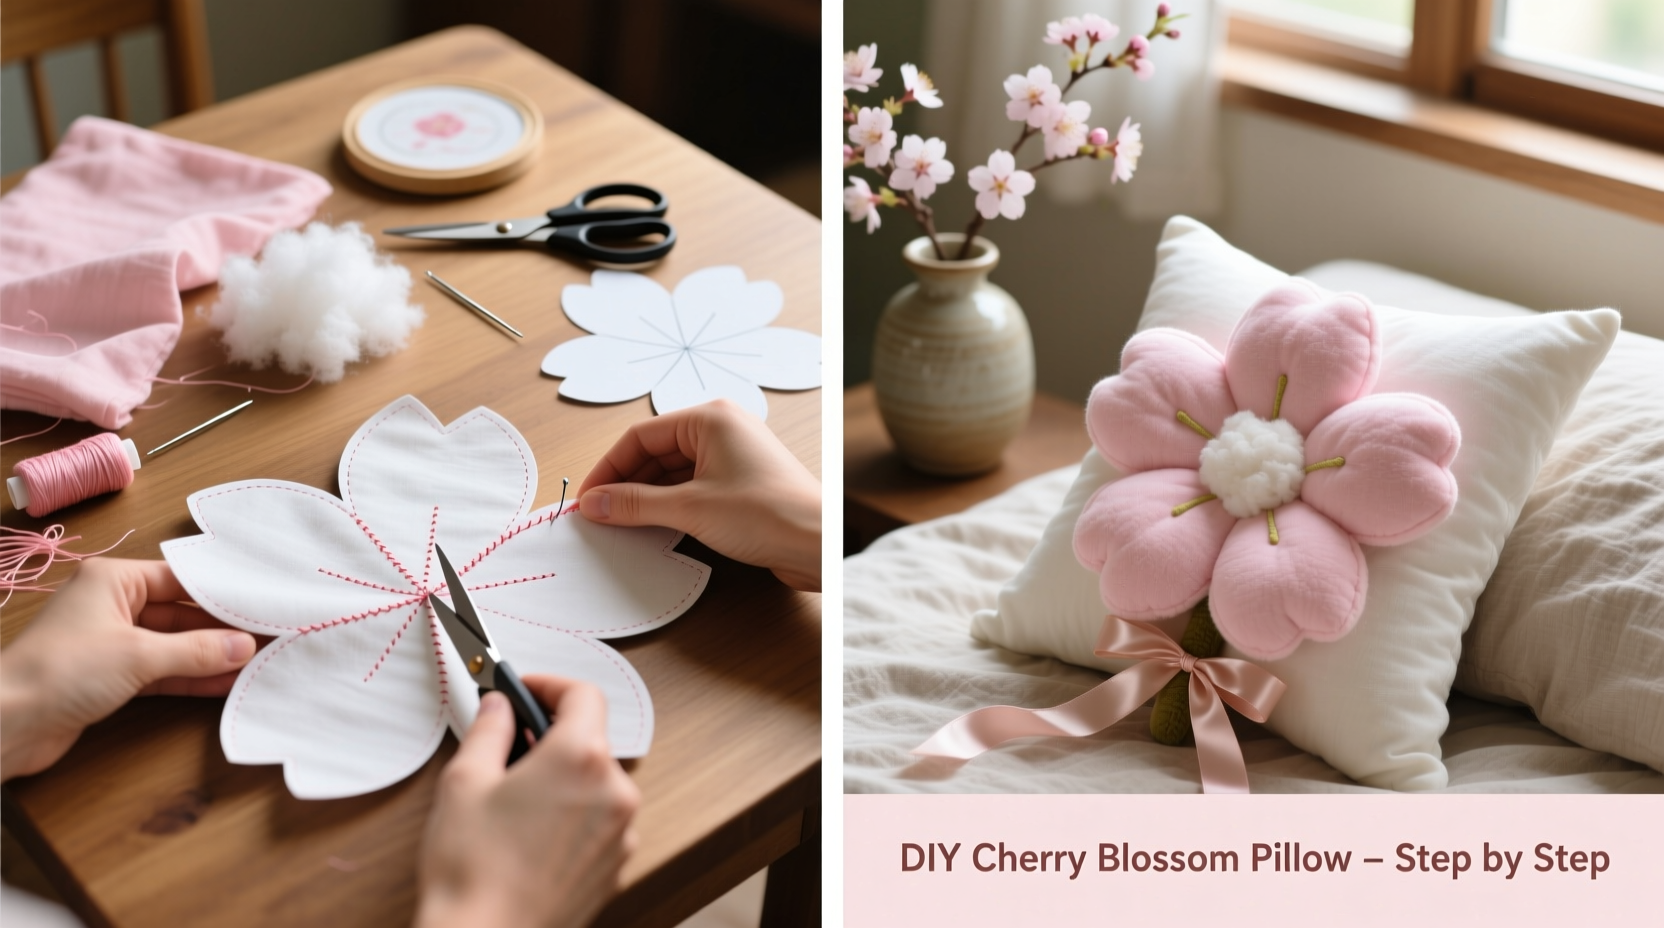
Assembling the Flower Pillow: Step-by-Step Guide
This stage transforms individual components into a cohesive, three-dimensional plush piece. Work slowly, pressing seams and aligning edges for a professional finish.
Step 1: Attach the Petals to the Base
Place the white fleece circle (about 8 inches in diameter) flat on your workspace. Arrange the five pink petals evenly around the edge, like slices of a pie, with their narrow ends meeting at the center. Pin each petal in place, ensuring the right sides face up. Sew along the inner edge of each petal using a straight or zigzag stitch to secure them to the base. Backstitch at start and end for durability.
Step 2: Add Embroidered Details
Using dark pink embroidery floss, add subtle stamen details in the center. A simple French knot cluster (3–5 knots) mimics the delicate filaments of real cherry blossoms. This step adds realism without complicating construction.
Step 3: Prepare the Backing
Cut a second fleece circle identical to the base. This will form the back of the pillow. If desired, embroider a name or date on this side before assembly for a personalized touch.
Step 4: Sew the Pillow Layers Together
Place the flower-side down and lay the backing on top, right side facing the flower base. Pin around the perimeter every 1–2 inches. Sew all the way around using a ½-inch seam allowance, leaving a 3-inch gap at the bottom for turning and stuffing. Use a consistent stitch length for even tension.
Step 5: Turn, Stuff, and Close
Clip curves gently (without cutting threads) to reduce bulk. Turn the pillow right-side out through the gap. Use a blunt tool like a chopstick to push out petal tips fully. Fill with polyester fiberfill until soft but firm—avoid overstuffing, which distorts the shape. Finally, hand-stitch the opening closed using a ladder stitch for an invisible finish.
Do’s and Don’ts: Fabric & Construction Tips
| Action | Do | Don’t |
|---|---|---|
| Cutting fabric | Use sharp fabric scissors and cut on a flat surface | Use kitchen shears that may be dull or contaminated |
| Sewing seams | Backstitch at beginning and end | Forget to reinforce stress points |
| Stuffing the pillow | Add filling gradually, focusing on corners first | Overpack, which strains seams |
| Washing | Spot clean with mild detergent; air dry | Machine wash unless fabric is pre-tested |
| Decorative touches | Use fabric-safe markers or embroidery | Apply glue that hardens or cracks |
Real Example: A Gift That Blossomed Into a Tradition
When Sarah Chen made her first cherry blossom pillow for her daughter’s eighth birthday, she didn’t expect it to become a family ritual. The child hugged it every night, naming it “Sakura.” Inspired, Sarah began crafting a new blossom-themed item each spring—pillows, hair clips, even a quilt. Two years later, she taught a local craft class using the same method outlined here. Her students appreciated the balance of simplicity and sentiment, proving that even modest projects can carry deep emotional resonance.
This story illustrates how a single handmade object can evolve into a meaningful tradition—rooted in attention to detail and shared affection.
Frequently Asked Questions
Can I make this pillow without a sewing machine?
Yes. While a machine speeds up the process, all steps can be completed by hand using a backstitch for seams and a ladder stitch for closing. Use a thimble to push the needle through multiple layers safely.
How do I care for the finished pillow?
Avoid submerging it in water. Instead, spot-clean stains with a damp cloth and mild soap. Let it air-dry away from direct sunlight to preserve color. Store in a breathable cotton bag when not in use.
Is this project suitable for children?
With supervision, older children (ages 10+) can participate, especially in tracing, stuffing, and simple embroidery. Use safety scissors and pre-cut templates to minimize risk. Consider fabric glue alternatives for no-sew versions.
Final Checklist Before You Begin
- ✅ Gather all fabrics, stuffing, and tools
- ✅ Wash and dry fabrics if needed
- ✅ Create and test petal/leaf templates
- ✅ Choose thread colors that match or contrast tastefully
- ✅ Set aside 2–3 hours for uninterrupted crafting
- ✅ Have a plan for storing leftovers (extra fabric makes great patches or bookmarks)
Bring Beauty Into Everyday Spaces
A handmade cherry blossom pillow is more than a decoration—it’s a quiet celebration of craftsmanship and seasonal beauty. Unlike mass-produced decor, it carries the imprint of your time, intention, and care. Each petal stitched, each knot tied, becomes part of a personal narrative. Whether placed on a couch, gifted to a friend, or used as a calming sensory object, this plush creation brings softness into the world—both physically and emotionally.


 浙公网安备
33010002000092号
浙公网安备
33010002000092号 浙B2-20120091-4
Comments
No comments yet. Why don't you start the discussion?