
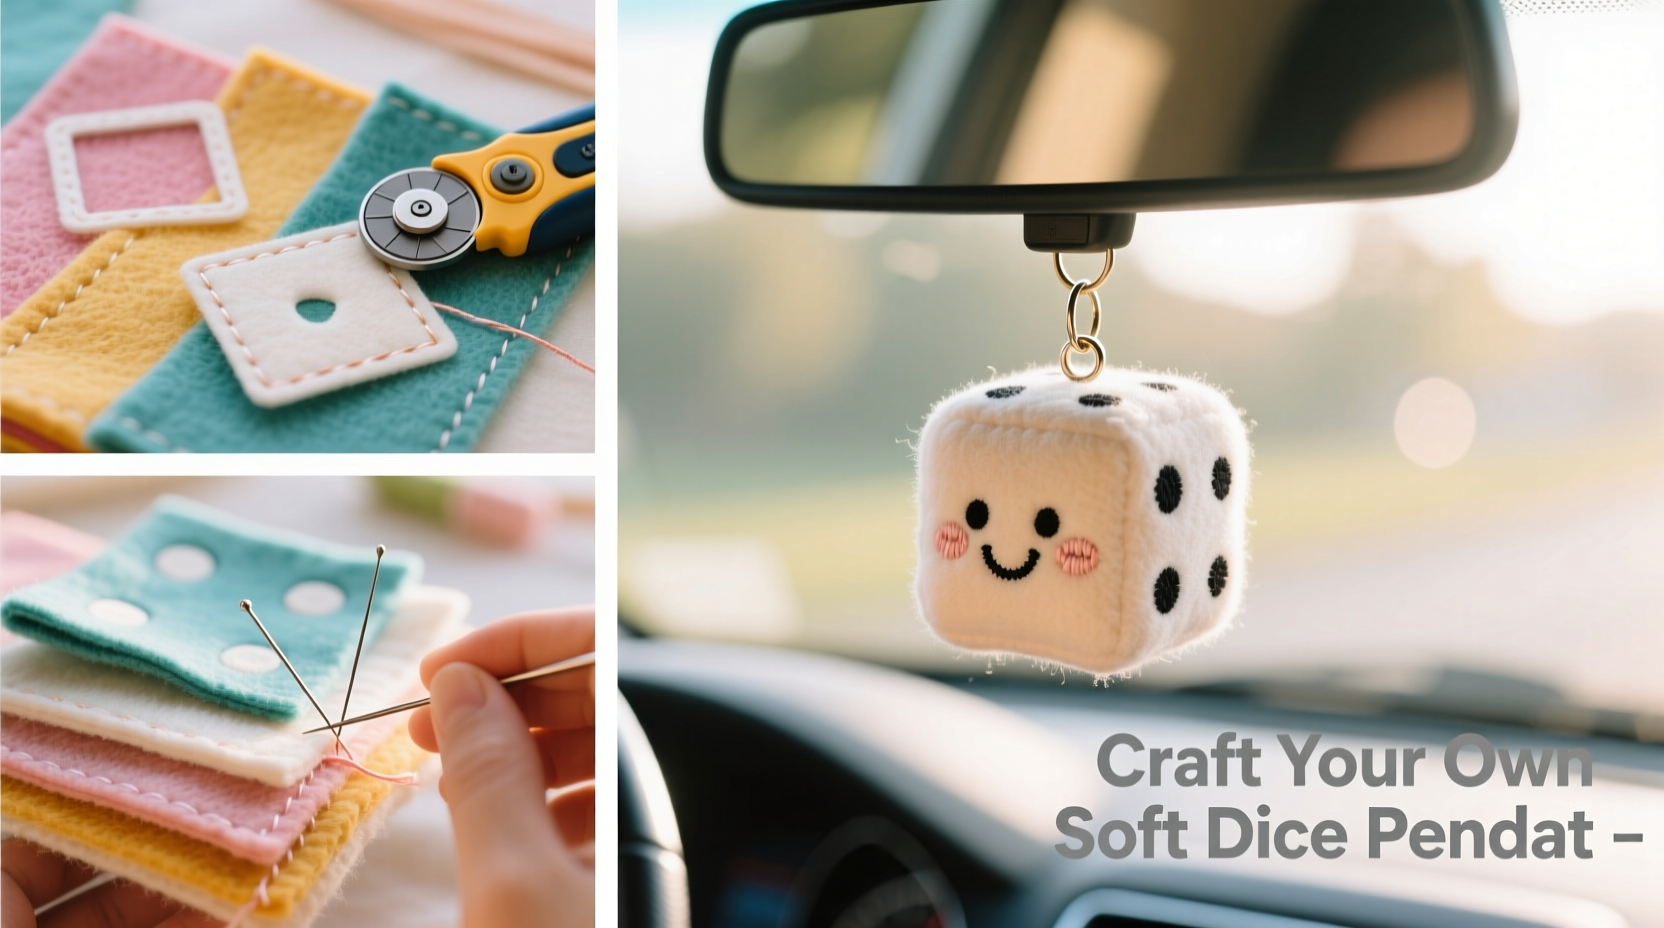
In an era where personal expression extends beyond clothing and into everyday accessories, customizing your vehicle’s interior offers a unique opportunity to showcase individuality. One charming and increasingly popular option is the soft plush dice car pendant—a nostalgic nod to classic automotive culture, reimagined with modern craft techniques. Unlike mass-produced versions, handmade plush dice allow you to control colors, textures, and details, resulting in a one-of-a-kind accessory that reflects your personality. This guide walks you through every stage of creating your own plush dice pendant from scratch, offering practical advice, expert insights, and design inspiration to ensure both durability and aesthetic appeal.
Gathering Materials and Tools
The foundation of any successful craft project lies in preparation. Before stitching begins, assemble all necessary materials and tools. Selecting high-quality components ensures the final product is not only visually appealing but also long-lasting, especially in the fluctuating temperatures of a vehicle interior.
- Fabric: Choose a soft, durable fabric such as minky, fleece, or cotton blend. These materials are easy to sew and retain shape well.
- Embroidery floss or small beads: For dot detailing on the dice faces.
- Polyester fiberfill: Provides a plump, cushioned texture.
- Needle and thread (or sewing machine): Hand-sewing works well for beginners; machines speed up repetitive seams.
- Scissors, pins, and fabric chalk: Essential for precise cutting and marking.
- Keyring or metal loop: Used for hanging the pendant from the rearview mirror.
- Ruler and cardboard template: Ensures uniform cube dimensions.
Design Planning and Customization Options
While traditional dice feature white faces with black dots, your plush version can reflect personal taste. Consider color schemes that match your car’s interior or favorite sports team. Some crafters opt for metallic threads, glow-in-the-dark fabric, or even miniature charms attached to the corner of each die.
Think about scale. A standard plush dice pendant measures between 1.5 to 2 inches per side—large enough to see clearly but small enough to avoid obstructing vision. You can make a single die or pair them together, connected by a short ribbon or chain-style fabric strip.
“Custom textiles in automotive spaces create emotional connection. When drivers personalize their interiors, they report higher satisfaction and mindfulness while driving.” — Dr. Lena Torres, Behavioral Designer at AutoLifestyle Lab
Material Comparison Table
| Material | Pros | Cons |
|---|---|---|
| Minky Fabric | Ultra-soft, excellent drape, holds shape | Can be slippery to cut; requires sharp scissors |
| Fleece | Warm, affordable, easy to sew | Limited color variety; pills over time |
| Cotton Blend | Breathable, crisp finish, great for embroidery | Less plush; may wrinkle under heat |
| Faux Fur | Luxurious look, stands out visually | Challenging to sew evenly; harder to clean |
Step-by-Step Construction Process
Creating a perfect cube requires precision in cutting and sewing. Follow this detailed sequence to assemble your plush dice accurately and securely.
- Create a Template: Cut a square of cardboard measuring 2 inches per side. Use this to trace six identical squares onto your chosen fabric (remember to add ¼ inch seam allowance around each edge).
- Cut Fabric Pieces: Carefully cut out the six squares using fabric scissors. Label one piece as the “top” to maintain orientation during assembly.
- Mark Dot Positions: On three pieces (opposite faces), use fabric chalk to mark circle positions corresponding to die values: one dot in center (for 1), two diagonal pairs (for 2 and 5), and opposing corners plus center (for 6).
- Attach Dots: Sew black embroidery floss circles or glue small felt dots onto designated areas. Allow adhesive to dry completely if used.
- Sew Sides Together: Place two fabric squares right sides facing, pin edges, and stitch three sides closed using a straight stitch. Repeat until five sides are joined into a box-like structure.
- Add the Final Panel: Attach the sixth face, leaving a 2-inch gap for turning and stuffing.
- Turn and Stuff: Flip the cube right-side out through the opening. Use a blunt tool like a chopstick to push out corners gently. Fill with fiberfill until firm but not overstuffed.
- Close Seam: Fold in the raw edges and hand-stitch the opening closed using a ladder stitch for invisibility.
- Attach Hanging Loop: Securely sew a metal keyring or braided thread loop to the top face’s center seam.
Real-Life Example: Sarah’s Retro-Inspired Build
Sarah, a graphic designer from Portland, wanted a playful yet elegant touch for her vintage Volkswagen Beetle. She selected navy blue minky fabric with gold-threaded dots to complement the car’s cream-colored interior. Instead of standard numbering, she embroidered tiny stars on each face, transforming the traditional dice into celestial-themed pendants. After assembling the cubes, she added a thin satin ribbon between them, allowing gentle movement without tangling. Her creation became a conversation starter at local car meets, with several attendees requesting tutorials. By documenting her process online, Sarah discovered a community of craft-focused car enthusiasts eager to blend nostalgia with handmade artistry.
Care and Longevity Tips
Although plush dice are decorative, they still require occasional maintenance. Dust accumulates quickly on textured surfaces, particularly in vehicles exposed to open windows or desert climates.
- Spot clean with a damp microfiber cloth and mild detergent.
- Avoid machine washing unless the stuffing is sealed in a waterproof liner.
- Store indoors during extreme weather to prevent UV fading or moisture damage.
- Inspect stitching monthly, especially near the hanging point.
Dos and Don’ts Checklist
| Dos | Don’ts |
|---|---|
| Use colorfast fabrics to prevent bleeding | Expose to direct sunlight for prolonged periods |
| Double-knot thread when attaching the hanger | Overstuff the cube, causing bulging seams |
| Test embroidery tension on scrap fabric first | Use glue excessively—it can stiffen fabric |
Frequently Asked Questions
Can I wash my plush dice pendant?
Yes, but only with caution. Hand-wipe dirty areas with a damp cloth. If deeper cleaning is needed, remove any glued elements and spot-clean gently. Never submerge unless the stuffing is protected, as wet fiberfill clumps and loses loft.
How do I make the dots look professional?
For clean, consistent dots, use a circular stencil or trace around a small coin. Embroider using a tight satin stitch or French knots. Alternatively, cut tiny felt circles and apply with fabric glue designed for synthetics.
Is it safe to hang a plush dice from the rearview mirror?
In most regions, small, lightweight pendants like plush dice are permitted as long as they don’t obstruct the driver’s view. Ensure the total length from mirror to bottom of dice does not exceed 4 inches. Always check local traffic regulations to remain compliant.
Final Thoughts and Creative Encouragement
Crafting a soft plush dice car pendant bridges the gap between nostalgia and self-expression. More than just a decoration, it becomes a tactile signature of your style—something no store-bought accessory can replicate. The process teaches patience, attention to detail, and the joy of making something functional by hand. Whether you're new to sewing or an experienced crafter, this project offers immediate gratification and lasting charm.


 浙公网安备
33010002000092号
浙公网安备
33010002000092号 浙B2-20120091-4
Comments
No comments yet. Why don't you start the discussion?