
Handmade accessories carry a personal charm that mass-produced items often lack. Among the most whimsical and nature-inspired designs is the mushroom keychain pendant—a small but expressive piece that blends craft, artistry, and a touch of forest magic. Whether you're drawn to the aesthetic of fairy gardens, enchanted forests, or simply love handmade jewelry, creating your own mushroom keychain offers both creative satisfaction and functional beauty. This guide walks through every stage of crafting a one-of-a-kind mushroom pendant using simple tools and materials readily available at craft stores or online.
Selecting Your Materials and Tools
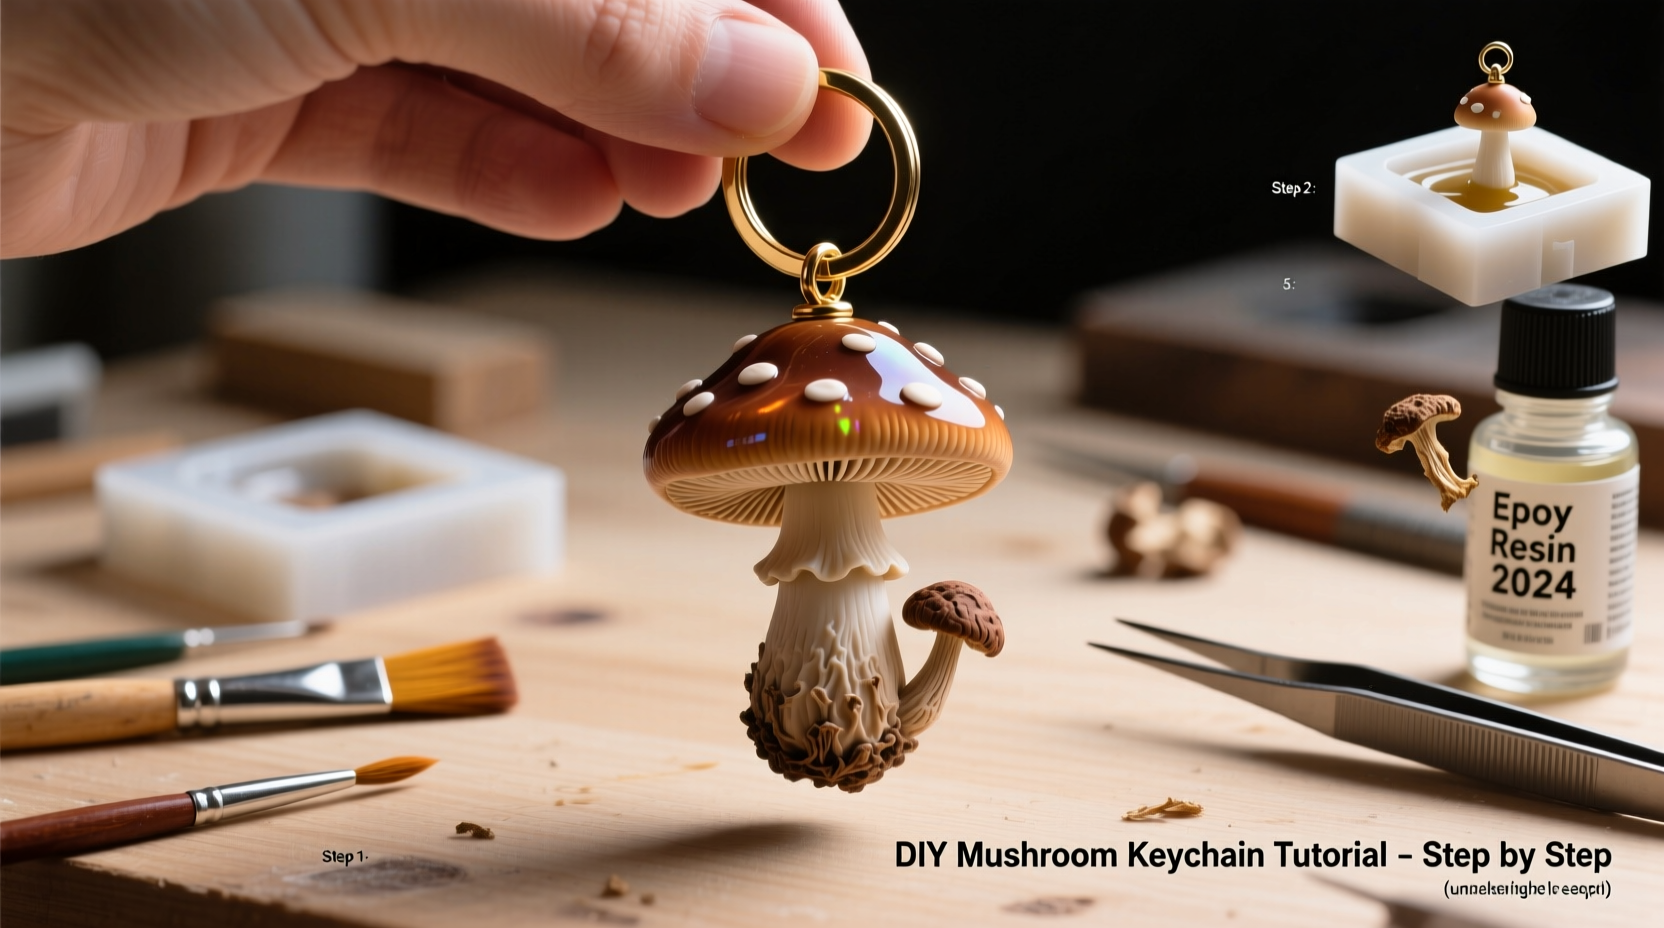
The foundation of any successful DIY project lies in thoughtful material selection. For a mushroom keychain, durability, texture, and visual appeal are essential. While many approaches exist—resin casting, polymer clay sculpting, felt stitching—the most versatile and beginner-friendly method uses polymer clay. It's pliable, bakes hard, and holds fine details beautifully.
Here’s what you’ll need:
- Polymer clay (two colors: red or pink for cap, white or cream for stem)
- Clay roller or acrylic bottle (for flattening clay)
- Blade or craft knife
- Baking tray lined with parchment paper
- Oven (for curing)
- Small paintbrush and acrylic paints (optional, for detailing)
- Clear varnish or resin sealer
- Keyring or split ring
- Jump ring (small metal connector)
- Needle or thin skewer (for drilling hole)
Sculpting the Mushroom Cap and Stem
Begin with the cap. Roll a small ball of colored clay (traditionally red with white dots) and flatten it gently into a dome shape. Aim for about 1.5 inches in diameter. Use your fingertip to create a smooth curve from center to edge. Let the base remain slightly thicker than the rim for structural strength.
Next, form the stem. Take a smaller portion of white clay and roll it into a short cylinder, approximately half an inch tall and just under an inch wide. Gently press it into the underside center of the cap. Blend the seam subtly with your finger or a sculpting tool to avoid sharp edges.
For authenticity, consider adding gills on the underside of the cap. Using a needle or blade, make shallow radial lines extending from the center outward. Not all mushroom species have visible gills, so this step is optional based on your design preference.
“Nature doesn’t repeat itself exactly—that’s why imperfections in handmade pieces add soul.” — Lila Chen, Botanical Jewelry Artist
Adding Personal Details and Character
This is where your pendant becomes truly unique. Many crafters opt for classic red-and-white fly agaric styling, but feel free to experiment. Try a blue-violet cap with silver speckles, or a more realistic brown bolete with textured pores. You can even incorporate tiny leaves, moss imprints, or fairy doors carved into the stem.
To create spots on the cap:
- Cut tiny balls from white clay.
- Flatten each slightly and press them onto the cured or uncured cap surface.
- Smooth the edges gently so they adhere well after baking.
If painting after baking, use acrylics to enhance depth—darken gill lines, add shading under the cap, or highlight the stem with subtle gradients. Seal all painted areas with a non-yellowing clear varnish to protect the finish.
Design Variations at a Glance
| Style | Color Palette | Special Features |
|---|---|---|
| Fairy Tale | Red cap, white dots, cream stem | Rounded shape, exaggerated size |
| Realistic Forager | Brown, tan, olive green | Gills/pores, earthy textures |
| Whimsical Fantasy | Purple, teal, iridescent | Glitter, embedded stones, glow-in-the-dark clay |
| Minimalist | Monochrome (black/white) | Clean lines, geometric cap |
Baking and Finishing Your Pendant
Before baking, ensure your piece is fully assembled and any attachment holes are made. Use a needle or thin skewer to pierce a small hole near the top edge of the cap or through the base of the stem—this will later hold the jump ring. Do this while the clay is still soft to avoid breakage.
Preheat your oven according to the clay manufacturer’s instructions (typically 265–275°F / 130–135°C). Place the mushroom on a parchment-lined tray, cap-side up, to preserve its shape. Bake for 15–30 minutes depending on thickness—thicker stems may require longer curing. Avoid overheating, as it can cause discoloration or brittleness.
After cooling completely, lightly sand any rough areas with fine-grit sandpaper (600+ grit). Wipe clean with a dry cloth. Apply 1–2 coats of glossy varnish or resin sealer using a small brush. This enhances durability and gives the cap a dewy, lifelike sheen.
Mini Case Study: Emma’s Forest-Inspired Gift Line
Emma Rodriguez, a hobbyist crafter from Oregon, began making mushroom pendants as gifts for hiking friends. Inspired by Pacific Northwest fungi, she used earth-toned clays and added tiny pressed fern fragments around the base. After sharing her work online, she received requests for custom orders. Within six months, she launched a small Etsy shop specializing in nature-themed keychains. Her secret? “I stopped trying to make perfect mushrooms,” she says. “Now I embrace lopsided caps and uneven spots—they look more real, more alive.”
Assembly and Final Touches
Once sealed and dry, attach the hardware. Open a jump ring using pliers (gently twist sideways, don’t pull apart), slide it through the baked hole, then hook on the keyring. Close the jump ring securely. Test the connection by giving it a light tug—nothing should wobble loose.
For extra flair, consider adding:
- A miniature charm (like a tiny acorn or bird)
- A leather cord instead of metal rings
- A handwritten tag describing the mushroom type (real or fictional)
Dos and Don’ts of Polymer Clay Keychains
| Do | Don't |
|---|---|
| Condition clay before sculpting | Use food utensils reserved for crafts only |
| Bake on parchment paper or ceramic tile | Expose finished pieces to prolonged sunlight |
| Seal with UV-resistant varnish | Wash in dishwashers or submerge frequently |
| Store in a soft pouch when not in use | Drill holes after baking without proper tools |
Frequently Asked Questions
Can I make these without an oven?
Some air-dry clays work for this project, though they tend to be less durable and more prone to chipping. If avoiding an oven, choose a high-quality air-dry clay and seal thoroughly. Note that drying times vary (usually 24–72 hours).
How long do handmade mushroom pendants last?
With proper sealing and care, polymer clay pendants can last years. Avoid dropping on hard surfaces and keep away from moisture and heat. Reapply varnish every 6–12 months if signs of wear appear.
Are these safe for children to handle?
Once fully baked and sealed, polymer clay is non-toxic and safe to touch. However, small parts like jump rings pose choking hazards for young children. These are best suited as adult accessories or supervised craft projects.
Conclusion: Bring Nature’s Whimsy Into Everyday Life
Crafting a DIY mushroom keychain isn’t just about making a functional item—it’s about capturing a moment of wonder, a memory of a forest walk, or a spark of imaginative play. Each piece reflects your attention to detail, your connection to natural forms, and your willingness to create something meaningful by hand. With patience and creativity, even first-time crafters can produce a pendant that sparks joy every time keys jingle.


 浙公网安备
33010002000092号
浙公网安备
33010002000092号 浙B2-20120091-4
Comments
No comments yet. Why don't you start the discussion?