
Concrete may not be the first material that comes to mind when thinking about pet accessories, but it’s surprisingly ideal for creating long-lasting, aesthetically pleasing dog bowls. When properly mixed, molded, and sealed, concrete offers durability that rivals ceramic or stainless steel—without the risk of chipping or rusting. With a bit of creativity, you can design a custom bowl that complements your home décor while providing a safe feeding solution for your dog. This guide walks you through every stage of making a concrete dog bowl from scratch, ensuring safety, functionality, and style.
Why Choose Concrete for Dog Bowls?
Concrete is often associated with construction, but its adaptability makes it suitable for artisanal home projects. When used in small-scale applications like pet bowls, high-quality concrete mixtures can yield smooth, food-safe surfaces after proper sealing. Unlike plastic bowls that degrade over time or metal ones that clang loudly, concrete provides weight and stability—preventing dogs from pushing their bowls across the floor during meals.
Additionally, concrete allows for full customization. You can control the size, shape, color, and texture of the bowl. Whether you prefer a minimalist matte finish or a bold geometric pattern, the final product reflects your personal taste and your pet’s needs.
Materials and Tools You’ll Need
Before starting, gather all necessary supplies. Using the right materials ensures both safety and longevity of the finished bowl.
- Portland cement (Type I or II)
- Fine sand (for smoother finish)
- Fiber reinforcement (optional, for added strength)
- Latex additive (improves flexibility and adhesion)
- Two plastic containers (one larger, one smaller—to act as mold and core form)
- Mixing bucket and trowel
- Measuring tools (scale or cups)
- Non-stick cooking spray or mold release agent
- Sanding block (120–400 grit)
- Food-grade epoxy or polyurethane sealer
- Gloves, mask, and safety goggles
“Concrete petware combines industrial strength with artistic potential. The key is proper curing and sealing.” — Dr. Lena Torres, Material Scientist & Pet Product Designer
Step-by-Step Construction Process
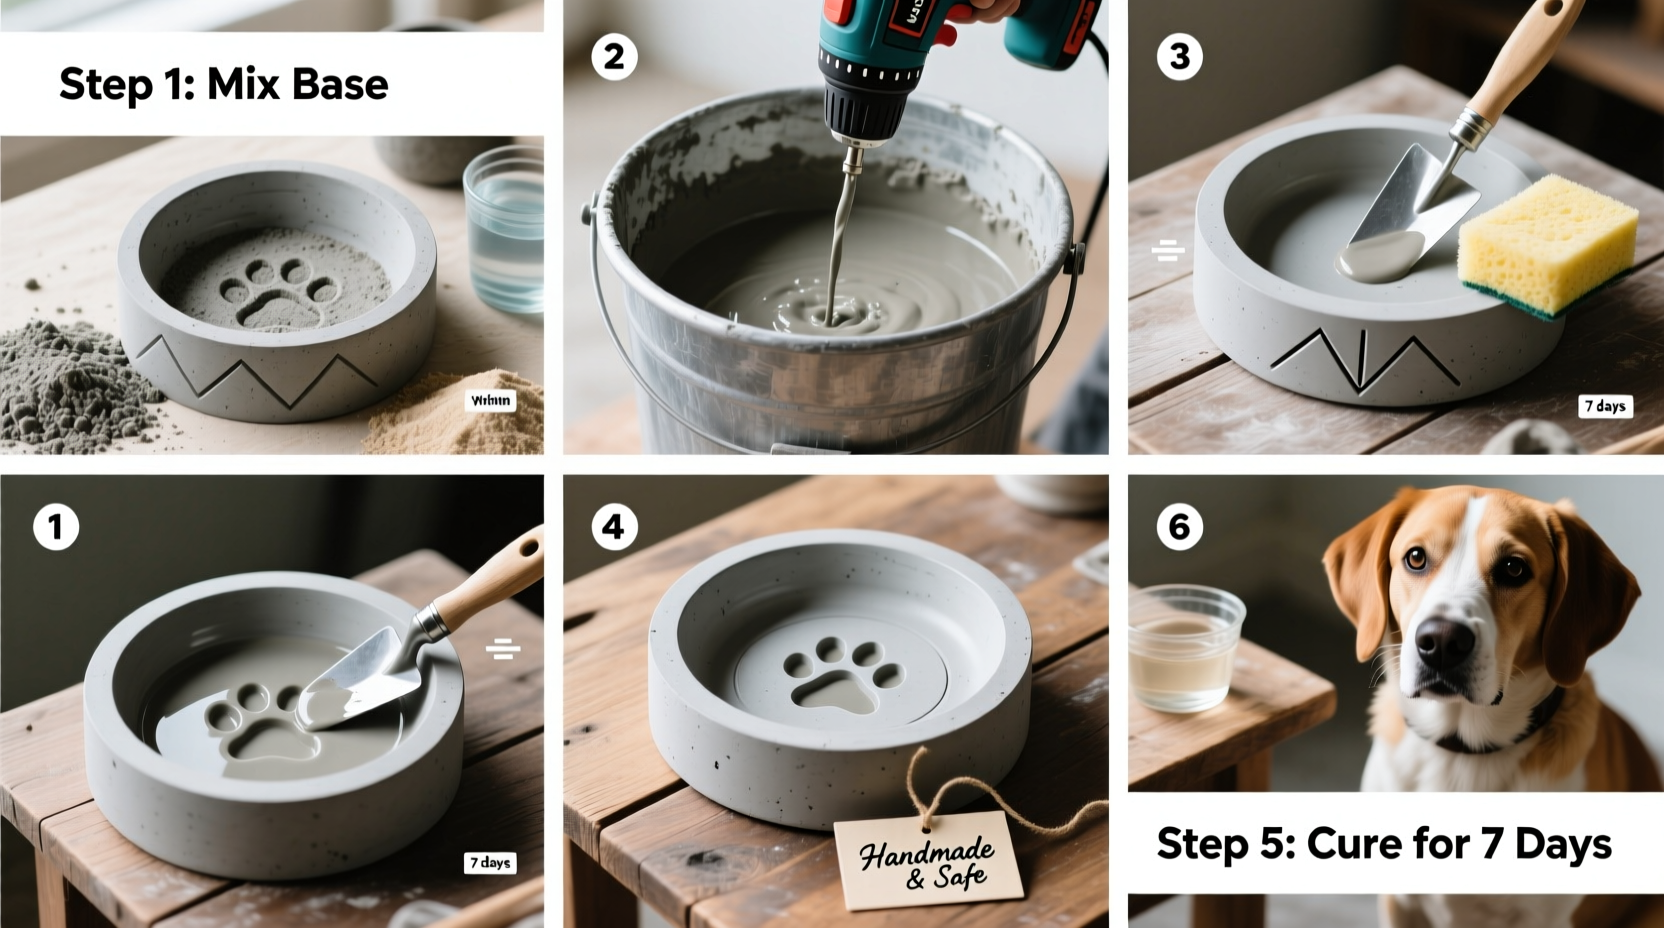
Follow this timeline to create a functional, attractive concrete dog bowl in about 7 days, including drying and curing phases.
- Day 1: Prepare the Mold
Create a two-part mold using nested plastic containers. The outer container forms the bowl’s exterior; the inner one shapes the cavity. Spray both with non-stick agent. Ensure the inner container floats securely without touching the bottom—use small spacers like pebbles or bottle caps if needed. - Day 1: Mix the Concrete
Use a 3:1 ratio of fine sand to Portland cement. For enhanced durability, replace 5–10% of the volume with fiber reinforcement. Add water gradually until the mixture reaches a peanut butter-like consistency. Incorporate a latex additive (per manufacturer instructions) to reduce cracking and improve workability. - Day 1: Pour and Vibrate
Pour the mix into the outer mold, filling halfway. Insert the inner mold carefully, pressing down slightly so it displaces an even layer of concrete around and beneath it. Tap the sides gently or use a vibrating tool (like an electric sander held against the mold) to release air bubbles. - Day 1–3: Initial Cure
Cover the mold with plastic wrap to retain moisture. Let cure undisturbed for 48 hours at room temperature. After 48 hours, remove the inner mold, then wait another 24 hours before extracting the outer mold. - Day 4: Demold and Inspect
Remove the hardened bowl. Check for cracks or weak spots. If present, minor flaws can be patched with a thin slurry of cement and water, then smoothed with a trowel. - Day 4–7: Wet Cure
Place the bowl in a tray of shallow water or mist it twice daily. Keeping concrete moist during early curing prevents shrinkage cracks and strengthens the final product. Continue for at least 7 days total from initial pour. - Day 8: Sand and Smooth
Begin sanding with 120-grit paper to remove rough edges and imperfections. Progress to 220, then 400-grit for a polished surface. Wipe clean with a damp cloth between stages. - Day 9: Seal Thoroughly
Apply two to three coats of food-safe epoxy sealer, allowing full drying time between layers (usually 24 hours). Ensure complete coverage inside and out, especially near the rim where moisture exposure is highest.
Design Considerations and Customization Options
One of the greatest advantages of DIY concrete bowls is the ability to tailor them precisely. Consider these design elements:
- Size: Match the bowl diameter to your dog’s breed. Small breeds need 4–6 inch bowls; large dogs benefit from 8–10 inch diameters.
- Depth: Shallow bowls (1.5–2 inches) suit flat-faced dogs; deeper bowls (3+ inches) prevent splashing for enthusiastic eaters.
- Color: Use mineral oxide pigments during mixing for consistent tones. Avoid organic dyes, which may leach over time.
- Base Design: Add rubber feet or felt pads to the bottom to protect floors and reduce noise.
| Feature | Do | Don’t |
|---|---|---|
| Mix Consistency | Aim for thick paste, holds shape | Don’t make it soupy or crumbly |
| Curing Environment | Keep moist and room temp | Don’t expose to drafts or sun |
| Sealing | Use certified food-safe sealant | Never skip sealing or use regular varnish |
| Finishing | Sand progressively finer | Don’t leave sharp edges |
Real-World Example: A Boston Terrier Owner’s Experience
Sarah M., a homeowner in Portland, wanted a modern-looking dog bowl that wouldn’t slide when her Boston terrier, Milo, ate. She followed this method using gray concrete with a hint of black oxide pigment. After seven days of curing and triple-coating with a food-safe epoxy, she added silicone bumpers to the base. Two years later, the bowl remains crack-free and easy to clean. “It looks like something from a design store,” she said. “And Milo can’t flip it anymore.” Her only adjustment? She now adds a removable stainless steel insert for easier washing, placing it inside the concrete shell—a hybrid solution gaining popularity among DIY pet owners.
Frequently Asked Questions
Is concrete safe for dog food and water?
Yes, provided the bowl is fully sealed with a non-toxic, food-grade epoxy. Unsealed concrete is porous and can harbor bacteria or leach lime into liquids. Once properly sealed, it becomes inert and safe for repeated contact with food and water.
How do I clean a concrete dog bowl?
Wipe with a damp cloth daily. For deeper cleaning, remove any liner (if used) and wash the interior with mild soap and water. Avoid soaking the bowl or placing it in a dishwasher, as prolonged water exposure can compromise the seal over time.
Can I make a two-bowl stand?
Absolutely. Extend the mold design to accommodate two cavities side by side. Use a larger rectangular outer mold and two identical inner containers spaced evenly. Reinforce with rebar or mesh if creating a wide span. This creates a cohesive feeding station with matching aesthetic appeal.
Final Checklist Before Use
- Confirm full 7-day wet cure has been completed
- Inspect for cracks or rough edges
- Ensure all interior and rim surfaces are sealed
- Test water resistance by filling with water for 24 hours
- Add protective base pads if desired
Conclusion
Creating a concrete dog bowl at home blends craftsmanship with practicality. With attention to material selection, curing discipline, and sealing precision, you can produce a piece that’s both resilient and refined. These bowls age gracefully, developing a subtle patina while maintaining structural integrity. More than just a feeding dish, a handmade concrete bowl becomes a functional sculpture—a testament to thoughtful pet care and creative living.


 浙公网安备
33010002000092号
浙公网安备
33010002000092号 浙B2-20120091-4
Comments
No comments yet. Why don't you start the discussion?