
Creating your own handbag handles from chains offers a unique blend of strength, style, and personalization. Whether you're repairing an old favorite or designing a new statement piece, chain handles can elevate both function and fashion. Unlike fabric or leather straps that wear out over time, well-crafted metal chains provide exceptional durability when properly installed and reinforced. This guide walks you through every stage—from selecting the right materials to securing them with professional-grade techniques—so you can build handles that last.
Selecting the Right Chain and Materials
The foundation of any durable chain handle lies in the quality of the components. Not all chains are designed for load-bearing applications like handbags. Choosing the wrong type may lead to breakage, sagging, or discomfort during use.
Look for chains made from solid metals such as stainless steel, brass, or aluminum alloy. These offer a balance between weight, strength, and corrosion resistance. Avoid plated or hollow-link chains—they might look attractive but lack structural integrity under repeated stress.
| Chain Type | Pros | Cons | Best For |
|---|---|---|---|
| Ball Chain | Smooth feel, lightweight | Low tensile strength | Decorative accents only |
| Cable Chain | Strong, flexible, classic look | Can kink if thin | Daily-use bags |
| Figaro Chain | Sturdy links, stylish pattern | Heavier than other types | Fashion-forward designs |
| Rolled Link Chain | High durability, uniform strength | More expensive | Heavy-duty or structured bags |
Chain thickness matters too. For most handbags, aim for a link diameter between 3mm and 6mm. Thinner chains (below 3mm) risk snapping under load, especially when carrying heavier items like laptops or books.
Essential Tools and Supplies
To assemble reliable chain handles, gather these tools ahead of time:
- Chain cutters or heavy-duty wire cutters (depending on metal hardness)
- Jump rings (stainless steel, 6–8mm size)
- Spring clasps or lobster clasps (optional, for detachable designs)
- End caps or connector bars (to join chain to bag body)
- Epoxy adhesive or industrial-strength glue
- Pliers (flat-nose and round-nose)
- Measuring tape
- Reinforcement patches (leather or nylon webbing)
Having the correct tools ensures clean cuts and secure connections. Using improper pliers or dull cutters can damage chain ends, weakening their attachment points.
“Many failed DIY handles fail at the connection point—not the chain itself. Reinforce where metal meets fabric.” — Lena Torres, Accessory Designer & Educator
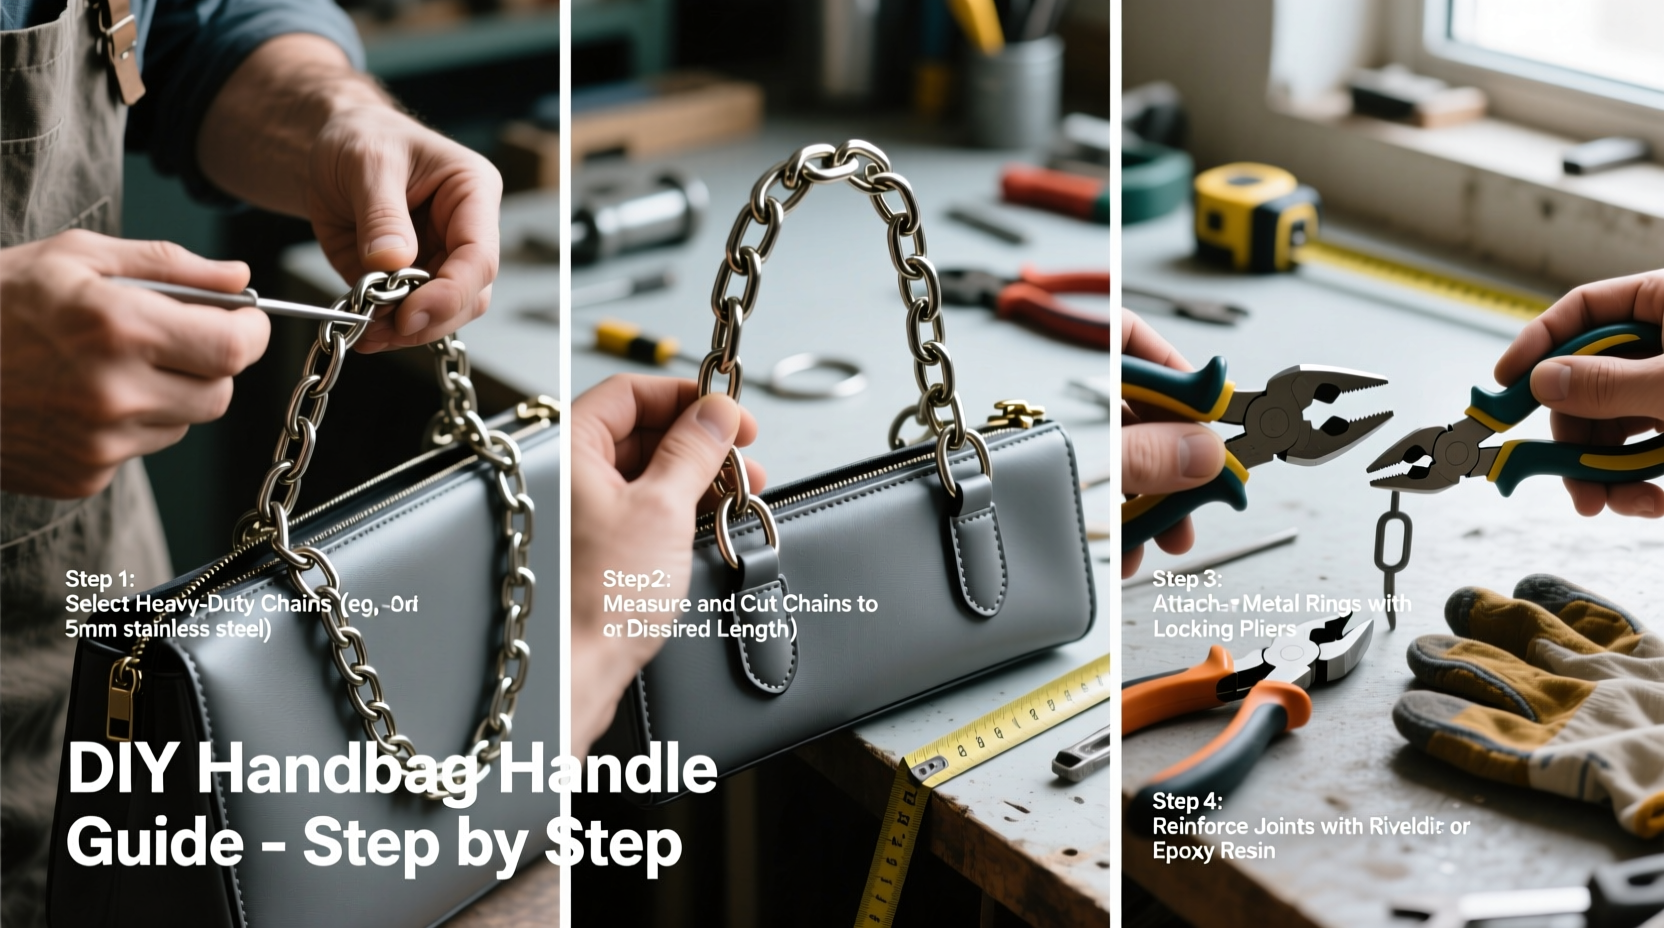
Step-by-Step Assembly Process
Follow this sequence to create sturdy, long-lasting chain handles:
- Measure and Cut the Chain: Determine desired handle drop (distance from top of bag to where hands rest). Standard drop ranges from 8 to 10 inches for shoulder carry. Add 1 inch extra per side for attachments. Use chain cutters to make clean, perpendicular cuts.
- Prepare Attachment Points: Examine your bag’s existing loops or D-rings. If weak or frayed, reinforce with a leather patch glued and stitched underneath. Replace flimsy factory rings with heavy-duty metal D-rings rated for at least 10 lbs of pull strength.
- Attach Jump Rings: Open a jump ring using two pairs of pliers (twist sideways, don’t pull apart). Slide one end of the chain onto the ring, then connect it to the D-ring on the bag. Close the jump ring securely by twisting back into place. Repeat for the other side.
- Reinforce Connections: Apply a small drop of two-part epoxy to the base of each jump ring where it contacts the D-ring. Let cure for 24 hours. This prevents lateral movement that leads to metal fatigue.
- Balance and Test: Hold the bag by the new handles and simulate normal use—swing gently, add weight (like a water bottle), check for wobbling or uneven tension. Adjust length or re-secure connections if needed.
Real-World Example: Upgrading a Vintage Tote
Maria, a handmade accessories seller in Portland, inherited a vintage structured tote with broken leather straps. Rather than replacing them conventionally, she wanted a bold, modern update. She chose a 5mm stainless steel cable chain in brushed gold tone for its resilience and aesthetic contrast against the black vegan leather body.
She reinforced the original stitching points with triangular nylon patches and replaced the flimsy nickel-plated D-rings with solid brass ones. After attaching the chain via welded jump rings and sealing joints with marine-grade epoxy, the bag held up to 15 pounds of groceries without strain. Two years later, the handles remain intact, while the original design would have required replacement multiple times.
This case illustrates how combining smart material choices with mechanical reinforcement creates lasting results beyond typical consumer expectations.
Common Mistakes and How to Avoid Them
Even experienced crafters can overlook critical details when working with metal components. Here are frequent errors and their solutions:
- Using decorative chains for structural support: Ornamental chains aren't built for stress. Always verify load ratings.
- Skipping reinforcement on anchor points: The bag’s fabric or stitching often fails before the chain does. Back high-tension areas with durable underlays.
- Improperly closed jump rings: Pulling rings open widens the gap permanently, creating weak spots. Always twist open and closed laterally.
- Neglecting weight distribution: Long chains concentrate pressure on small contact points. Consider dual-handle setups or wider connector bars to spread load.
Checklist: Building Durable Chain Handles
Use this checklist before and after installation to ensure quality:
- ✅ Selected chain with appropriate thickness and material (≥3mm solid metal)
- ✅ Verified chain strength with manual tension test
- ✅ Inspected and reinforced bag’s attachment points
- ✅ Used heavy-duty D-rings or mounting hardware
- ✅ Cut chain cleanly with proper tool
- ✅ Attached jump rings with correct twisting technique
- ✅ Secured joints with epoxy or threadlocker
- ✅ Balanced both sides for even hang
- ✅ Tested with realistic weight load
- ✅ Added comfort grips if needed
Frequently Asked Questions
Can I mix chain and leather in the same handle?
Yes, combining chain and leather is popular for hybrid aesthetics and comfort. Attach the chain segment to the D-ring, then connect it to a leather strap using a strong connector or custom-fabricated bar. Ensure both materials are equally reinforced at junctions.
How do I prevent chain handles from scratching my clothes?
Choose polished or coated finishes (e.g., enamel-dipped or PVD-coated chains) to reduce abrasiveness. Alternatively, cover contact zones with silicone sleeves or woven textile wraps. Avoid sharp-edged link styles like curb chains for everyday wear.
Are chain handles suitable for heavy laptop bags?
Only if engineered for load. Use thick, solid-link chains (6mm+) with wide, reinforced anchors. Even then, consider dual handles or crossbody support for loads over 10 lbs. Chains alone may dig into shoulders without padding.
Final Thoughts and Next Steps
Crafting durable DIY handbag handles with chains blends craftsmanship with practical engineering. It’s not just about appearance—it’s about building something that withstands daily demands while reflecting your personal style. With the right materials, attention to stress points, and careful assembly, your creations can outperform store-bought alternatives.
Start small: upgrade an old purse or experiment with scrap materials. Document your process, note what works, and refine your technique. Over time, you’ll develop a signature approach that balances beauty and resilience.


 浙公网安备
33010002000092号
浙公网安备
33010002000092号 浙B2-20120091-4
Comments
No comments yet. Why don't you start the discussion?