
Creating your own DIY pony keychain decorations is a delightful way to blend creativity with practicality. Whether you're making a keepsake for yourself or a thoughtful handmade gift, these tiny equine-inspired accessories offer charm and personality. With simple materials and a bit of imagination, you can design one-of-a-kind keychains that reflect individual style. This guide walks you through every stage—from planning your design to sealing the final piece—ensuring a polished, durable result.
Why Make Your Own Pony Keychains?
Drawing inspiration from childhood nostalgia and equestrian elegance, pony-themed crafts have enjoyed a resurgence in popularity. Crafting your own keychain allows for full customization: choose colors, add names, or incorporate meaningful symbols. Unlike mass-produced items, handmade keychains carry emotional value and showcase personal effort. They’re also ideal for beginners exploring resin art, polymer clay modeling, or fabric crafting.
Materials You’ll Need
The beauty of this project lies in its accessibility. Most supplies are affordable and widely available at craft stores or online. Depending on your chosen medium—resin, felt, or polymer clay—the list varies slightly. Below is a comprehensive overview.
| Material Type | Essential Supplies | Optional Add-Ons |
|---|---|---|
| Resin | Epoxy resin & hardener, silicone mold (pony-shaped), mixing cups, stir sticks, gloves | Glitter, mica powder, tiny charms, UV lamp (for fast curing) |
| Polymer Clay | Clay (white, brown, pink), sculpting tools, acrylic roller, oven-safe surface | Paints, varnish, texture stamps |
| Felt Fabric | Felt sheets, embroidery thread, needle, scissors, stuffing | Beads, ribbon, fabric glue, snap buttons |
| All Methods | Keyring hardware, sandpaper (for smoothing), work mat | Ponytail holders, miniature horseshoes, name tags |
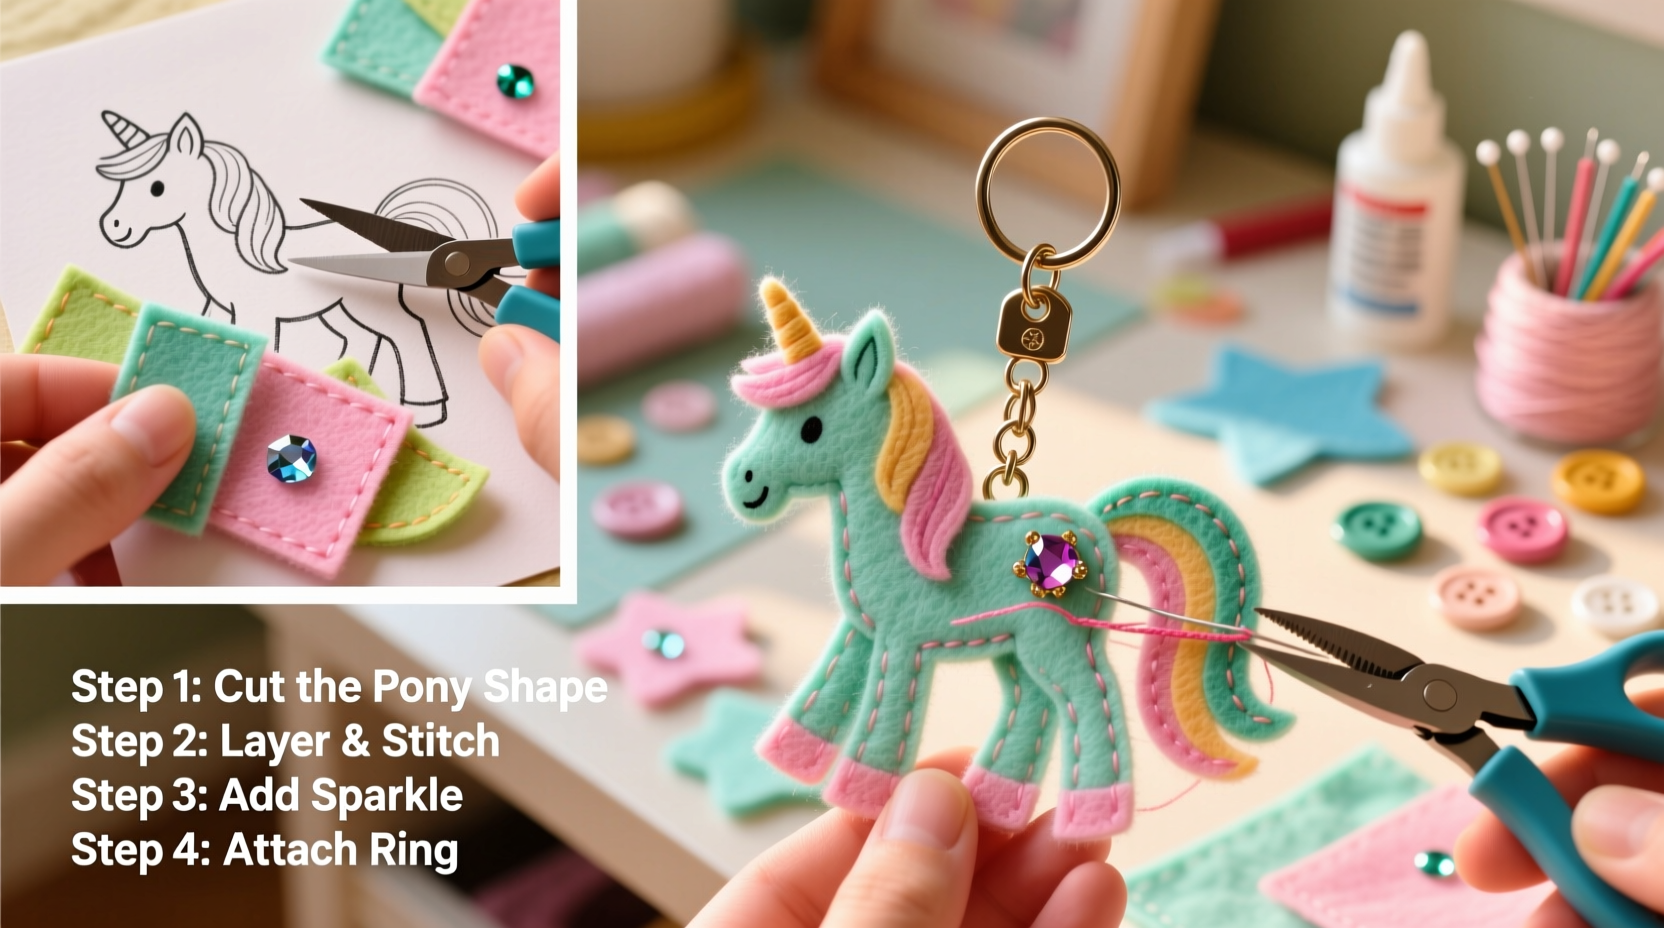
Step-by-Step Guide to Creating Your Pony Keychain
- Choose Your Medium: Decide whether you want a glossy resin charm, a sculpted clay figure, or a soft fabric plushie. Each offers different textures and durability levels.
- Design Your Pony: Sketch a simple side profile or front view. Focus on key features—mane shape, facial expression, and stance. Keep it small (1–2 inches) to fit standard keyrings.
- Prepare the Workspace: Cover your table with parchment paper or a silicone mat. Ensure good ventilation, especially when working with resin or baked clay fumes.
- Create the Base Form:
- Resin: Mix resin according to instructions, pour into a pony-shaped mold, and let sit 24 hours.
- Clay: Condition the clay, roll body parts separately, and assemble using water or liquid clay as adhesive.
- Felt: Cut two identical pony shapes from felt, sew around edges leaving space for stuffing, then insert fiberfill before closing.
- Add Details: Paint eyes, hooves, and markings. For resin, suspend tiny flowers or glitter mid-cure. For clay, use fine tools to carve nostrils or braided manes. Felt versions can include embroidered whiskers or ribbon manes.
- Cure or Dry: Bake polymer clay at manufacturer-recommended temperatures (usually 230–275°F for 15–30 minutes). Resin cures at room temperature; avoid moving during setting. Felt pieces air-dry naturally.
- Attach the Keyring: Once fully set, drill a small hole (if needed) or embed a metal loop before final curing. Slide on a split ring or lobster clasp.
- Seal and Protect: Apply a clear sealant—gloss varnish for clay, resin topcoat for porous finishes—to enhance shine and prevent wear.
Mini Case Study: Emma’s Birthday Gift Series
Emma, a middle school art teacher from Portland, wanted to create memorable gifts for her students’ birthdays. She decided on personalized pony keychains reflecting each child’s favorite color and name. Using polymer clay, she molded basic pony bodies, then added hand-painted initials on saddle blankets. One student loved unicorns, so Emma added a sparkly horn; another adored rainbows, prompting a multicolored mane. The keychains were sealed with UV-resistant varnish and attached to brushed gold rings. Parents reported the children used them daily on backpacks and lunchbox zippers. “It showed I saw them as individuals,” Emma said. “And now they remember their art lessons every time they reach for their keys.”
Expert Insight
“Handmade accessories connect emotion with utility. A well-crafted keychain isn’t just functional—it becomes a token of memory.” — Lena Torres, Craft Educator & Author of *Everyday Handmade*
Common Pitfalls and How to Avoid Them
- Bubbles in resin: Stir slowly and use a heat gun or toothpick to pop bubbles after pouring.
- Clay cracking during baking: Condition thoroughly and avoid thick sections without armatures.
- Felt edges fraying: Use pinking shears or apply a thin line of fabric glue along cut edges before sewing.
- Weak attachment points: Reinforce holes with jump rings or embed metal loops inside while crafting.
Checklist: Before You Begin Your Project
- ☐ Choose your crafting method (resin, clay, or felt)
- ☐ Gather all necessary tools and materials
- ☐ Set up a clean, ventilated workspace
- ☐ Sketch your pony design at actual size
- ☐ Test paint colors or resin tints on scrap material
- ☐ Confirm keyring compatibility with your finished piece
- ☐ Allow 24–48 hours total crafting time (including drying/curing)
FAQ
Can I make these with kids?
Absolutely. Felt and air-dry clay are safest for younger crafters. Supervise closely with hot ovens or resin chemicals. Pre-cut shapes and use washable paints for ease.
How long do DIY keychains last?
With proper sealing and care, they can last years. Avoid prolonged sun exposure and moisture. Store in a dry place when not in use.
Where can I find pony-shaped molds?
Silicone molds are available on craft websites like Etsy, Amazon, or specialty resin supply stores. Search for \"mini horse mold,\" \"pony charm mold,\" or \"animal silhouette silicone.\"
Crafting Variations to Try
Once comfortable with the basics, experiment with themes:
- Seasonal Ponies: Add tiny pumpkin patches (fall), snowflakes (winter), or floral wreaths (spring).
- Night Sky Magic: Embed glow-in-the-dark pigment in resin for starry manes.
- Retro Style: Use bold geometric patterns on felt or clay, inspired by 80s My Little Pony designs.
- Personalized Touch: Attach a mini tag with a name or date using alphabet beads or engraved metal pieces.
Conclusion
DIY pony keychain decorations merge whimsy with craftsmanship, offering a satisfying creative outlet and a lasting memento. Whether you’re drawn to the glossy finish of resin, the tactile joy of shaping clay, or the cozy charm of stitched felt, each technique opens doors to endless personalization. These small creations carry big meaning—perfect for gifting, collecting, or simply brightening your everyday carry items.


 浙公网安备
33010002000092号
浙公网安备
33010002000092号 浙B2-20120091-4
Comments
No comments yet. Why don't you start the discussion?