
Crafting a plush keyring isn’t just a creative outlet—it’s a way to personalize everyday accessories with charm and sentiment. Whether you're making one for yourself, as a gift, or to sell at a craft fair, handmade plush keychains carry emotional value that mass-produced items can't match. With basic sewing skills and affordable materials, you can design unique characters, animals, or abstract shapes in minutes. This guide walks through every stage of the process, from selecting fabrics to attaching hardware, ensuring even beginners achieve polished results.
Gather Your Materials and Tools
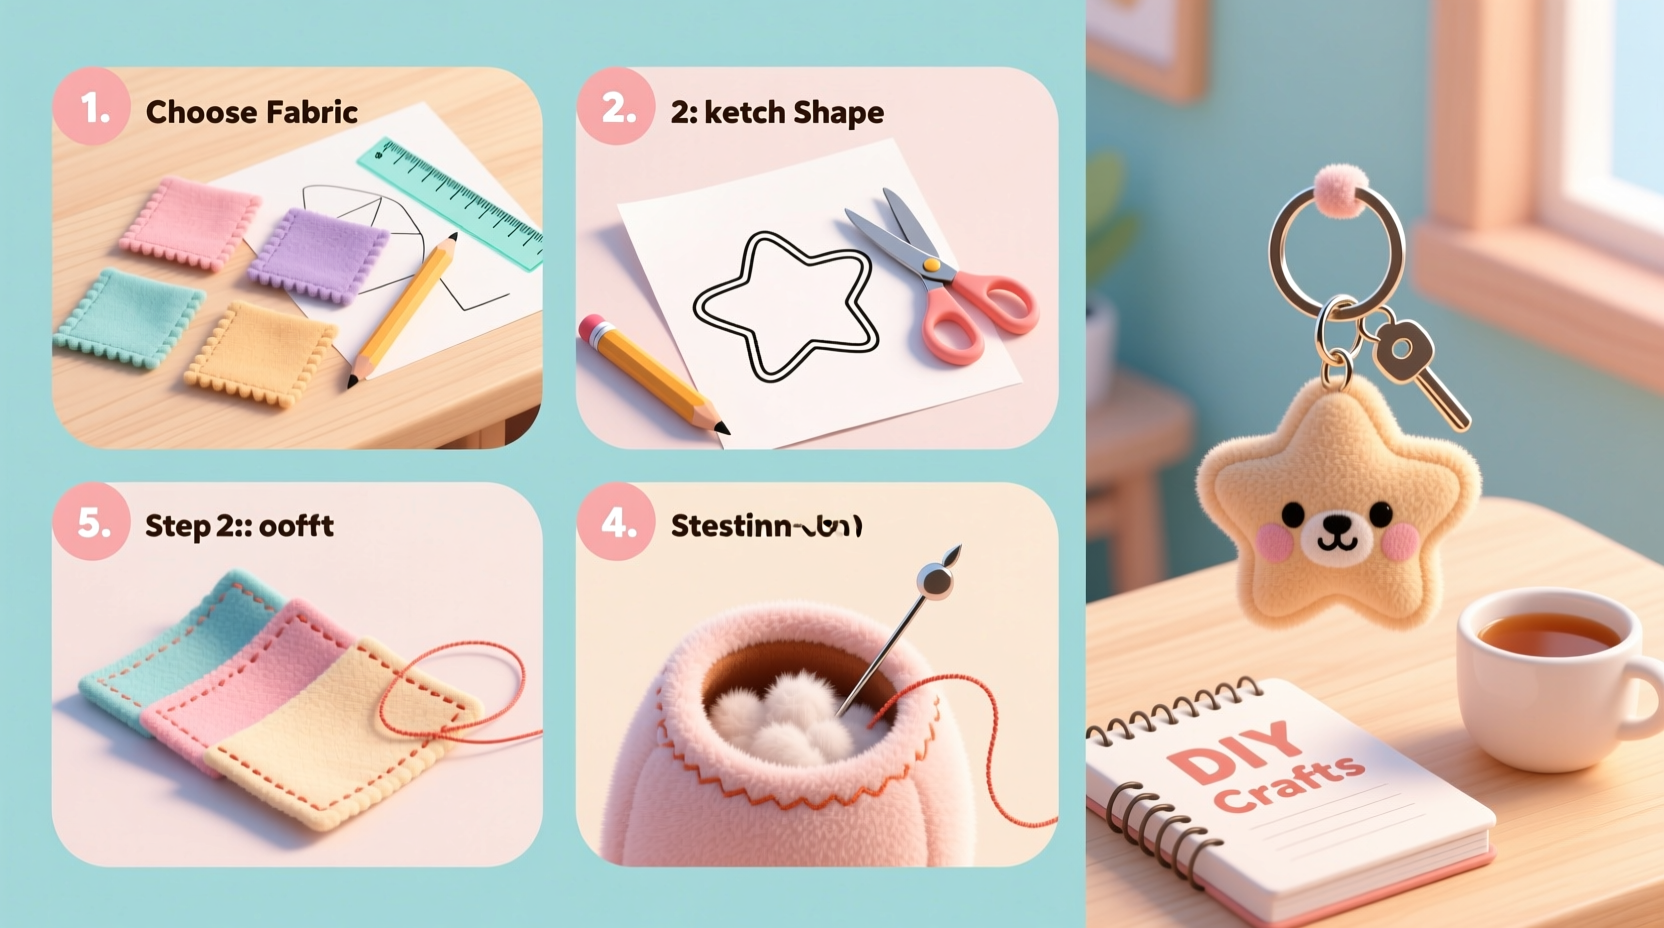
The foundation of any successful DIY project lies in preparation. Before cutting fabric or threading a needle, assemble everything you’ll need. Most supplies are reusable, making this an economical hobby over time.
- Fleece, felt, or cotton fabric (½ yard is sufficient for multiple keyrings)
- Embroidery floss or thread (for facial features or accents)
- Scissors (fabric scissors for clean cuts)
- Needles (hand-sewing needles or machine if preferred)
- Pins or clips (to hold fabric layers together)
- Fiberfill stuffing (polyester fiberfill works best)
- Keyring hardware (metal rings, lobster clasps, or split rings)
- Chalk or washable marker (for tracing patterns)
- Ruler and measuring tape
Design and Cut Your Pattern
Start by sketching your plush shape on paper. Simple designs like hearts, stars, cats, or cartoon faces work well for beginners. Once satisfied, cut out the paper template. Place it on your fabric and trace around it twice—once for the front and once for the back. Always add a ¼-inch seam allowance around the edges.
For symmetrical shapes, fold the fabric in half before tracing to ensure both sides match perfectly. If using patterned fabric, align prints so they appear consistent across both pieces.
| Material Type | Best For | Pros | Cons |
|---|---|---|---|
| Fleece | Beginners, soft textures | Doesn’t fray, easy to sew | Can stretch if pulled |
| Felt | Flat, structured designs | No fraying, holds shape | Less cuddly, thinner |
| Cotton | Detailed prints, quilting | Breathable, wide variety | Frays easily, needs finishing |
Sew and Stuff Your Plush
Align the two fabric pieces with the right sides facing each other. Pin or clip along the edges to prevent slipping. Sew around the perimeter using a small running stitch (by hand) or a tight zigzag stitch (by machine), leaving a 1.5-inch gap for turning and stuffing.
After stitching, carefully trim excess fabric near the seams—especially at curves—to reduce bulk when turned right side out. Use small scissors and avoid cutting the thread. Turn the piece right side out using a blunt tool like a chopstick or knitting needle. Gently push out corners for crisp definition.
- Begin stuffing from the outer edges toward the center.
- Add fiberfill gradually, fluffing between additions.
- Aim for firm but flexible density—overstuffing may distort the shape.
- Once fully stuffed, hand-stitch the opening closed with a ladder stitch for an invisible finish.
“Hand-stitched closures give plush toys a more professional look because they blend seamlessly into the fabric.” — Lila Chen, Textile Artist & Craft Instructor
Add Personality with Details
This is where your keyring transforms from generic to memorable. Embroider eyes, noses, mouths, or blush marks using contrasting thread. French knots work beautifully for eyes, while backstitch creates clean lines for smiles.
You can also glue on small buttons, beads, or fabric scraps for ears, wings, or bows. If adding embellishments, secure them tightly with multiple knots or fabric glue. Avoid large protruding parts if the keyring will be carried in a pocket or bag.
Mini Case Study: Emma’s First Keyring Gift
Emma, a college student in Portland, wanted to make meaningful graduation gifts for her roommates. She designed miniature plush versions of their pet cats using photos they shared. Starting with simple oval bodies and triangle ears, she used black embroidery floss for whiskers and personalized collar colors with tiny ribbon ties. Each took under 45 minutes to complete. Her friends were moved by the thoughtfulness—and three later started making their own keyrings after learning the basics from her tutorial video.
Attach the Keyring Hardware
Securely fastening the metal ring is crucial for durability. Thread a strong needle with doubled thread and knot the end. From the inside of the top edge, bring the needle out where you want the loop to sit—usually centered at the top of the head or back.
Create a small fabric loop (about ½ inch long) using leftover material or thin ribbon. Sandwich it between two stitches as you reinforce the attachment point. Make 6–8 passes through the same spot for strength, then tie off with a secure knot hidden within the plush.
Alternatively, use a split ring plier tool to attach a pre-made metal loop directly if no fabric loop is desired. This method is faster but offers less customization.
Checklist: Final Quality Control
- ✅ All seams are securely closed with no gaps
- ✅ Stitches around the attachment point are reinforced
- ✅ Embellishments are firmly attached
- ✅ No loose threads or exposed knots
- ✅ Shape is evenly stuffed and symmetrical
- ✅ Keyring opens and closes smoothly
Frequently Asked Questions
Can I wash my DIY plush keyring?
Spot cleaning is recommended. Dampen a cloth with mild soapy water and gently wipe the surface. Avoid submerging it, as moisture can clump the stuffing and weaken glued elements. Let air dry completely away from direct heat.
What if I don’t know how to sew?
No-sew options exist using fabric glue and pre-cut felt sheets. Trace and cut two identical shapes, glue around the edges leaving a gap, insert stuffing, then seal completely. Results are less durable than sewn versions but suitable for temporary or decorative use.
How long does it take to make one plush keyring?
Beginners should expect 45–60 minutes per piece. With practice, experienced crafters can complete a simple design in 20–30 minutes. Complex shapes with detailed embroidery may take up to 90 minutes.
Bring Joy One Stitch at a Time
Creating a custom plush keyring blends creativity with practicality. It's a gateway into textile arts, a thoughtful alternative to store-bought gifts, and a way to express personality through color, texture, and design. The process fosters mindfulness—each stitch anchors attention in the present moment, offering quiet satisfaction few digital hobbies provide.
Whether you’re reviving childhood memories of sewing class or exploring crafting for the first time, this project welcomes all skill levels. Start small, refine your technique, and soon you’ll find yourself designing entire collections—from seasonal themes to pop culture icons.


 浙公网安备
33010002000092号
浙公网安备
33010002000092号 浙B2-20120091-4
Comments
No comments yet. Why don't you start the discussion?