
Transforming fabric scraps into a beautiful, personalized patchwork pillow cover is both sustainable and creatively rewarding. Whether you're new to sewing or looking to refine your textile skills, making a patchwork pillow cover allows you to express your style while adding handmade charm to your living space. This guide walks you through every stage—from selecting fabrics to stitching the final seam—so you can complete a professional-looking project with confidence.
1. Gather Your Materials and Tools
Before cutting or sewing, ensure you have all necessary supplies on hand. A well-prepared workspace reduces frustration and keeps your momentum going.
Here’s what you’ll need:
- Fabric scraps or fat quarters (at least 5 different patterns/colors)
- Coordinating thread
- Rotary cutter or sharp fabric scissors
- Cutting mat
- Ruler (preferably quilting or clear grid ruler)
- Sewing machine with a straight stitch setting
- Pins or fabric clips
- Iron and ironing board
- Measuring tape
- Hand-sewing needle (for closing openings if needed)
- Zipper or envelope-style closure fabric (optional)
2. Design Your Patchwork Layout
The visual impact of your pillow cover comes down to thoughtful design. Decide whether you want a symmetrical grid, random collage, or themed pattern such as log cabin, chevron, or courthouse steps.
Start by choosing a color scheme. Earth tones, pastels, or bold primaries each evoke different moods. Then cut fabric pieces into uniform squares—common sizes are 3” x 3” or 4” x 4”—to maintain consistency. You’ll typically need 16–25 squares depending on pillow size (e.g., 12” x 16” or 16” x 16”).
Lay out your squares on a flat surface without gluing or pinning. Play with arrangement until you achieve balance. Alternate light and dark tones, mix scales of prints, and avoid clustering similar colors together.
“A strong contrast between adjacent patches makes the design pop. Don’t be afraid of bold combinations—they often work better than expected.” — Lila Monroe, Textile Artist & Quilter
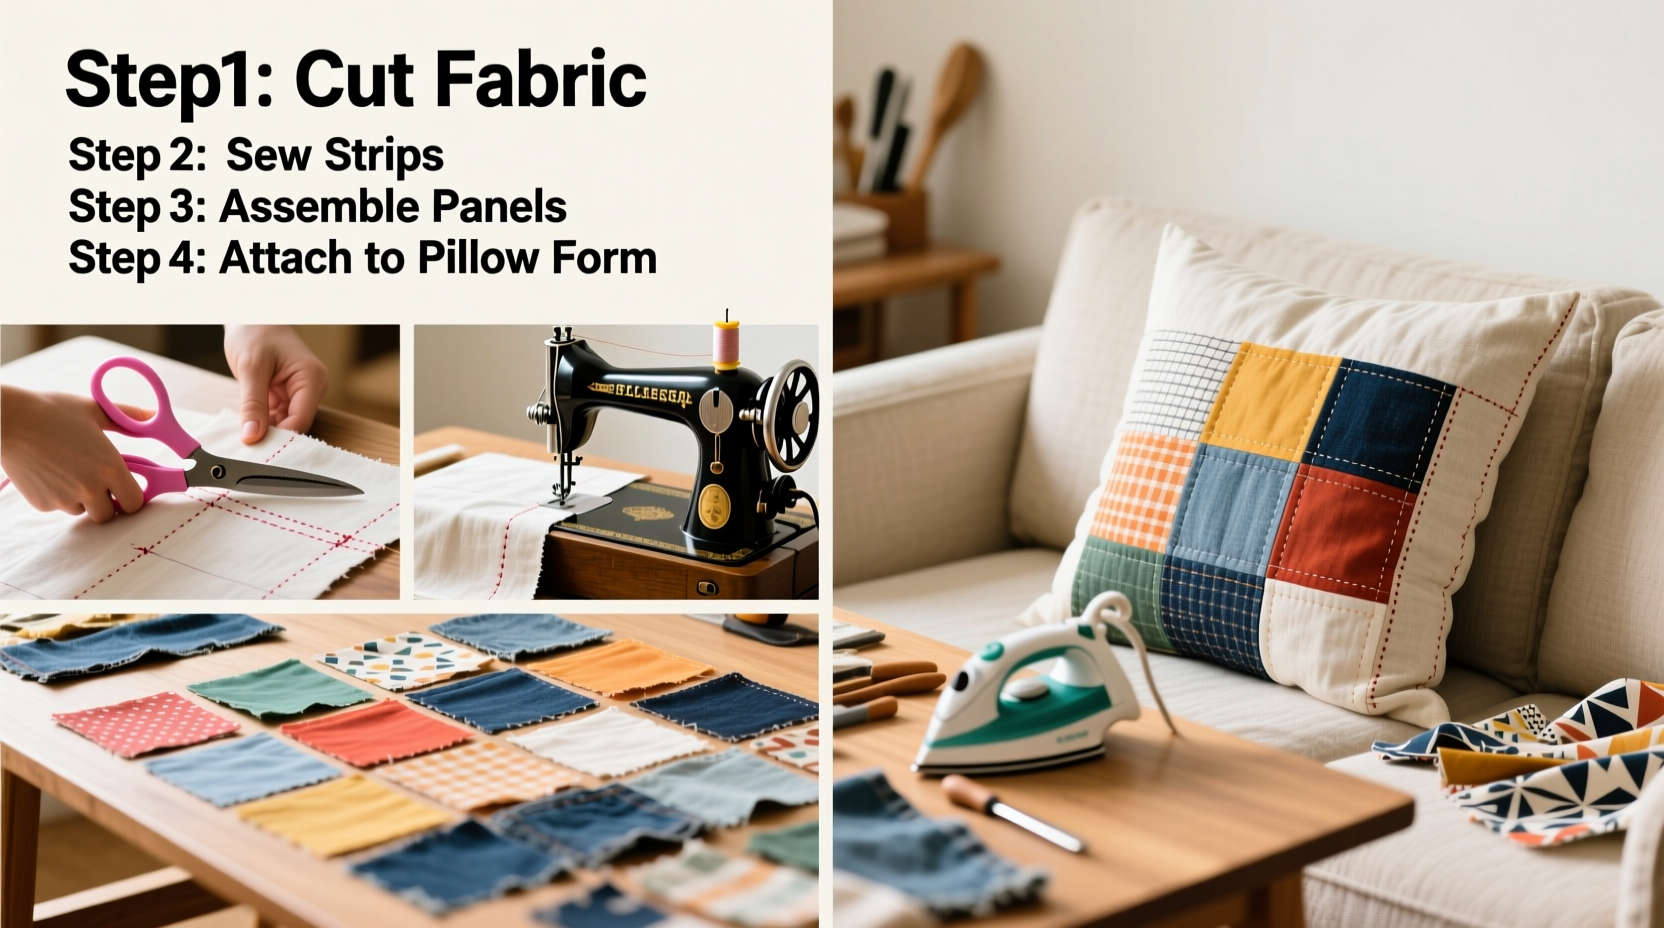
3. Sew the Patchwork Top: Step-by-Step Process
Once satisfied with your layout, begin sewing the squares together in rows. Accuracy here ensures clean lines and alignment.
- Stitch squares into rows: Pick up two adjacent squares from the top row. Place them right sides together and sew a ¼-inch seam along one edge. Continue adding squares until the row is complete. Press seams open or to one side using an iron for a flat finish.
- Repeat for all rows: Complete each horizontal row separately, pressing as you go.
- Join the rows: Align two completed rows with right sides facing. Match seam intersections carefully and pin in place. Sew with a ¼-inch seam, backstitching at start and end. Press again to set seams.
- Complete the top: Repeat joining until all rows form one cohesive panel. Trim any uneven edges with your rotary cutter for a clean rectangle.
4. Add Backing and Closure
A functional pillow cover needs a smart closure system. Two popular options are the envelope back and the zipper insert.
Envelope Back Method (Beginner-Friendly):
- Cut two overlapping rectangles from solid fabric—one should be ⅔ the width of the pillow front, the other ⅓.
- Layer them on the backside of your patchwork top, right sides down, so they overlap like envelope flaps.
- Sew around all four edges with a ½-inch seam allowance, leaving no opening.
- Turn right side out and press. The overlapping flaps allow easy insertion and removal of the pillow form.
Zipper Method (Neater Finish):
- Attach a centered or side zipper using a zipper foot on your sewing machine.
- Requires more precision but gives a tailored look ideal for display pillows.
| Closure Type | Difficulty | Durability | Best For |
|---|---|---|---|
| Envelope Back | Easy | Moderate | Beginners, casual decor |
| Centered Zipper | Intermediate | High | Showcase pillows, frequent use |
| Invisible Zipper | Advanced | Very High | Professional results |
5. Final Assembly and Finishing Touches
With the front and backing ready, it’s time to assemble the full cover.
- Place the patchwork top and backing together, right sides facing.
- Pin or clip around the perimeter, especially at corners and closures.
- Sew a ½-inch seam around the entire edge. Backstitch at the beginning and end.
- Trim corners diagonally to reduce bulk, being careful not to cut the stitches.
- Turn the cover right side out through the open section (if using envelope back) or via the zipper.
- Use a blunt tool like a chopstick to push out corners gently.
- Press the outer edges for a crisp, finished appearance.
For extra durability, consider topstitching ⅛ inch from the edge around the entire pillow. This secures the lining and adds a polished detail.
Mini Case Study: Sarah’s First Patchwork Pillow
Sarah, a college student with no prior sewing experience, wanted to personalize her dorm room on a budget. She collected leftover cotton fabric from a thrift store and used her roommate’s sewing machine. After watching a short tutorial and following a simple 4x4 square layout, she assembled a vibrant rainbow-themed pillow cover in under three hours. By using the envelope-back method, she avoided the complexity of zippers. The result? A durable, washable accent piece that sparked compliments and inspired her to make matching curtains.
Her advice: “Don’t aim for perfection. My seams weren’t perfect, but pressing them made everything look intentional. Just start with what you have.”
Checklist: Crafting Your Patchwork Pillow Cover
- ☐ Choose and pre-wash fabrics
- ☐ Cut uniform squares (e.g., 4” x 4”)
- ☐ Arrange layout on a flat surface
- ☐ Sew squares into rows
- ☐ Join rows into one panel
- ☐ Press all seams flat
- ☐ Cut and prepare backing (envelope or zipper)
- ☐ Layer front and back, right sides together
- ☐ Sew around edges with ½-inch seam
- ☐ Trim corners, turn, and press
- ☐ Insert pillow form and enjoy!
Frequently Asked Questions
Can I use non-cotton fabrics for patchwork?
Yes, but stick to stable weaves like cotton, linen, or denim for ease of sewing. Avoid stretchy knits or slippery silks unless you’re experienced, as they shift during assembly and complicate seam alignment.
How do I clean my patchwork pillow cover?
Machine wash cold on gentle cycle with mild detergent. Turn inside out first to protect seams and colors. Air dry or tumble dry low. Iron on reverse side if needed.
What size should my pillow cover be?
Make it ½ to 1 inch smaller than your pillow insert to ensure a snug, plump fit. For example, use an 18” x 18” cover for an 18” insert.
Bring Creativity Home—One Stitch at a Time
Crafting a patchwork pillow cover isn’t just about sewing fabric—it’s about weaving memories, repurposing materials, and creating something uniquely yours. With basic tools and mindful attention to detail, you can produce a piece that enhances your space and reflects your personality. Each patch tells a story; every seam holds intention. Whether you’re decorating your first apartment or adding warmth to a lived-in home, this project proves that beauty grows from patience and practice.


 浙公网安备
33010002000092号
浙公网安备
33010002000092号 浙B2-20120091-4
Comments
No comments yet. Why don't you start the discussion?