
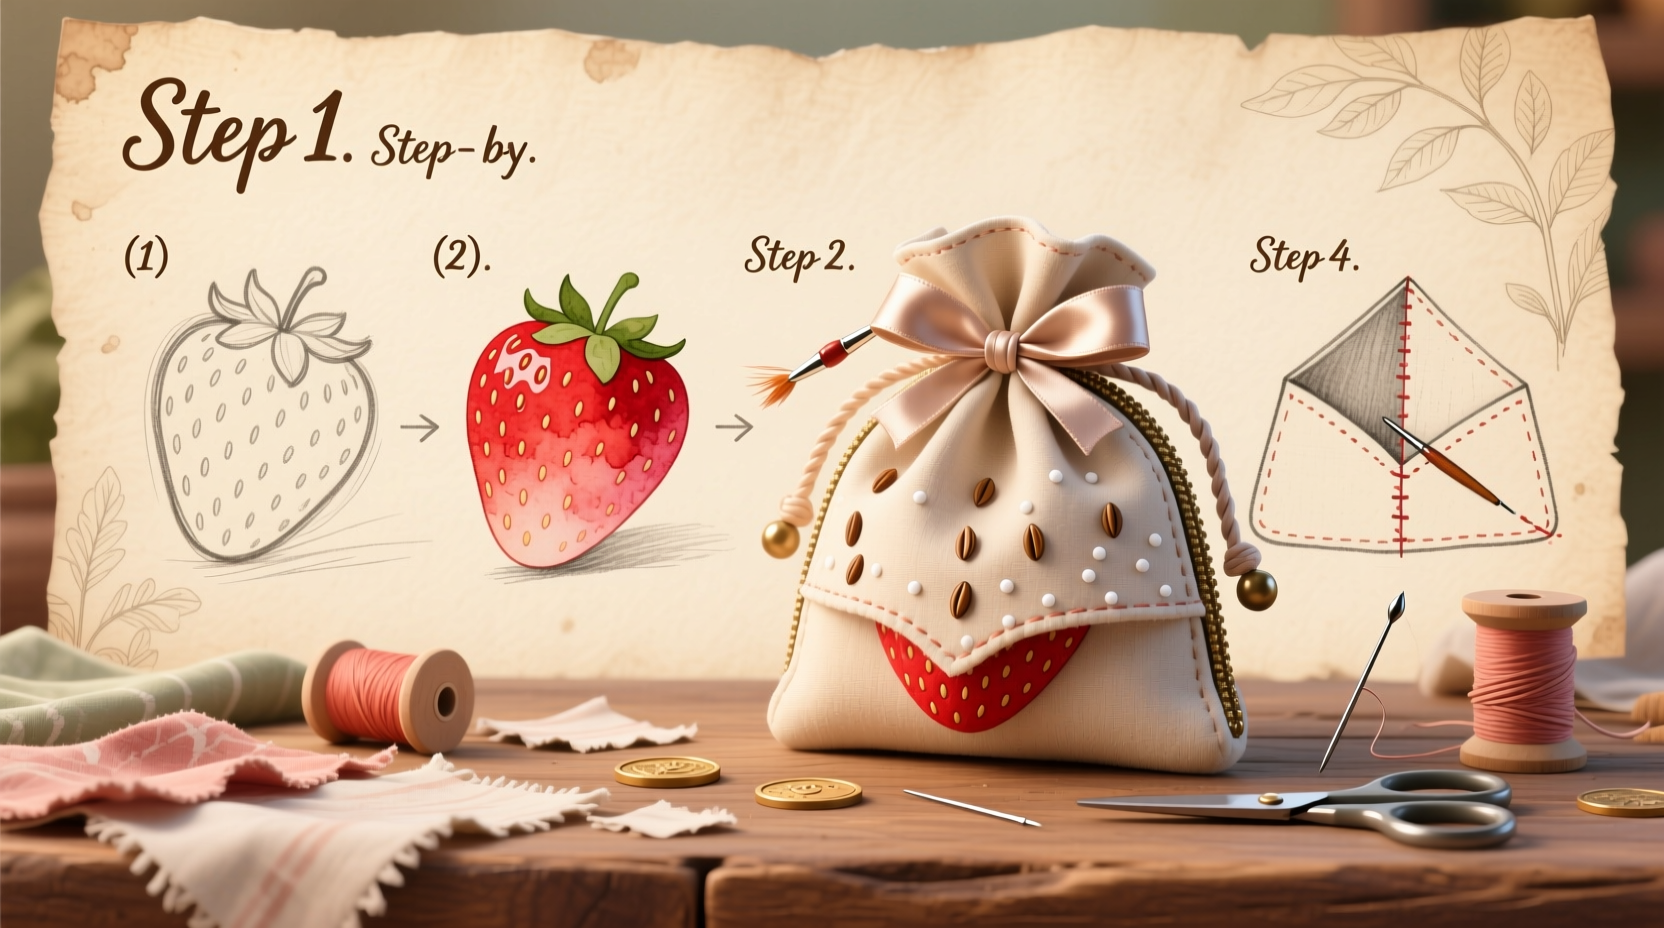
Crafting small accessories by hand offers both creative fulfillment and functional rewards. Among the most delightful projects is the handmade strawberry fruit coin purse—a whimsical, compact accessory that blends practicality with playful design. Inspired by the shape and color of a ripe strawberry, this soft-sculpted piece is ideal for storing coins, jewelry, or even as a gift tucked inside a larger present. With simple materials and careful stitching, you can complete this project in a few hours, regardless of your sewing experience.
Gathering Your Materials
The success of any handmade item begins with selecting the right components. For a strawberry coin purse, you’ll need materials that are both durable and visually appealing. The contrast between the red body, green calyx (leaves), and textured seeds defines its charm. Choose fabrics that hold structure without stiffness—cotton, felt, or wool blend fabrics work best.
- Felt or cotton fabric in red (main body)
- Felt in dark green (for the leafy top)
- Embroidery floss in black or off-white (for seed detailing)
- Small zipper (approximately 3–4 inches long)
- Polyester stuffing or fiberfill
- Sharp scissors, pins, and needles
- Embroidery hoop (optional but helpful)
- Water-soluble fabric marker or chalk
- Sewing thread in matching colors
Designing and Cutting the Pattern
Begin by sketching the strawberry shape on paper. A classic strawberry silhouette is wider at the top and tapers slightly toward the base. You’ll need two identical red fabric pieces for the front and back. Trace your pattern onto the fabric using a water-soluble marker, then cut them carefully with sharp scissors.
For the green calyx, draw a starburst-like shape with five to six pointed lobes. This will sit on top of the purse and cover the seam where the zipper is inserted. Cut two pieces—one for the top layer and one to sandwich the zipper.
Accuracy matters here. Misaligned pieces can cause lumps or uneven stuffing later. Pin the fabric layers together before cutting to ensure symmetry.
Pattern Dimensions Reference
| Component | Recommended Size | Notes |
|---|---|---|
| Strawberry Body (each side) | 4 inches tall × 3 inches wide | Adjustable based on desired fullness |
| Zipper | 3.5 inches | Match color to fabric if possible |
| Calyx (leaf top) | 2.5 inches in diameter | Ensure it covers zipper seam |
| Seed Placement Guide | N/A | Use template with 8–12 evenly spaced dots |
Assembling the Coin Purse: Step-by-Step
- Attach the zipper to the red body pieces. Place one red fabric piece right-side up. Lay the zipper face down along the curved top edge. Align the edges precisely. Pin in place. Place the second red piece on top, wrong side facing the zipper teeth. Sew along the edge using a zipper foot on your sewing machine or by hand with a backstitch for strength.
- Repeat with the green calyx. Take one green calyx piece and align it with the other side of the zipper, again placing the right side of the fabric against the zipper tape. Sew it in place. Once both red sides and the green top are attached to the zipper, you should be able to flip the pieces open like a book, revealing the zipper centered between them.
- Stitch the main body. With the red pieces now connected via the zipper, bring them together so their right sides face each other. Pin around the outer edge, leaving a 2-inch gap at the bottom for turning and stuffing. Sew carefully around the perimeter using a ¼-inch seam allowance. Reinforce the beginning and end with a few backstitches.
- Turn and stuff. Carefully turn the purse right side out through the opening. Use a blunt tool like a chopstick to push out the curves, especially near the top. Add polyester stuffing until the strawberry feels firm but not overstuffed. Hand-stitch the opening closed using a ladder stitch for an invisible finish.
- Add seed details. Using black embroidery floss, create small French knots across the surface of the strawberry. Space them evenly, mimicking natural seed distribution. Aim for 8 to 12 seeds depending on size. Secure each knot with a hidden backstitch on the inside.
- Finishing touches. Fluff the calyx slightly to give it dimension. If desired, add subtle shading with fabric-safe pastels or use green embroidery to outline the calyx lobes for added definition.
Common Challenges and How to Overcome Them
Even experienced crafters encounter hiccups. One frequent issue is puckering along the zipper edge, which occurs when fabric tension is uneven during sewing. To prevent this, baste the zipper in place first with long temporary stitches before final sewing.
Another challenge is overstuffing, which distorts the strawberry’s natural shape. Begin with less filling and add gradually. Remember, the purse should hold coins without bulging excessively.
If your French knots come out too large or loose, practice on a scrap fabric first. Pull the floss gently through the loop to control knot size.
“Handcrafted accessories gain character through imperfections. A slightly asymmetrical strawberry isn’t flawed—it’s unique.” — Lila Monroe, Textile Artist & Craft Instructor
Mini Case Study: Sarah’s First Craft Fair Success
Sarah, a hobbyist crafter from Portland, decided to try her hand at soft-sculpture accessories after seeing similar designs online. She followed a basic strawberry coin purse tutorial but adapted it by using organic cotton and natural dyes. Her first few attempts had uneven stitching and weak seed attachment, but after refining her technique—particularly mastering the French knot and using wool-blend felt—her purses gained consistency.
She brought ten to a local craft fair, pricing them at $12 each. By midday, they were sold out, with customers praising their “vintage charm” and “perfect for slipping into a child’s lunchbox.” Sarah now hosts monthly workshops teaching others how to make them, emphasizing patience and precision.
Checklist: Building Your Strawberry Coin Purse
- ✓ Select red and green felt or cotton fabric
- ✓ Prepare a 3.5-inch zipper and matching thread
- ✓ Cut two strawberry-shaped pieces and two calyx tops
- ✓ Attach the zipper between the red body and green calyx
- ✓ Sew the red pieces together around the edges
- ✓ Turn right-side out and lightly stuff with fiberfill
- ✓ Hand-stitch the opening closed
- ✓ Embroider black French knots for seeds
- ✓ Test zipper functionality and adjust if needed
- ✓ Gently shape the calyx for a natural look
Frequently Asked Questions
Can I wash the strawberry coin purse?
Spot clean only. Submerging it in water may cause the stuffing to clump and the fabric to shrink. Use a damp cloth with mild soap to wipe the surface gently.
Is it possible to make this without a sewing machine?
Absolutely. All steps can be completed by hand using a backstitch for seams and a ladder stitch for closing. It will take longer, but the result is equally sturdy and often more precise for small projects.
What can I use instead of a zipper?
You can sew the purse shut and rely on stuffing tightness, but this limits access. Alternatively, use a snap button or magnetic closure, though these require additional reinforcement to handle daily use.
Final Thoughts and Creative Encouragement
The strawberry fruit coin purse is more than a container—it’s a celebration of handmade artistry. Each stitch reflects intention, and every curve captures a sense of joy. Whether you’re making one for yourself, as a gift, or to sell, the process nurtures patience, attention to detail, and creative confidence.
Don’t hesitate to experiment. Try different fabric textures, vary the seed patterns, or even scale up the design into a keychain or doll accessory. The techniques learned here apply to countless other soft-sculpture projects.


 浙公网安备
33010002000092号
浙公网安备
33010002000092号 浙B2-20120091-4
Comments
No comments yet. Why don't you start the discussion?