
In an age where digital tools are more accessible than ever, maintaining stacks of paper files at home is not only inefficient—it’s risky. Paper can be lost, damaged, or misfiled, and retrieving a single document from a disorganized cabinet often turns into a time-consuming chore. Transitioning to a paperless filing system simplifies organization, enhances security, and makes important records instantly accessible from any device.
Creating a paperless home office doesn’t require expensive software or technical expertise. With a clear plan, the right tools, and consistent habits, you can digitize years of accumulated paperwork in a matter of weeks. This guide walks you through every stage—from sorting and scanning to naming conventions and long-term maintenance—so you can build a sustainable, reliable system that works for your lifestyle.
Assess Your Current Paper Load
The first step in going paperless is understanding what you’re dealing with. Take inventory of all physical documents stored at home: tax returns, medical records, warranties, utility bills, bank statements, insurance policies, contracts, and more. Group them into broad categories to identify patterns and prioritize what needs immediate attention.
Ask yourself:
- Which documents do I access frequently?
- Which ones are outdated or no longer necessary?
- Are there legal requirements for keeping certain papers (e.g., tax records for seven years)?
- What would happen if these documents were lost or destroyed?
Be ruthless during this phase. Many people hold onto expired manuals, duplicate receipts, or old promotional materials “just in case.” Most of these can be safely discarded. Shred anything containing personal information before disposal.
Choose Your Scanning Method and Tools
Digitizing your documents requires a reliable scanning method. You have several options depending on volume, budget, and convenience:
| Method | Best For | Pros | Cons |
|---|---|---|---|
| Smartphone App (e.g., Adobe Scan, Microsoft Lens, CamScanner) | Occasional use, low volume | Free or low-cost, portable, automatic edge detection | Lower quality on wrinkled pages; batch processing limited |
| Dedicated Scanner (Flatbed or Sheet-fed) | High-volume projects | Faster, higher resolution, better OCR accuracy | Costs $100+, requires desk space |
| All-in-One Printer with Scanning | Households already using printers | Convenient, multi-function device | Slower than dedicated scanners, bulk handling may jam |
For most homeowners, a smartphone app is sufficient to begin. These apps use your phone’s camera to capture images, automatically straighten and crop them, enhance contrast, and convert them into searchable PDFs using optical character recognition (OCR).
“Mobile scanning apps have closed the gap between consumer and professional tools. Today’s smartphones can produce archival-quality scans suitable for legal and financial records.” — David Lin, Digital Archiving Consultant
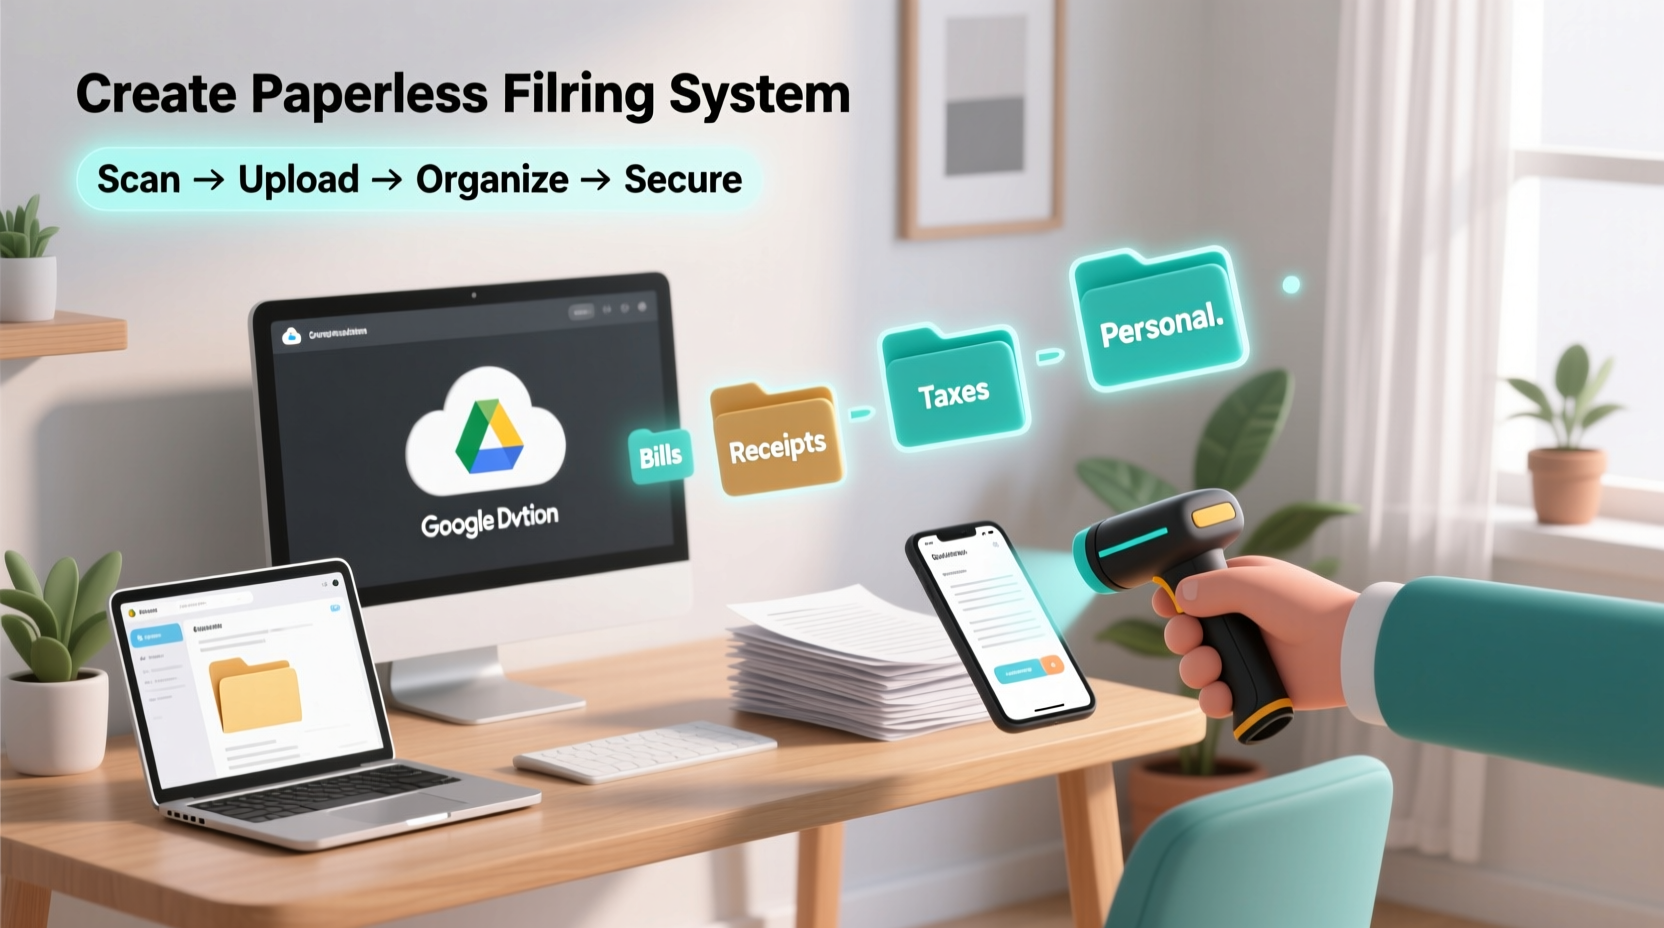
Create a Logical Folder Structure
A well-organized digital filing system mirrors how you think about your documents. Avoid dumping everything into a single folder called “Scans.” Instead, design a hierarchy that supports quick retrieval and scalability.
Start with top-level folders based on life domains:
- Personal
- Financial
- Medical
- Legal
- Home & Property
- Taxes
- Warranties & Manuals
Then create subfolders. For example:
📁 Financial
├── Bank Statements
├── Credit Cards
├── Investments
└── Loans

📁 Taxes
├── 2023
├── 2022
├── 2021
└── Tax Professionals (contact info, engagement letters)
Use consistent naming conventions. Include dates in YYYY-MM-DD format so files sort chronologically. For instance:
2023-12-05_Chase_Bank_Statement.pdf2023-04-15_Federal_Tax_Return.pdf2022-10-20_Kaiser_Medical_Summary.pdf
Scan and Organize Documents Systematically
Now comes the core task: converting paper into digital files. Follow this step-by-step process for efficiency and consistency.
- Sort by category: Pull out one category at a time (e.g., medical records).
- Prep pages: Remove staples, flatten creases, clean smudges. Discard duplicates and unnecessary items.
- Scan in batches: Use your chosen tool to scan multiple pages into a single PDF. Ensure text is legible and orientation is correct.
- Name immediately: Rename each file using your standard convention before moving to the next.
- File in correct location: Save directly into the appropriate folder within your digital archive.
- Verify completeness: Open the file to confirm all pages are present and readable.
- Securely dispose: Shred original documents unless legally required to keep them physically.
If you're scanning large volumes, set aside 30–60 minutes daily rather than attempting a weekend marathon. Consistency prevents burnout and ensures higher quality.
Real Example: The Johnson Family’s Transition
The Johnsons had three filing cabinets filled with over a decade of unsorted paperwork. They began by clearing their kitchen table and sorting documents into labeled bins: “Taxes,” “Insurance,” “Kids’ School Records,” etc. Using Adobe Scan on their phones, they processed 20–30 pages per evening after dinner. Within three weeks, they’d digitized five years of tax returns, medical bills, and mortgage documents. After verifying backups, they shredded 80% of the originals. Now, when they need a past W-2 or immunization record, it takes less than 30 seconds to find it via search.
Ensure Security and Redundancy
Digital files are vulnerable to hardware failure, theft, and accidental deletion. Protect your investment with a robust backup strategy and security practices.
Follow the 3-2-1 rule:
- 3 copies of your data (original + two backups)
- 2 different media types (e.g., computer + external drive)
- 1 offsite backup (cloud storage)
Recommended cloud services include:
- Google Drive (15 GB free, integrates with Gmail)
- iCloud (ideal for Apple users)
- Dropbox (excellent file syncing)
- OneDrive (included with Microsoft 365)
For sensitive documents—such as wills, Social Security numbers, or medical diagnoses—add encryption. Tools like VeraCrypt (free) allow you to create encrypted containers. Alternatively, password-protect individual PDFs using Adobe Acrobat or free online tools, but store passwords securely in a manager like Bitwarden or 1Password.
Do’s and Don’ts of Digital Document Security
| Do’s | Don’ts |
|---|---|
| Use strong, unique passwords for cloud accounts | Store sensitive files in unencrypted email attachments |
| Enable automatic backups | Keep all files on a single laptop without backup |
| Review access permissions regularly | Share links to private documents via text or social media |
| Encrypt highly sensitive PDFs | Save passwords in plain text files |
Maintain the System Long-Term
A paperless system only works if it’s sustainable. Build habits that prevent paper from accumulating again.
Adopt these ongoing practices:
- Go paperless with providers: Switch to electronic billing for utilities, banks, and subscriptions.
- Digitize incoming mail immediately: Scan or photograph new documents upon arrival.
- Schedule monthly reviews: Dedicate 20 minutes each month to organize new files and delete temporary scans.
- Teach household members: Ensure everyone knows where to save shared documents.
Consider setting up automated workflows. For example, forward e-bills directly to a designated folder in your cloud drive using email rules. Or use apps like Evernote or Notion to auto-tag and index incoming documents.
Checklist: Building Your Paperless System
- Sort and purge unnecessary paper documents
- Select a scanning method (smartphone app or scanner)
- Design a logical folder structure
- Establish a consistent file-naming convention
- Scan and rename documents systematically
- Store files in organized digital folders
- Implement 3-2-1 backup strategy (local + cloud)
- Apply encryption to sensitive files
- Shred original documents when safe to do so
- Create habits to maintain the system monthly
Frequently Asked Questions
Do I need to keep original paper copies after scanning?
In most cases, no. Digitally scanned copies are legally valid for records such as tax documents, bank statements, and medical history. However, keep originals of irreplaceable items like birth certificates, passports, marriage licenses, and property deeds unless you’ve obtained certified duplicates. Even then, store them separately in a fireproof safe.
How can I search for a specific document quickly?
Use OCR-enabled scanning tools so text within documents is searchable. In macOS, use Spotlight; on Windows, use File Explorer search. Cloud platforms like Google Drive allow full-text search across PDFs. Tagging files with keywords (e.g., “insurance,” “2023”) also improves retrieval speed.
What should I do if my computer crashes?
If you follow the 3-2-1 backup rule, you’ll still have access to your files. Restore from your external drive or log into your cloud service from another device. This is why redundancy matters—never rely on a single storage point.
Conclusion: Start Small, Think Long-Term
Transitioning to a paperless home filing system isn’t about perfection—it’s about progress. You don’t need to digitize everything overnight. Begin with one drawer, one category, or even one type of bill. As you experience the benefits—no more frantic searches, no water-damaged tax records, no lost warranties—you’ll find motivation to keep going.
The goal isn’t just to eliminate paper but to create a smarter, safer, and more efficient way of managing your life’s essential documents. With the tools available today, anyone can build a system that lasts for years and adapts as needs change.


 浙公网安备
33010002000092号
浙公网安备
33010002000092号 浙B2-20120091-4
Comments
No comments yet. Why don't you start the discussion?