
Character decals have transformed the world of at-home manicures, offering a playful, creative way to express personality through nail art. Whether you're drawn to whimsical anime figures, charming Disney characters, or minimalist cartoon icons, applying decals is an accessible method to achieve salon-quality designs without advanced painting skills. With the right tools and technique, even beginners can create polished, long-lasting results. This guide walks you through every phase—from prep to preservation—so you can confidently craft eye-catching nail art that turns heads.
Essential Tools and Materials
Before applying any decal, it's crucial to gather the proper supplies. Using high-quality products not only improves application but also extends wear time. Here’s what you’ll need:
- Base coat (preferably ridge-filling or strengthening)
- Nail polish in your chosen base color
- Top coat (quick-dry and non-yellowing formula recommended)
- Character decals (water-slide or sticker-style)
- Nail file and buffer block
- Cuticle pusher or orange stick
- Tweezers (fine-tipped for precision)
- Lint-free wipes or cotton pads
- Acetone-free nail cleanser or rubbing alcohol
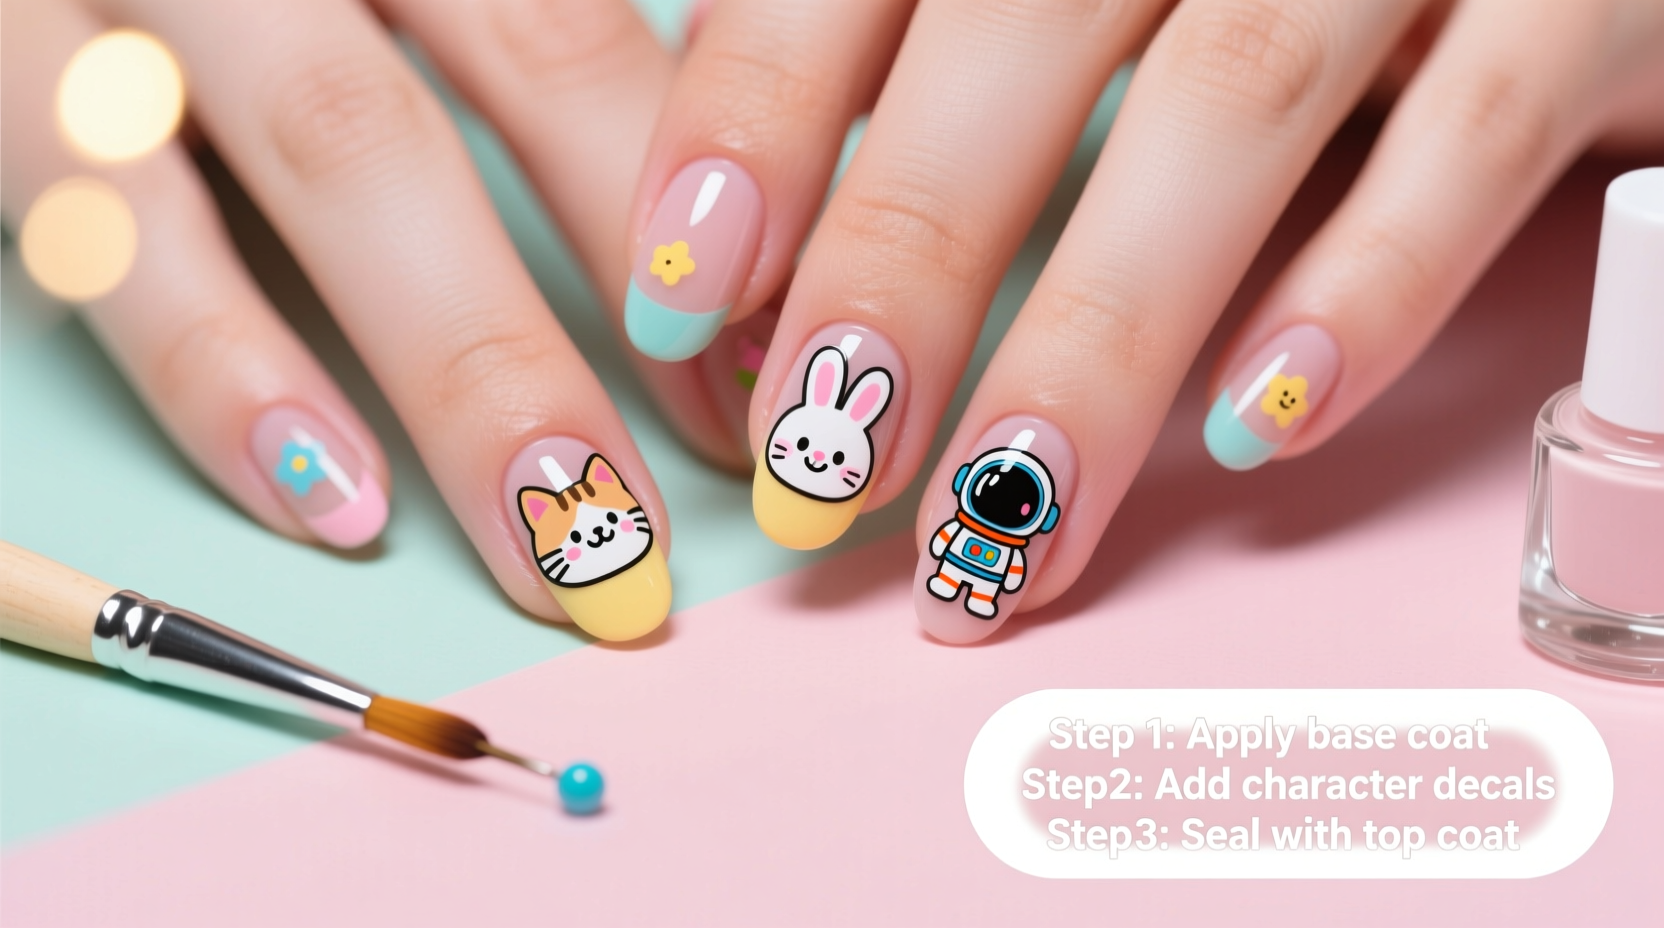
Step-by-Step Application Process
Applying character decals may seem simple, but skipping steps can lead to bubbling, misalignment, or premature chipping. Follow this detailed sequence for flawless results.
- Prep your nails. Remove old polish, shape nails to desired length, and gently push back cuticles. Buff the nail surface lightly to remove shine and ridges—this helps polish adhere better.
- Apply base coat. A thin, even layer protects the nail and creates a smooth canvas. Let it dry completely (about 2–3 minutes).
- Paint your base color. Choose a shade that complements your decals—neutral tones like white, pastel pink, or black work well for visibility. Apply two thin coats, allowing each to dry fully before adding the next.
- Select and prepare your decal. For water-slide decals, cut out the design just outside the image. Soak it in lukewarm water for 20–30 seconds until the paper feels slippery. Gently slide the decal off using tweezers.
- Position the decal. Place it on the nail where desired. Use tweezers to adjust alignment. Avoid touching it with fingers to prevent oils from interfering with adhesion.
- Gently press and smooth. Starting from the center, use a lint-free wipe or soft tool to press out air bubbles toward the edges. Work slowly to avoid tearing delicate transfers.
- Seal with top coat. Once all decals are applied and perfectly dry (wait at least 5 minutes), apply a thin layer of top coat over the entire nail. Extend slightly over the edges to seal the decal. Two layers are ideal for durability.
Do’s and Don’ts When Using Character Decals
Avoid common pitfalls by following best practices. The table below summarizes key recommendations:
| Do’s | Don’ts |
|---|---|
| Use a matte base for vibrant decal contrast | Apply decals on tacky or wet polish |
| Wait 5+ minutes after base color dries before placing decals | Press too hard and tear the transfer film |
| Trim decal close to the image to reduce visible edges | Skip the top coat—this leads to quick peeling |
| Layer multiple small decals for a collage effect | Soak decals longer than 30 seconds (paper disintegrates) |
| Store leftover decals in resealable bags with desiccant packs | Use oil-based removers near sealed decals during wear |
Real Example: Creating a Kawaii-Inspired Manicure
Sophie, a college student and fan of Japanese kawaii culture, wanted to recreate a Sanrio-themed design for a friend’s birthday party. She began with a clean, oval-shaped nail prep. After applying a milky white base coat and two layers of soft pink polish, she selected tiny water-slide decals of Hello Kitty, My Melody, and Cinnamoroll. Each was soaked briefly, carefully positioned on her ring and pointer fingers, then smoothed with a microfiber cloth. To add charm, she dotted clear rhinestones beside one decal using a wax pencil. After sealing everything with a glossy top coat, her nails stayed intact for nearly ten days—even through handwashing and typing. Her secret? “I waited extra time between layers and didn’t rush the top coat,” she said. “It made all the difference.”
Expert Insight on Longevity and Finish
“Decals fail not because of poor quality, but due to improper sealing. A flexible, non-shrinking top coat is non-negotiable—it locks in the design and prevents moisture from lifting the edges.” — Lena Torres, Professional Nail Technician & Educator
Torres emphasizes that many clients overlook the importance of capping the free edge of the nail with top coat. This simple move prevents chips caused by daily contact and dramatically increases wear time. She recommends UV-cured top coats for maximum durability, though high-performance regular polishes work well when reapplied every few days.
Pro Checklist for Flawless Decal Nails
Follow this concise checklist before, during, and after application to ensure success:
- ✅ Clean and shape nails properly
- ✅ Push back cuticles and dehydrate nail surface
- ✅ Apply base coat and let dry completely
- ✅ Paint base color in thin, even layers
- ✅ Wait until base is fully dry (no smudging)
- ✅ Cut decal precisely and soak only as needed
- ✅ Position with tweezers, then smooth gently
- ✅ Seal with two layers of high-gloss top coat
- ✅ Cap the free edge of each nail
- ✅ Allow full cure time (at least 30 minutes) before heavy use
Frequently Asked Questions
Can I mix decals with hand-painted designs?
Absolutely. Many artists combine decals with freehand details like dots, lines, or glitter gradients. Just ensure each layer is fully dry before adding the next. For example, paint a moon and stars background, apply a cat decal, then outline it with a fine brush for definition.
How do I fix a misaligned decal?
If caught early, gently lift the edge with a cuticle stick and reposition while still moist. Once dry or sealed, correction isn’t possible without removing the entire design. Precision during placement is key—take your time.
Are character decals safe for weak or damaged nails?
Yes, more so than aggressive filing or gel extensions. Since decals require minimal nail prep and no drilling, they’re gentler on compromised nails. Just maintain hydration with cuticle oil and avoid excessive peeling.
Final Thoughts and Creative Encouragement
Creating adorable nail art with character decals blends fun with finesse. It’s not just about decoration—it’s a form of self-expression that invites playfulness into everyday routines. With patience and attention to detail, anyone can master this technique and enjoy fresh, imaginative designs weekly. Don’t be afraid to experiment: layer decals, pair them with chrome powders, or alternate themed nails across both hands. The only limit is imagination.


 浙公网安备
33010002000092号
浙公网安备
33010002000092号 浙B2-20120091-4
Comments
No comments yet. Why don't you start the discussion?