
Peach heart nail art combines soft, romantic hues with timeless symbolism, making it a favorite for spring, summer, and special occasions. Achieving this delicate design at home doesn’t require professional training—just the right tools, patience, and technique. With a growing trend toward personalized self-care, more people are embracing DIY nail art as a creative outlet. This guide walks you through every stage of crafting elegant peach heart nails, from prep to polish, ensuring salon-quality results without leaving your bathroom.
Essential Tools and Materials
Before diving into the design, gather everything you’ll need. Having the right supplies on hand streamlines the process and prevents smudging mid-application. The beauty of nail art lies in its simplicity—most tools are affordable and reusable.
- Base coat (preferably ridge-filling)
- Peach nail polish (creamy or shimmer finish)
- White or nude polish for contrast
- Top coat (quick-dry formula recommended)
- Fine detail nail art brush (angled or liner style)
- Nail tape or striping tape (optional for clean edges)
- Cotton pads and acetone-free nail polish remover
- Nail file and buffer
- Orange stick or cuticle pusher
- Lint-free wipes or microfiber cloth
Prep Your Nails for a Flawless Finish
Even the most intricate design fails if the foundation is weak. Proper nail prep ensures longevity, smooth application, and even color distribution.
- Shape and file: Choose an oval or almond shape to complement the softness of peach tones. File in one direction to prevent splitting.
- Push back cuticles: Gently use an orange stick after soaking hands in warm water for 2–3 minutes.
- Buff lightly: Use a fine-grit buffer to smooth ridges without thinning the nail.
- Cleanse: Wipe each nail with a lint-free pad soaked in acetone-free remover to eliminate residue.
- Apply base coat: Cover each nail evenly and let dry for 2 minutes. This protects the nail and prevents staining.
“Skipping prep is the number one reason for chipping and uneven polish. Invest five extra minutes—it makes all the difference.” — Lila Monroe, Professional Nail Technician & Educator
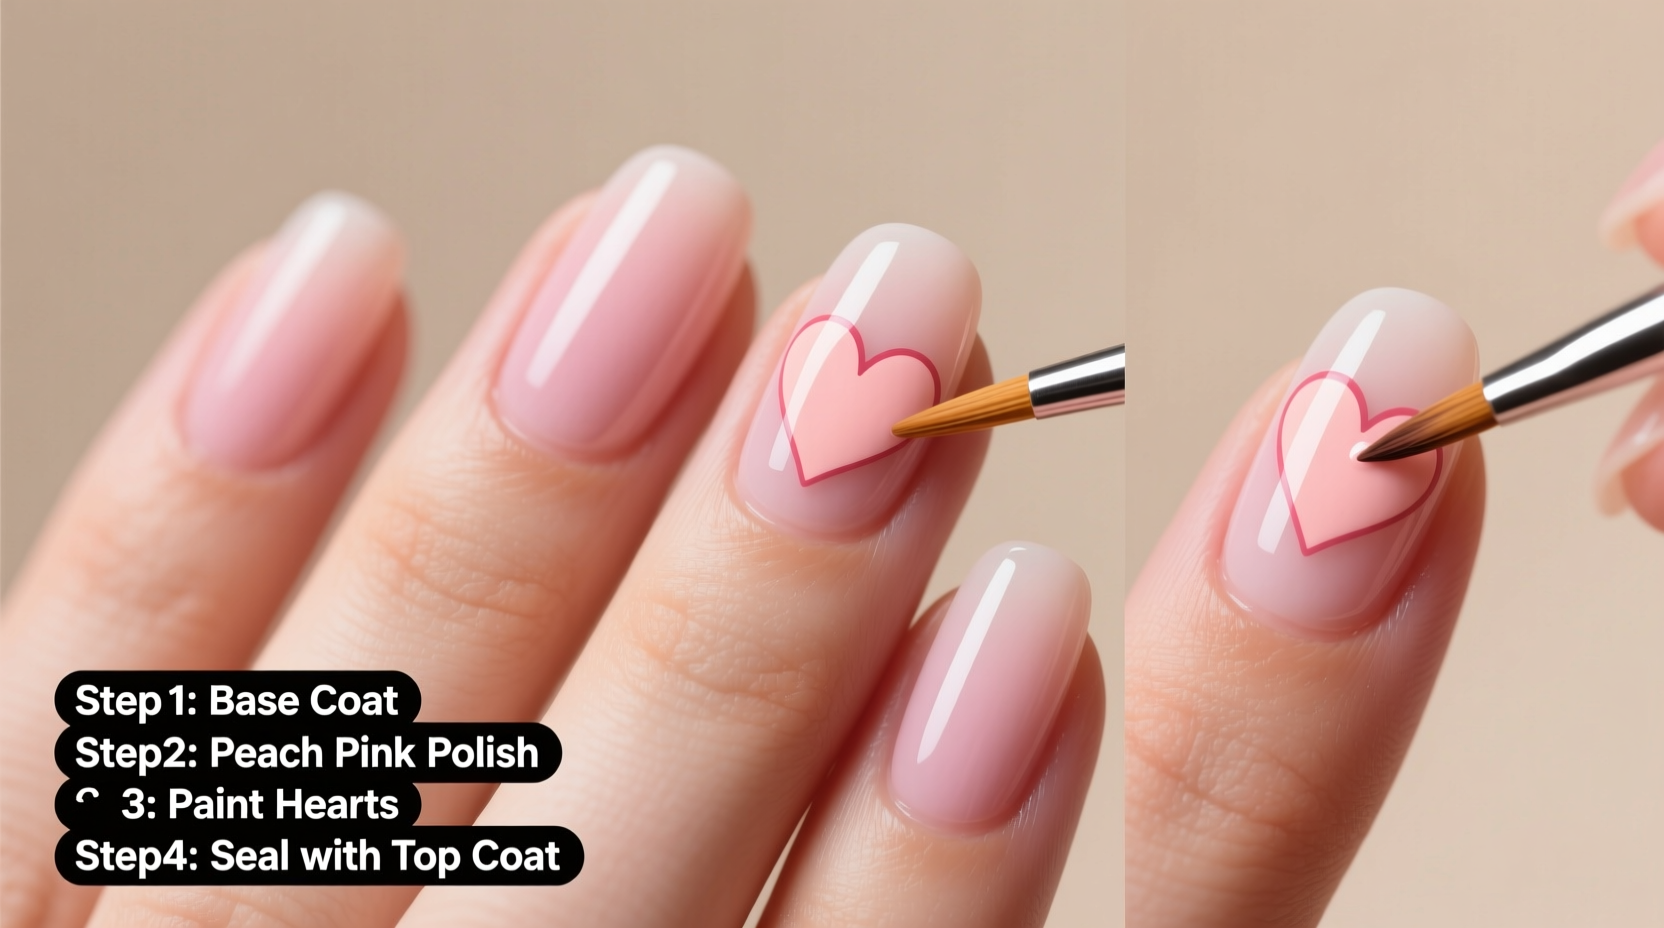
Step-by-Step Application of Peach Heart Design
The heart motif can be painted freehand or created using tape for precision. Below is a detailed timeline for both beginners and intermediate artists.
Phase 1: Apply the Base Color
Select a creamy peach polish for opacity. Apply two thin coats, waiting 2–3 minutes between layers. Thick coats lead to bubbling and longer drying times.
Phase 2: Plan the Heart Placement
Decide where the heart will sit—centered near the tip, slightly off-center, or at the cuticle for a “crescent moon” effect. Lightly mark the spot with a pencil dot if needed.
Phase 3: Paint the Heart
Use a fine liner brush and white or nude polish to draw the heart. Follow these steps:
- Start with a “U” shape at the bottom.
- Add two symmetrical curves rising from each side to form the top lobes.
- Close the top by connecting the curves gently.
- Let dry for 5 minutes before touching up edges.
Phase 4: Add Dimension (Optional)
For depth, use a tiny brush to add a subtle shadow inside the heart with a slightly darker peach shade. Alternatively, place a small rhinestone at the center for sparkle.
Phase 5: Seal the Design
Apply a high-gloss top coat. Wrap the tip of the nail to prevent premature chipping. Wait 10–15 minutes before using your hands.
Common Mistakes and How to Avoid Them
Even experienced DIYers make errors. Recognizing pitfalls helps refine your technique faster.
| Mistake | Why It Happens | Solution |
|---|---|---|
| Smudged hearts | Painting over tacky polish | Wait at least 5 minutes after color coats |
| Uneven lines | Brush too full or shaky hand | Dab excess polish; rest hand on surface |
| Peeling polish | Skipping base or top coat | Always seal with protective layers |
| Faded peach color | Thin or translucent application | Use two even coats of quality polish |
Mini Case Study: Sarah’s First-Time Success
Sarah, a 28-year-old graphic designer from Portland, had never tried nail art beyond basic colors. Inspired by a bridal photoshoot she styled, she wanted to recreate a soft peach heart look for her own wedding prep. Using drugstore polishes and a $5 nail art brush, she followed a method similar to the one outlined here. She prepped her nails thoroughly, used nail tape to create a crisp half-moon edge, then painted tiny hearts in white on each thumbnail. After sealing with top coat, her design lasted nine days with minimal chipping. “I was shocked how professional they looked,” she said. “It felt like I gave myself a luxury treat without spending a dime at the salon.”
Pro Tips for Long-Lasting Wear
To keep your peach heart nails looking fresh, follow these expert-backed habits:
- Wear gloves when washing dishes or cleaning to protect the polish.
- Reapply top coat every 2–3 days to maintain shine and durability.
- Avoid using nails as tools (e.g., opening cans or texting aggressively).
- Moisturize cuticles daily with oil to prevent peeling at the edges.
- Store polishes in a cool, dark place—heat and light degrade formulas.
FAQ
Can I use regular paintbrushes for nail art?
No. Regular brushes aren’t sterilized for cosmetic use and may harbor bacteria. Always use brushes designed for nail art—they’re finer, safer, and hold polish better.
How do I fix a crooked heart without starting over?
Dip a clean angled brush in remover and carefully trace the mistake. Clean the brush frequently to avoid spreading polish. Let dry before repainting.
Is there a way to make the heart look 3D?
Yes. Try shading one side of the heart with a slightly darker peach tone and highlight the opposite edge with a sheer iridescent polish for dimension.
Final Checklist Before You Begin
- ✅ Nails are cleaned, shaped, and buffed
- ✅ Base coat applied and dried
- ✅ Peach polish applied in two thin layers
- ✅ Heart placement planned or marked
- ✅ Fine brush loaded with contrasting polish
- ✅ Workspace well-lit and stable
- ✅ Top coat ready for sealing
Conclusion
Creating stunning peach heart nail art at home is more than just a beauty task—it’s an act of self-expression and mindfulness. With the right approach, even beginners can achieve results that rival salon work. The key lies in preparation, patience, and practice. Each attempt refines your skill, turning what once seemed intricate into second nature. Whether you're dressing up for a date, celebrating a milestone, or simply treating yourself, these delicate designs add a touch of warmth and elegance to your everyday look.


 浙公网安备
33010002000092号
浙公网安备
33010002000092号 浙B2-20120091-4
Comments
No comments yet. Why don't you start the discussion?