
In recent years, \"ins style\" — short for Instagram aesthetic — has become a dominant trend in fashion, beauty, and especially nail art. Characterized by minimalist shapes, soft pastels, delicate metallics, and subtle textures, ins style nails offer elegance with an effortless vibe. Achieving this look doesn’t require professional training or expensive tools. Nail stickers have revolutionized at-home manicures, making it easier than ever to create polished, on-trend designs in minutes. This guide walks you through the entire process, from prep to finishing touches, so you can achieve flawless ins-style nails using only stickers.
Understanding Ins Style Nail Aesthetics
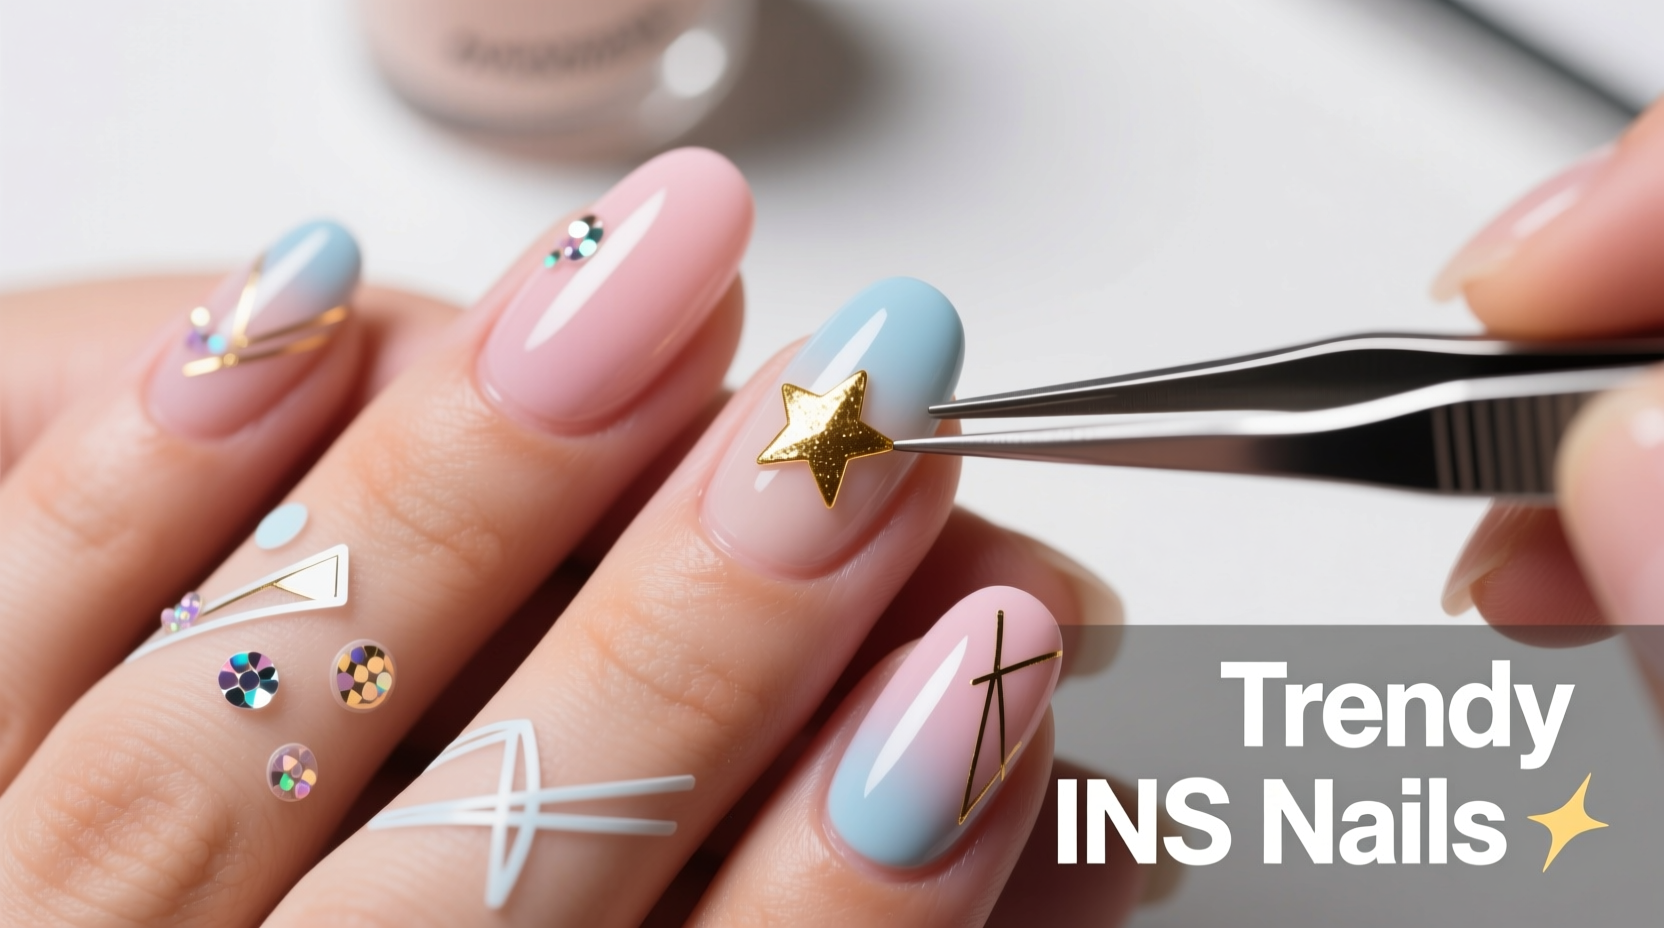
Ins style isn't about complexity—it's about intentionality. Think neutral tones like beige, milky white, and soft lavender paired with clean lines, tiny hearts, crescent moons, or micro-glitter accents. The goal is understated chic: nails that look curated but not overdone. Unlike bold glitter gradients or 3D embellishments, ins style favors subtlety and balance. Nail stickers designed for this aesthetic often feature fine details such as:
- Thin gold foil stripes
- Miniature abstract brushstroke motifs
- Tiny rhinestone clusters
- Geometric line patterns (half-moon, tip lines)
- Floral micro-patches in muted tones
The appeal of using stickers lies in precision. Freehand painting those hairline gold borders is challenging; stickers deliver consistent results every time, even for beginners.
Essential Tools and Materials
Before applying any design, gather the right supplies. Using quality products ensures longevity and a clean finish. Here’s what you’ll need:
- Base coat – Protects nails and prevents staining.
- Top coat – Seals the design and adds shine.
- Nail polish (base color) – Typically nude, sheer pink, or milky white for ins style.
- Nail stickers – Choose ones labeled “ins style,” “minimalist,” or “K-beauty.”
- Cuticle pusher & nail file – For shaping and prepping the nail bed.
- Nail adhesive tape (optional) – Helps position stickers perfectly.
- Tweezers or orange stick – For precise sticker placement.
- Lint-free wipes & acetone/nail cleanser – To remove oils before application.
Investing in a good top coat is crucial. A quick-dry, non-yellowing formula will keep your stickers intact for up to two weeks without peeling.
Step-by-Step Application Process
Follow these steps carefully to achieve a seamless, professional-looking result:
- Prep your nails. Remove old polish, shape your nails, and gently push back cuticles. Wipe each nail with a lint-free pad soaked in nail cleanser to remove natural oils and residue.
- Apply base coat. Even if your base color is sheer, always use a base coat to protect the nail and improve polish adhesion.
- Paint your base color. Apply one or two thin layers of your chosen ins-style shade. Let dry completely—this is critical. Sticky polish will ruin sticker adhesion.
- Select and size your stickers. Peel the sticker from its backing using tweezers. If it’s too large, trim it with small scissors before application.
- Position the sticker. Align it carefully on the nail. Use adhesive tape as a guide for straight edges (e.g., half-moon or French tips). Press down gently with an orange stick to smooth out air bubbles.
- Seal the design. Once all stickers are applied, cover the entire nail with a generous layer of top coat. Wrap the tip to prevent chipping.
- Final wipe and cure (if needed). After the top coat dries, clean the nail surface with a cleanser to remove any tackiness. For gel stickers, cure under UV/LED lamp for 30–60 seconds.
“Stickers are game-changers for minimalist aesthetics. They allow everyday users to access intricate detailing that would otherwise take years to master.” — Lina Park, Nail Artist & K-Beauty Educator
Design Ideas and Styling Tips
Ins style thrives on variety within simplicity. Rotate between different looks to keep your manicure fresh while staying on-theme. Try these popular combinations:
| Design | Sticker Type | Base Color | Best For |
|---|---|---|---|
| Single gold stripe | Foil line sticker | Barely-there pink | Daily wear, office settings |
| Half-moon accent | Crescent-shaped transfer | Oatmeal beige | Soft glam looks |
| Micro heart cluster | Dot-sized heart decals | Milky white | Spring/romantic themes |
| Abstract corner art | Minimalist paint-splatter patch | Light gray | Edgy yet refined style |
Common Mistakes and How to Avoid Them
Even simple techniques can go wrong without attention to detail. Here are frequent errors and how to fix them:
- Peeling stickers – Usually caused by oily nails or rushing the drying process. Always wait 5–10 minutes after the base color before applying stickers.
- Air bubbles – Press stickers from the center outward using a cuticle stick. Don’t stretch the sticker—it may tear.
- Uneven edges – Use tape barriers for crisp lines. Remove tape immediately after placing the sticker, before sealing with top coat.
- Chips around sticker edges – Ensure your top coat fully covers the sticker’s perimeter. Reapply top coat every 3–4 days for durability.
Mini Case Study: From Beginner to Confident DIYer
Sophie, a 27-year-old graphic designer, wanted salon-quality nails without weekly appointments. She tried freehand designs but struggled with symmetry. After purchasing a $6 set of Korean ins-style nail stickers featuring gold arcs and tiny stars, she followed the prep-and-seal method outlined here. Her first attempt had minor bubbles, but by the second try—using tweezers and proper drying time—she achieved a flawless set. Now, she rotates four base colors and uses seasonal sticker packs for holidays and events. “It takes me 20 minutes max,” she says. “People think I go to a nail bar every week.”
FAQ
Can I reuse nail stickers?
No, most nail stickers are single-use. Once removed, they lose adhesive quality and may tear. Store unused sheets in a cool, dry place to preserve their lifespan.
How long do sticker designs last?
With a quality top coat and proper care, sticker-based manicures last 7–14 days. Avoid prolonged water exposure (e.g., dishwashing) and wear gloves when possible.
Are nail stickers safe for weak or damaged nails?
Yes—stickers are less damaging than acrylics or gels. Since they don’t require drilling or heavy filing, they’re ideal for sensitive or thin nails. Just ensure gentle removal with acetone-soaked pads.
Checklist: Your Ins Style Manicure Routine
- ✅ Clean and shape nails
- ✅ Push back cuticles
- ✅ Wipe nails with cleanser
- ✅ Apply base coat
- ✅ Paint base color (2 thin coats)
- ✅ Wait 10 minutes for full dry
- ✅ Trim and position stickers
- ✅ Seal with 1–2 top coats
- ✅ Clean tacky residue
- ✅ Repeat every 10–14 days
Conclusion
Creating trendy ins style nail designs with stickers is accessible, affordable, and endlessly creative. You don’t need artistic talent—just patience, the right materials, and a clear process. Whether you're dressing up a simple nude base with a single gold line or adding subtle sparkle to your ring finger, stickers empower you to express your style with confidence. With practice, your at-home manicures will rival salon work—without the cost or time commitment.


 浙公网安备
33010002000092号
浙公网安备
33010002000092号 浙B2-20120091-4
Comments
No comments yet. Why don't you start the discussion?