
A blender is one of the most versatile kitchen appliances, essential for smoothies, soups, sauces, and more. But frequent use leads to buildup—residue in hard-to-reach crevices, lingering odors, and bacterial growth. Over time, a poorly maintained blender can compromise food safety and performance. While many users wipe down the jar after use, true hygiene requires a deeper, systematic approach. This guide walks you through a safe, effective deep cleaning process that preserves your blender’s integrity while ensuring it operates at peak efficiency.
Why Deep Cleaning Matters
Surface cleaning doesn’t address what happens beneath the blade assembly or inside the gasket—the rubber seal between the blade and the jar. These areas trap moisture and organic matter, creating an ideal environment for mold and bacteria. According to the U.S. Department of Agriculture (USDA), foodborne pathogens can survive on damp kitchen surfaces for days. A study published in *Food Microbiology* found that 30% of tested household blenders showed detectable microbial contamination when not cleaned properly.
Beyond health concerns, neglecting deep cleaning affects performance. Buildup around blades reduces cutting efficiency, forces the motor to work harder, and shortens the appliance's lifespan. Regular deep maintenance prevents corrosion, maintains blending consistency, and keeps odors from transferring between recipes.
Pre-Cleaning Safety Checks
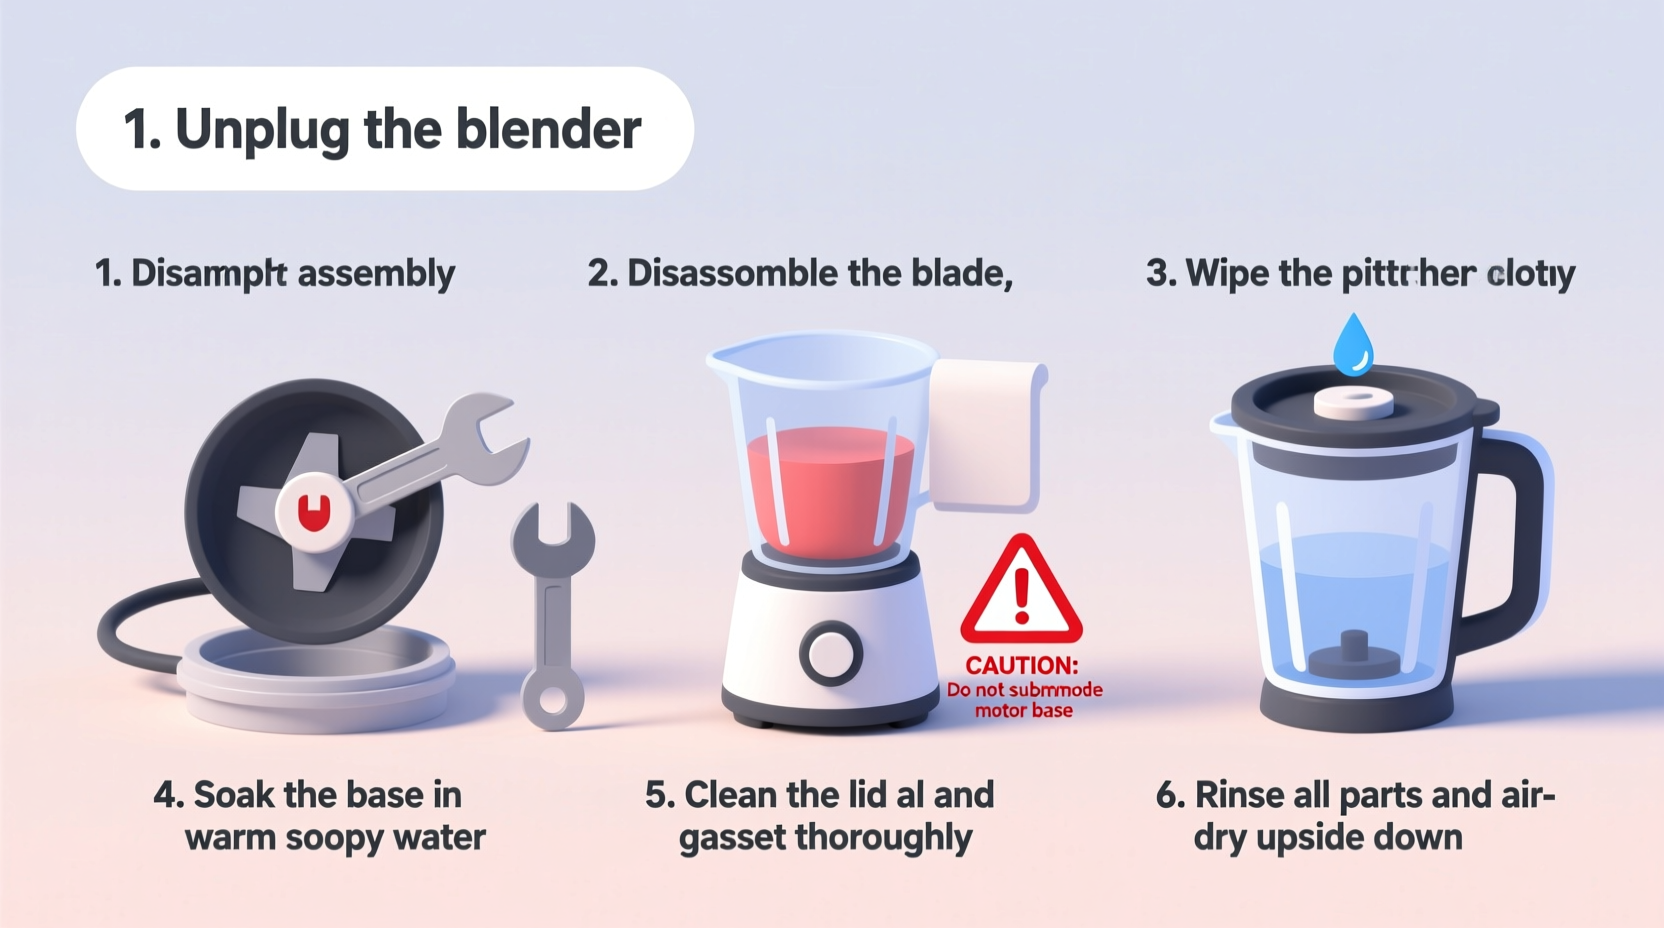
Before disassembling any part of your blender, safety must come first. Blenders contain sharp blades and electrical components. Mishandling can lead to injury or damage.
- Unplug the unit. Never attempt cleaning while the blender is connected to power.
- Allow cooling time. If used recently, especially for hot liquids, let the motor base cool completely.
- Check manufacturer guidelines. Not all blenders are disassemblable or dishwasher-safe. Refer to your model’s manual before proceeding.
- Use protective gloves. Latex or rubber gloves protect hands from cuts during blade handling.
Most high-performance blenders feature removable blades and seals, but budget models may have sealed bases. In such cases, avoid submerging the entire base. Focus only on parts explicitly labeled as washable.
Step-by-Step Deep Cleaning Process
This method works for both countertop and personal-size blenders with removable components. Follow these steps carefully to achieve a thorough clean without damaging seals or motors.
Step 1: Disassemble Removable Parts
Remove the jar, lid, blade assembly, and rubber gasket. Place them on a clean surface. Most modern blenders allow the blade housing to twist off the bottom of the jar. Use a towel for grip if needed.
Step 2: Soak Components in Warm, Soapy Water
Fill a sink or basin with warm water and a few drops of mild dish soap. Submerge the jar, lid, blade, and gasket. Let soak for 10–15 minutes. This loosens stuck-on particles and softens residue.
Step 3: Scrub All Surfaces
Using a soft-bristle brush or non-abrasive sponge, scrub the interior and exterior of the jar. Pay special attention to the threads where the blade attaches and under the rim. For the blade assembly, gently brush around each edge—never use steel wool or harsh pads, which can scratch metal and promote rust.
The rubber gasket often harbors mold due to trapped moisture. Remove it from the blade base and clean both sides with a toothbrush. Rinse thoroughly.
Step 4: Clean the Motor Base
Wipe the motor base with a damp cloth. Never immerse it in water. Dampen a corner of the cloth to clean around control buttons and ventilation slots. Dry immediately with a microfiber towel.
Step 5: Sanitize with Vinegar Solution
Mix equal parts white vinegar and water. Pour into the blender jar until halfway full. Attach the blade assembly securely. Blend on high for 30 seconds. This kills bacteria and removes mineral deposits. Afterward, rinse all parts thoroughly with clean water.
Step 6: Air-Dry Completely
Place all components on a drying rack or clean towel. Allow to air-dry fully before reassembly. Moisture trapped under the gasket promotes mold regrowth. Do not return parts to the blender until completely dry—this may take 1–2 hours.
Step 7: Reassemble and Test
Once dry, reattach the blade and gasket firmly. Fill the jar halfway with water, secure the lid, and run the blender for 10 seconds to ensure smooth operation. Wipe down again if necessary.
“Many people overlook the gasket, but it’s the most common source of persistent odors and microbial growth in blenders.” — Dr. Lena Torres, Food Safety Specialist at the National Kitchen Hygiene Institute
Cleaning Do’s and Don’ts
| Do’s | Don’ts |
|---|---|
| Use warm, soapy water for soaking | Never submerge the motor base |
| Disassemble and clean the gasket monthly | Avoid bleach unless specified by the manufacturer |
| Sanitize with vinegar or diluted hydrogen peroxide | Don’t use abrasive scrubbers on plastic jars |
| Air-dry all parts before storage | Never force stuck components apart |
| Check for cracks or warping during cleaning | Don’t leave wet parts assembled overnight |
When to Replace Parts
Even with proper care, blender components degrade over time. Inspect each part during deep cleaning:
- Blades: Look for dullness, pitting, or looseness. Replace if they no longer chop efficiently.
- Gasket: Check for brittleness, cracking, or discoloration. A compromised seal can leak and harbor bacteria.
- Jar: Scratches or cloudiness in plastic jars indicate wear. Glass jars are more durable but can chip.
- Lid: Ensure the vent cover and measuring cup are intact and fit snugly.
Manufacturers typically offer replacement parts. Using genuine components ensures compatibility and maintains warranty coverage. As a general rule, replace the blade assembly every 1–2 years with regular use.
Mini Case Study: Eliminating Persistent Odors
Sarah, a health coach from Portland, noticed her morning smoothies tasted faintly sour despite daily rinsing. She assumed it was ingredient-related until a friend pointed out a musty smell coming from the blender’s base. Upon disassembling the unit, she discovered black specks under the gasket—mold colonies thriving in residual moisture.
Following the deep cleaning steps outlined here, Sarah soaked the parts, scrubbed the gasket with a toothbrush, and ran a vinegar cycle. The odor vanished. She now deep cleans her blender every two weeks and stores the gasket separately to prevent recurrence. “I didn’t realize how much I was compromising flavor and safety,” she said. “Now I treat deep cleaning like brushing my teeth—non-negotiable.”
Alternative Cleaning Methods
While hand-washing is safest, some users prefer alternative techniques. Below is a comparison of popular methods:
Vinegar and Baking Soda Cycle
Add one cup water, two tablespoons vinegar, and one teaspoon baking soda to the jar. Blend for 30 seconds. The fizzing action lifts debris. Rinse well afterward.
Dishwasher-Safe Components
If your model specifies dishwasher safety, place the jar, lid, and blade (if detachable) on the top rack. Avoid high-heat drying cycles, which can warp plastic or degrade rubber seals over time.
Lemon Juice Deodorizing
Squeeze half a lemon into the jar, add warm water, and blend for 20 seconds. Citric acid breaks down residue and leaves a fresh scent. Ideal for quick refreshes between deep cleans.
Note: Never mix vinegar and bleach—even in trace residues—as this produces toxic chlorine gas.
Deep Cleaning Checklist
Keep this checklist handy for your next deep cleaning session:
- ✅ Unplugged the blender
- ✅ Removed jar, lid, blade, and gasket
- ✅ Soaked parts in warm, soapy water (with baking soda)
- ✅ Scrubbed jar interior, threads, and blade edges
- ✅ Cleaned gasket with toothbrush
- ✅ Wiped motor base with damp cloth
- ✅ Sanitized with vinegar solution
- ✅ Rinsed all parts thoroughly
- ✅ Air-dried components completely
- ✅ Reassembled and tested operation
- ✅ Inspected for wear or damage
Frequently Asked Questions
How often should I deep clean my blender?
For regular users (3+ times per week), deep clean every two weeks. Occasional users can do it monthly. Signs it’s time include lingering smells, visible film under the blade, or difficulty securing the jar.
Can I use bleach to disinfect my blender?
Only if recommended by the manufacturer. If so, dilute one teaspoon of unscented bleach per quart of water. Soak for no more than five minutes, then rinse three times with clean water. Residual bleach can leach into food and cause irritation.
Why does my blender still smell after cleaning?
Odors usually stem from trapped moisture under the gasket or biofilm buildup in microscopic scratches. Ensure complete drying and consider replacing old gaskets. Running a lemon-vinegar cycle weekly can prevent recurrence.
Conclusion: Make Deep Cleaning a Habit
A clean blender isn’t just about appearance—it’s about safety, performance, and longevity. Taking 20 minutes every two weeks to perform a thorough cleaning protects your investment and ensures every blend is fresh and hygienic. The process is simple, cost-effective, and requires only basic household items. By incorporating these steps into your routine, you eliminate hidden hazards and maintain consistent results.


 浙公网安备
33010002000092号
浙公网安备
33010002000092号 浙B2-20120091-4
Comments
No comments yet. Why don't you start the discussion?