
Running a WordPress site on Pressable offers speed, scalability, and managed support tailored for high-performance websites. However, when it comes to developing new features, testing plugins, or debugging issues, making changes directly on a live environment is risky. That’s where LocalWP comes in—a powerful, free tool that allows developers and site owners to run an exact copy of their Pressable-hosted WordPress site on their local machine.
By setting up your Pressable site locally using LocalWP, you gain a safe sandbox to experiment, build, and refine without affecting your live audience. This guide walks through the entire process—from exporting your site data to launching a fully functional local version—with clear instructions, expert insights, and practical tips to ensure a smooth setup.
Why Run Your Pressable Site Locally?
Pressable, built on the Flywheel platform and powered by AWS, delivers excellent uptime and performance. But even the best hosting doesn’t eliminate the need for local development. Testing updates, custom code, or theme modifications on a live server can lead to downtime, broken layouts, or data loss.
Local environments solve this problem. With LocalWP, you get:
- A secure space to test updates before pushing them live
- Faster iteration cycles without relying on server uploads
- The ability to debug PHP errors or JavaScript conflicts safely
- Full database access for development and migration planning
“Developers who use local environments reduce production errors by over 70%.” — Sarah Nguyen, Senior WordPress Engineer at 10up
Prerequisites: What You’ll Need Before Starting
Before downloading your Pressable site, ensure your system meets the requirements for LocalWP and that you have all necessary credentials and tools ready.
System Requirements
- Windows 10/11 (Pro or higher recommended), macOS 10.15+, or Linux
- At least 8GB of RAM (16GB preferred)
- 20GB+ of free disk space
- Docker must be allowed to run (installed automatically by LocalWP)
Account & Access Requirements
- Admin access to your Pressable dashboard
- FTP/SFTP credentials (optional but helpful)
- phpMyAdmin or database export access via Pressable
- LocalWP installed on your computer (https://localwp.com)
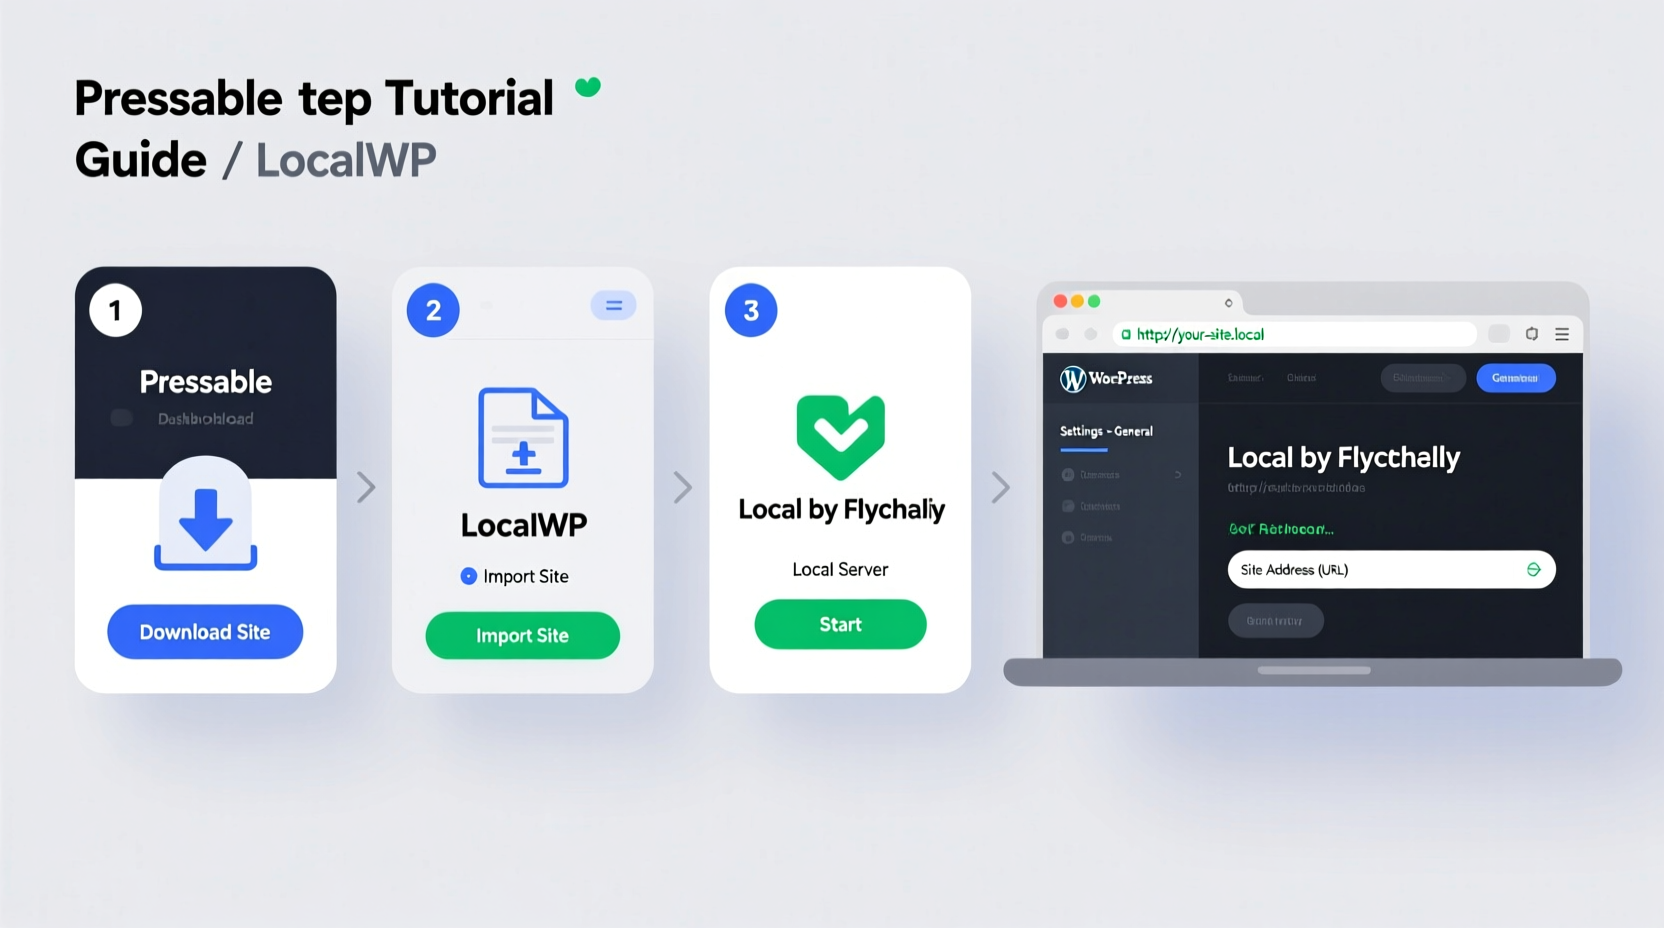
Step-by-Step Guide to Migrate Your Pressable Site to LocalWP
Moving a Pressable-hosted WordPress site to LocalWP involves four core phases: backup creation, environment setup, data import, and configuration. Follow each step carefully to avoid missing files or database inconsistencies.
- Export Your Site Files from Pressable
Log into your Pressable dashboard, select your site, and go to the “Backup” tab. Download a full backup including all files under/sites/{your-site}/files. Alternatively, use SFTP to manually download thewp-contentfolder, which contains themes, plugins, and uploads. - Export Your Database
In the same Backup section, locate the database export option. Click “Download SQL Dump” to get a complete snapshot of your current database. Save this file securely—it contains user data, settings, and content. - Create a New Site in LocalWP
Open LocalWP and click “Create a New Site.” Choose a meaningful name like “pressable-mysite-local.” Select the latest PHP version and enable SSL (recommended). Leave the default settings unless you’re replicating specific configurations. - Replace Local Site Files
Once LocalWP finishes creating the site, navigate to its root directory via the “Open Site Directory” option. Replace the entirewp-contentfolder with the one downloaded from Pressable. Confirm overwrite prompts if any. - Import the Database
Go to the “Database” tab in LocalWP and open Adminer (or phpMyAdmin if configured). Delete all existing tables in the local database, then click “Import” and upload your SQL dump file. Wait for the import to complete—this may take several minutes depending on size. - Update Site URL and Home Options
After import, WordPress still thinks it's running on your live domain. To fix this, run two SQL queries in Adminer:UPDATE wp_options SET option_value = 'http://yoursitename.local' WHERE option_name = 'siteurl';
Replace
UPDATE wp_options SET option_value = 'http://yoursitename.local' WHERE option_name = 'home';yoursitename.localwith your actual LocalWP site URL shown in the app. - Clear Caches and Test Login
Restart the site in LocalWP. Visithttp://yoursitename.local/wp-adminand log in using your original Pressable admin credentials. If login fails, verify thewp_userstable imported correctly.
Troubleshooting Common Issues
Even with careful execution, some issues may arise during migration. Here are frequent problems and how to resolve them.
| Issue | Possible Cause | Solution |
|---|---|---|
| White screen after login | Missing or corrupted theme files | Re-upload the active theme folder via SFTP or re-copy wp-content |
| Database connection error | Incorrect DB credentials in wp-config.php | Use LocalWP’s “Advanced” > “Config Files” to verify host, user, password match |
| Images not loading | Hardcoded URLs pointing to live site | Run a search-replace in the database or use WP CLI: wp search-replace 'https://yoursite.com' 'http://yoursite.local' |
| Plugins deactivated | License checks failing off-domain | This is normal; premium plugins often deactivate locally. Reactivate when pushing back live. |
Real Example: A Developer’s Workflow Using LocalWP
Jamal, a freelance WordPress developer managing multiple client sites on Pressable, used to make small edits directly on staging environments. After accidentally breaking a WooCommerce checkout page during a plugin update, he decided to adopt a strict local-first workflow.
Now, whenever a client requests changes, Jamal exports the latest backup from Pressable, imports it into LocalWP, and tests all modifications locally. He develops new functionality, checks responsiveness, and confirms compatibility across browsers—all before deploying a single change. Once verified, he uses deployment tools like WordMove or manual sync to push only the updated files back to Pressable.
His error rate dropped to zero, client satisfaction improved, and his development time decreased by nearly 40% due to faster load times and offline access.
Best Practices Checklist
📋 Local Migration Checklist- ✅ Back up your Pressable site fully before starting
- ✅ Install and update LocalWP to the latest version
- ✅ Export both files and database from Pressable
- ✅ Create a new site in LocalWP with matching PHP version
- ✅ Replace wp-content folder with your exported one
- ✅ Import SQL dump into LocalWP’s database
- ✅ Update siteurl and home entries in wp_options
- ✅ Test frontend and backend functionality thoroughly
- ✅ Use search-replace for absolute URLs if assets don’t load
- ✅ Document the process for future migrations
Frequently Asked Questions
Can I sync changes back to my Pressable site?
Yes, but manually. LocalWP does not auto-push to live servers. You can use SFTP to upload modified files and tools like WP Migrate DB to handle database synchronization. Always back up your live site before importing changes.
Why are my forms or memberships not working locally?
Some services (like MemberPress or Gravity Forms) rely on license validation tied to your domain. They may disable functionality on .local domains. This doesn’t affect testing form logic or styling—just expect limited activation status.
Is LocalWP safe for handling sensitive client data?
Yes, because everything stays on your machine. No data is uploaded to the cloud unless you explicitly deploy it. For extra security, encrypt your local drive and avoid sharing database exports.
Final Thoughts and Next Steps
Setting up your Pressable site locally with LocalWP transforms how you manage WordPress development. It introduces a layer of safety, efficiency, and control that simply isn’t possible when editing directly on remote servers.
Once configured, your local environment becomes a reliable replica of your live site—ideal for testing, training, or redesigning without consequences. Over time, this practice builds better habits, reduces risk, and enhances your technical confidence.


 浙公网安备
33010002000092号
浙公网安备
33010002000092号 浙B2-20120091-4
Comments
No comments yet. Why don't you start the discussion?