
Drawing a lion might seem intimidating at first, especially with its wild mane and expressive face. But with the right approach, even complete beginners can create a recognizable and satisfying lion sketch in under 30 minutes. The key is breaking down the complex form into basic shapes, focusing on proportions, and building details gradually. This guide walks you through each stage with clear instructions, practical tips, and structured exercises to help you draw a confident, simplified lion—no prior experience required.
Why Start with a Lion?
Lions are iconic subjects in beginner art because they combine symmetry, bold features, and distinct textures. Their large head, strong facial structure, and flowing mane offer excellent opportunities to practice shape-building, line control, and shading. More importantly, lions are forgiving when drawn simply—their exaggerated features allow room for artistic interpretation without losing identity.
“Beginners often fear realism, but animals like lions respond well to stylized simplicity. Focus on character, not perfection.” — Marcus Reed, Art Instructor & Children’s Illustration Specialist
What You’ll Need
Gathering the right tools sets the foundation for a smooth drawing experience. While professional supplies enhance results, this guide is designed for accessibility.
- A standard #2 (HB) pencil
- An eraser (preferably a kneaded eraser for gentle corrections)
- A ruler (optional, for alignment checks)
- Plain printer paper or a sketchbook
- A pencil sharpener (keep your lines clean and precise)
No coloring materials are required for this version, though you may choose to add soft shading with the side of your pencil later.
Step-by-Step Guide: Drawing a Simple Lion
Follow these seven steps to create a front-facing lion suitable for beginners. Each phase builds on the last, ensuring steady progress without overwhelm.
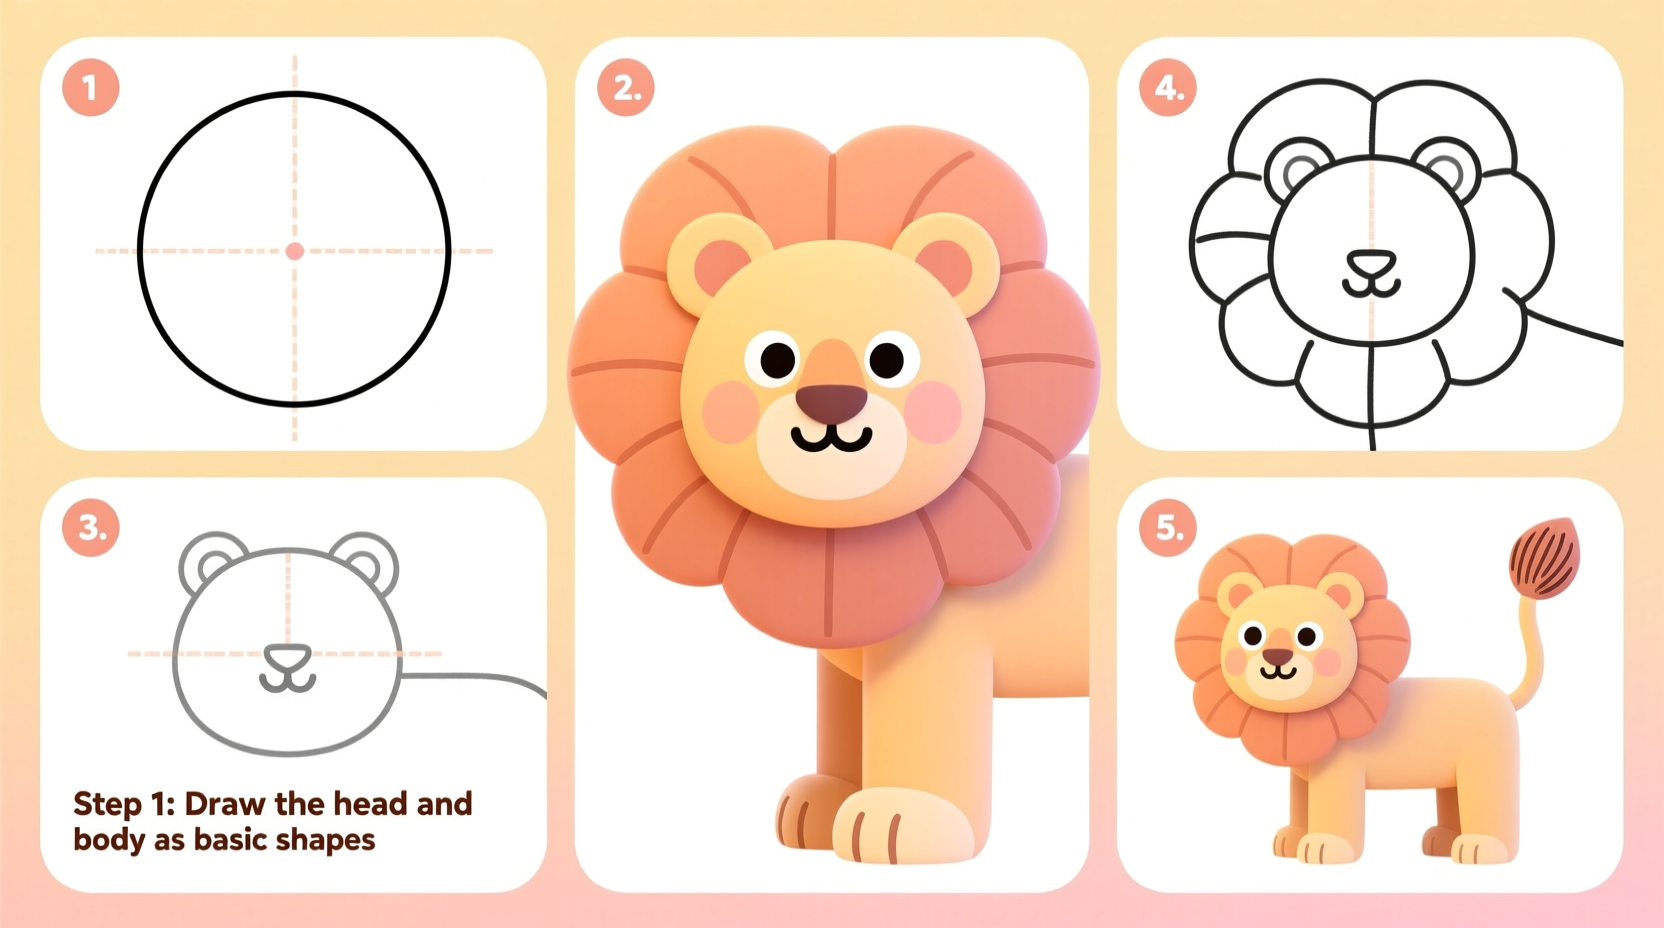
- Draw the Head Shape
Start with a large circle in the center of your page. This will be the base for the lion’s head. Don’t worry about it being perfect—a slightly wobbly circle still works. This circle represents the skull, so keep it sizable to leave room for facial features. - Add the Jawline
Below the circle, draw a wide U-shape that connects at both sides to form the lower jaw. The U should be about half the height of the circle. Think of it as a rounded triangle with soft edges. This creates the fullness of the lion’s face. - Sketch the Mane
Now, draw a larger, irregular oval around the head. This doesn’t need to be symmetrical—lions’ manes are naturally uneven. Let the outline extend more at the sides and back, tapering slightly at the chin. This outer shape frames the head and gives volume to the mane. - Place the Facial Guidelines
Lightly draw a vertical line down the center of the face and a horizontal line across the middle of the head circle. These intersecting lines help align the eyes, nose, and mouth symmetrically. Extend the horizontal line slightly into the jaw area. - Draw the Eyes, Nose, and Mouth
- Place two almond-shaped eyes along the horizontal line, one on each side of the vertical center.
- Below the center intersection, draw a small upside-down triangle for the nose.
- From the base of the nose, draw a short vertical line down, then curve two lines outward to form a slight “W” shape for the mouth.
- Add small curved lines above the eyes for eyebrows (optional, adds expression).
- Refine the Ears and Whisker Pads
- On top of the head circle, draw two rounded triangles for ears. Angle them slightly outward.
- On each side of the muzzle, sketch a small teardrop shape for whisker pads.
- Inside each ear, draw a smaller curved shape to suggest inner detail.
- Finalize and Clean Up
Erase the internal guidelines once all features are placed. Go over your final lines with slightly firmer pressure to define the lion. Add short, outward strokes around the mane to suggest texture. Keep the strokes directional—flowing from the face outward—to mimic fur movement.
Common Mistakes and How to Avoid Them
Even simple drawings can go off track if foundational errors aren’t caught early. Here’s a comparison table highlighting frequent beginner issues and their fixes.
| Mistake | Why It Happens | How to Fix It |
|---|---|---|
| Poor eye alignment | Skipping facial guidelines | Always use light construction lines to map symmetry before adding details. |
| Mane looks flat | Using a smooth, round outline | Add jagged, uneven edges to mimic natural fur clumps. |
| Face too small | Overemphasizing the mane early | Build the face first, then expand outward with the mane. |
| Too much erasing damages paper | Pressing too hard during sketching | Use light, ghost-like strokes until the structure is confirmed. |
Practice Checklist: Build Confidence with Repetition
Improvement comes from consistent, mindful practice. Use this checklist every time you draw a lion to reinforce good habits.
- ☑ Lightly sketch the head circle and jaw before committing to lines
- ☑ Use vertical and horizontal guides for facial symmetry
- ☑ Draw the mane as an extension of the head, not a separate halo
- ☑ Keep ears proportional—no larger than the eyes
- ☑ Refine slowly; erase guidelines only after final lines are set
- ☑ Add texture last—short strokes for fur near the face, longer ones at the edges
- ☑ Step back and view your drawing from a distance to assess balance
Mini Case Study: From Frustration to First Success
Jamie, a 10-year-old student with no formal art training, tried drawing a lion three times before following this guide. The first attempt had misaligned eyes and a tiny face swallowed by a circular mane. The second was better but lacked definition. After using the step-by-step method—especially the facial guidelines and jawline construction—Jamie’s third sketch showed clear improvement. The lion looked alert and balanced. With encouragement, Jamie added light shading under the mane and called it “Leo.” Two weeks later, three more versions hung on the fridge, each showing growing confidence in line control and proportion.
Frequently Asked Questions
Can I draw a side-view lion using this method?
Yes, but with adjustments. For a profile, replace the central circle with an oval rotated horizontally. The snout extends forward, and the mane flows backward from the head. Facial guidelines become a single horizontal line across the oval. Practice the front view first—it’s easier to master symmetry before tackling angles.
My mane looks too neat. How do I make it look furry?
Avoid smooth outlines. Instead, use broken, staggered lines that vary in length. Imagine clumps of fur rather than a solid shape. Lightly sketch overlapping wisps around the outer edge, especially near the cheeks and neck. Less is more—suggest texture rather than drawing every strand.
Do I need to shade the drawing?
Shading is optional for this beginner exercise. However, adding soft graphite with the side of your pencil beneath the mane, behind the ears, and under the jaw can create depth. Use your fingertip or a blending stump for a smooth gradient. Always apply shading last, after all lines are finalized.
Keep Practicing, Keep Improving
Drawing is a skill built through repetition and observation. Your first lion doesn’t need to be gallery-worthy—only a little better than the last one. Return to this guide whenever you feel stuck. Try drawing the lion smaller, larger, tilted, or with a friendly expression. Challenge yourself to draw it from memory after three attempts. Each session strengthens hand-eye coordination and visual problem-solving.
“The best artists weren’t born with talent—they drew badly hundreds of times before finding their voice.” — Lena Torres, Visual Arts Educator


 浙公网安备
33010002000092号
浙公网安备
33010002000092号 浙B2-20120091-4
Comments
No comments yet. Why don't you start the discussion?