
Four leaf clover star bracelets have become a beloved accessory for their symbolic meaning of luck, love, and protection. Whether gifted or self-purchased, these delicate pieces often feature intricate chains and adjustable closures designed for flexibility. However, even with an adjustable clasp, achieving a truly personalized fit can be tricky without the right approach. A bracelet that’s too loose may slip off, while one that’s too tight can restrict circulation or damage the chain over time.
The good news is that with a few simple tools and careful technique, you can fine-tune your bracelet’s length for all-day comfort and security. This guide walks you through each stage—from measuring your wrist to securing the final link—with precision and care. Whether you're adjusting a new purchase or restoring an old favorite, this process ensures your bracelet sits just right: snug enough to stay put, but loose enough to breathe.
Understanding Your Bracelet’s Design
Most four leaf clover star bracelets use a trace chain or rolo chain paired with a spring ring or lobster clasp and multiple adjustment links. These extra links—often two to five—are not decorative; they’re functional, allowing wearers to customize the fit across different wrist sizes. The clover charm itself is typically centered on the chain, so balance matters when shortening or extending.
Before making any adjustments, examine how your bracelet is constructed:
- Chain Type: Trace chains are common due to their smooth drape and strength. They consist of oval links connected in a continuous line.
- Closure Mechanism: Spring ring clasps are standard. They require a small hook to latch into a loop at the end of the chain.
- Adjustment Links: Look for several small loops at one end of the chain, beyond the clasp. These allow incremental changes in length (usually 0.5–1 inch total).
If your bracelet lacks additional links, it may still be adjustable using professional methods—but home adjustments should only be attempted if clear options exist.
Measuring Your Wrist Accurately
Precise measurement is the foundation of a proper fit. Use a flexible measuring tape or a strip of paper and ruler to determine your wrist circumference.
- Wrap the tape around the narrowest part of your wrist, just below the wrist bone.
- Hold it snug but not tight—slip one finger between the tape and skin to simulate comfort spacing.
- Note the measurement in inches or centimeters.
For example, an average women’s wrist ranges from 6 to 7 inches (15–18 cm). Men’s wrists tend to be larger, averaging 7–8 inches (18–20 cm), though many clover bracelets are marketed as unisex.
Add 0.25 to 0.5 inches (0.6–1.3 cm) to your actual measurement to allow for movement and comfort. So, if your wrist measures 6.5 inches, aim for a finished bracelet length of 6.75 to 7 inches.
| Wrist Size (inches) | Recommended Bracelet Length (inches) | Adjustment Link Target |
|---|---|---|
| 6.0 | 6.25 – 6.5 | Second-to-last link |
| 6.5 | 6.75 – 7.0 | Middle link |
| 7.0 | 7.25 – 7.5 | Second-from-end or last link |
| 7.5+ | 7.75+ | Last available link or consult jeweler |
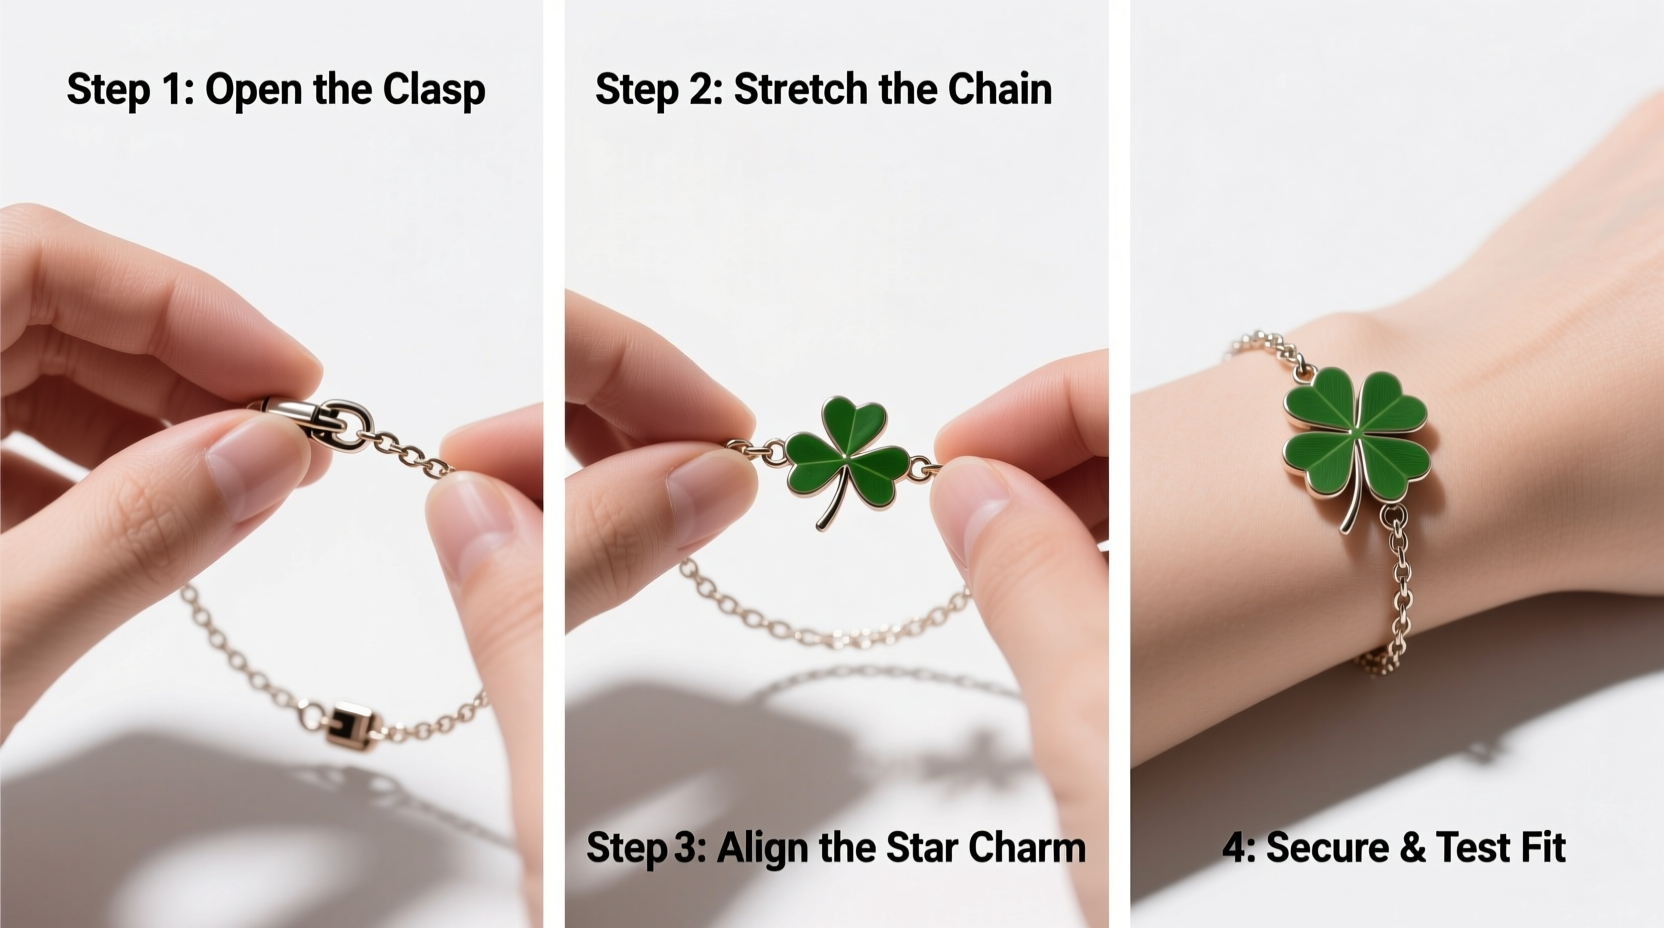
Step-by-Step Adjustment Process
Follow these steps carefully to adjust your bracelet safely at home. You’ll need only basic tools and about 10 minutes.
- Gather Supplies: Small jewelry pliers (chain-nose or flat-nose), a soft cloth, and a magnifying glass if needed.
- Lay Out the Bracelet: Place it on a clean, well-lit surface. Identify the side with multiple small loops extending from the clasp.
- Determine Desired Length: Based on your earlier measurement, decide which loop will serve as the new attachment point.
- Open the Clasp Loop: Using pliers, gently pry open the jump ring connecting the clasp to the current link. Do not pull sideways—twist it horizontally to avoid deforming the metal.
- Reattach to New Link: Slide the clasp onto the chosen adjustment loop. Ensure the orientation matches the original design (clasp facing inward, charm centered).
- Close Securely: Use pliers to twist the jump ring closed until both ends meet flush. It should no longer wobble or gap.
- Test the Fit: Fasten the bracelet and check mobility. You should be able to slide two fingers beneath it comfortably.
Mini Case Study: Restoring a Gifted Heirloom
Sophia inherited her grandmother’s four leaf clover star bracelet—a cherished piece made in the 1970s. Though beautiful, it was too large for her slender 6-inch wrist. After measuring precisely, she decided to shift the clasp from the outermost link to the third from the end. Using fine-tipped pliers, she carefully opened the jump ring, reattached the clasp, and closed it evenly. The result? A secure, elegant fit that honored both memory and comfort. “It finally feels like it belongs on my wrist,” she said. “I wear it every day now.”
Common Mistakes to Avoid
Even minor errors can compromise durability or aesthetics. Be mindful of the following pitfalls:
- Overstretching Jump Rings: Pulling them apart instead of twisting can weaken the metal and leave visible gaps.
- Choosing the Wrong Link: Skipping too many links may misalign the charm or reduce structural integrity.
- Ignoring Tension: A bracelet that pulls on the clasp when worn increases risk of accidental opening.
- Using Improper Tools: Regular pliers or nails can scratch gold or silver finishes.
“Precision matters more than speed when adjusting fine jewelry. One misaligned link can affect both safety and symmetry.” — Daniel Reyes, Master Jeweler & Repair Specialist
When to Seek Professional Help
If your bracelet shows signs of wear—such as stretched links, tarnished metal, or a loose clasp—it’s wise to consult a jeweler before attempting adjustments. Older or antique pieces may have fragile components unsuitable for DIY handling. Additionally, if your ideal fit falls outside the provided adjustment range, a professional can add or remove links permanently using soldering techniques.
Many local jewelers offer free minor adjustments with purchase, and some chains provide lifetime service for branded items. Don’t hesitate to ask.
Frequently Asked Questions
Can I resize a four leaf clover bracelet without tools?
Not safely. Attempting to open a jump ring with fingers or household items risks damaging the metal or injuring yourself. Always use proper jewelry pliers.
How do I know if my bracelet is too tight?
If you feel tingling, notice indentations on your skin, or struggle to move your hand freely, the fit is too snug. Remove it immediately and adjust to a looser link.
Will adjusting the bracelet shorten its lifespan?
Minimal adjustments using correct technique won’t harm the piece. However, repeatedly opening and closing the same jump ring can cause fatigue over time. Limit changes to once or twice unless necessary.
Final Checklist Before Wearing
Use this quick verification list after adjusting your bracelet:
- ✅ Clasp opens and closes smoothly
- ✅ Charm hangs centered and upright
- ✅ No gaps or twists in the jump ring
- ✅ Two fingers fit comfortably beneath the band
- ✅ Chain lies flat without kinking
Conclusion
A perfectly fitted four leaf clover star bracelet isn’t just about comfort—it enhances the meaning behind the piece. When it stays securely on your wrist, moves naturally with you, and draws compliments without slipping off, you’ve achieved more than a good fit. You’ve created a personal connection with a symbol of fortune and care.
Now that you know how to adjust your bracelet with confidence, take a moment to ensure yours sits exactly where it should. Whether it’s a daily staple or reserved for special moments, a well-fitted accessory elevates your presence. Share your experience, pass on the knowledge, or simply enjoy the quiet satisfaction of a job well done.


 浙公网安备
33010002000092号
浙公网安备
33010002000092号 浙B2-20120091-4
Comments
No comments yet. Why don't you start the discussion?