
Bucket bags have surged in popularity for their relaxed silhouette and spacious interiors. However, many struggle with the short handles that force an awkward hand-carry or shoulder drape. Converting your bucket bag into a crossbody style enhances comfort, frees your hands, and improves weight distribution—especially during long days out. The good news? This transformation doesn’t require advanced skills or expensive alterations. With simple tools and a bit of know-how, you can customize your favorite bucket bag for effortless daily wear.
Why Convert Your Bucket Bag to Crossbody?
The appeal of a crossbody bag lies in its functionality. By shifting the weight across your torso, it reduces shoulder strain and keeps the bag secure and balanced. For bucket bags—which often lack structured straps—this upgrade makes them more versatile and wearable across different body types and outfits.
Designers often prioritize aesthetics over ergonomics, leaving bucket bags with handles too short for true shoulder use. A crossbody strap solves this by extending the drop length, allowing the bag to rest comfortably on the hip rather than halfway up the bicep. This adjustment not only improves posture but also prevents the bag from slipping off, a common frustration with shorter straps.
Tools and Materials You’ll Need
Before starting, gather the following items. Most are affordable and reusable for future bag modifications:
- Adjustable crossbody strap (preferably with quick-release clips or lobster clasps)
- Measuring tape or ruler
- Sewing kit or rivet tool (if permanent attachment is desired)
- Leather punch or hole awl (for adding anchor points if needed)
- Scissors
- Reinforcement rings or D-rings (optional, for added durability)
Choose a strap made from durable material like nylon webbing, genuine leather, or vegan leather with padding if comfort is a priority. Widths between 3/4 inch and 1.5 inches offer the best balance of support and style.
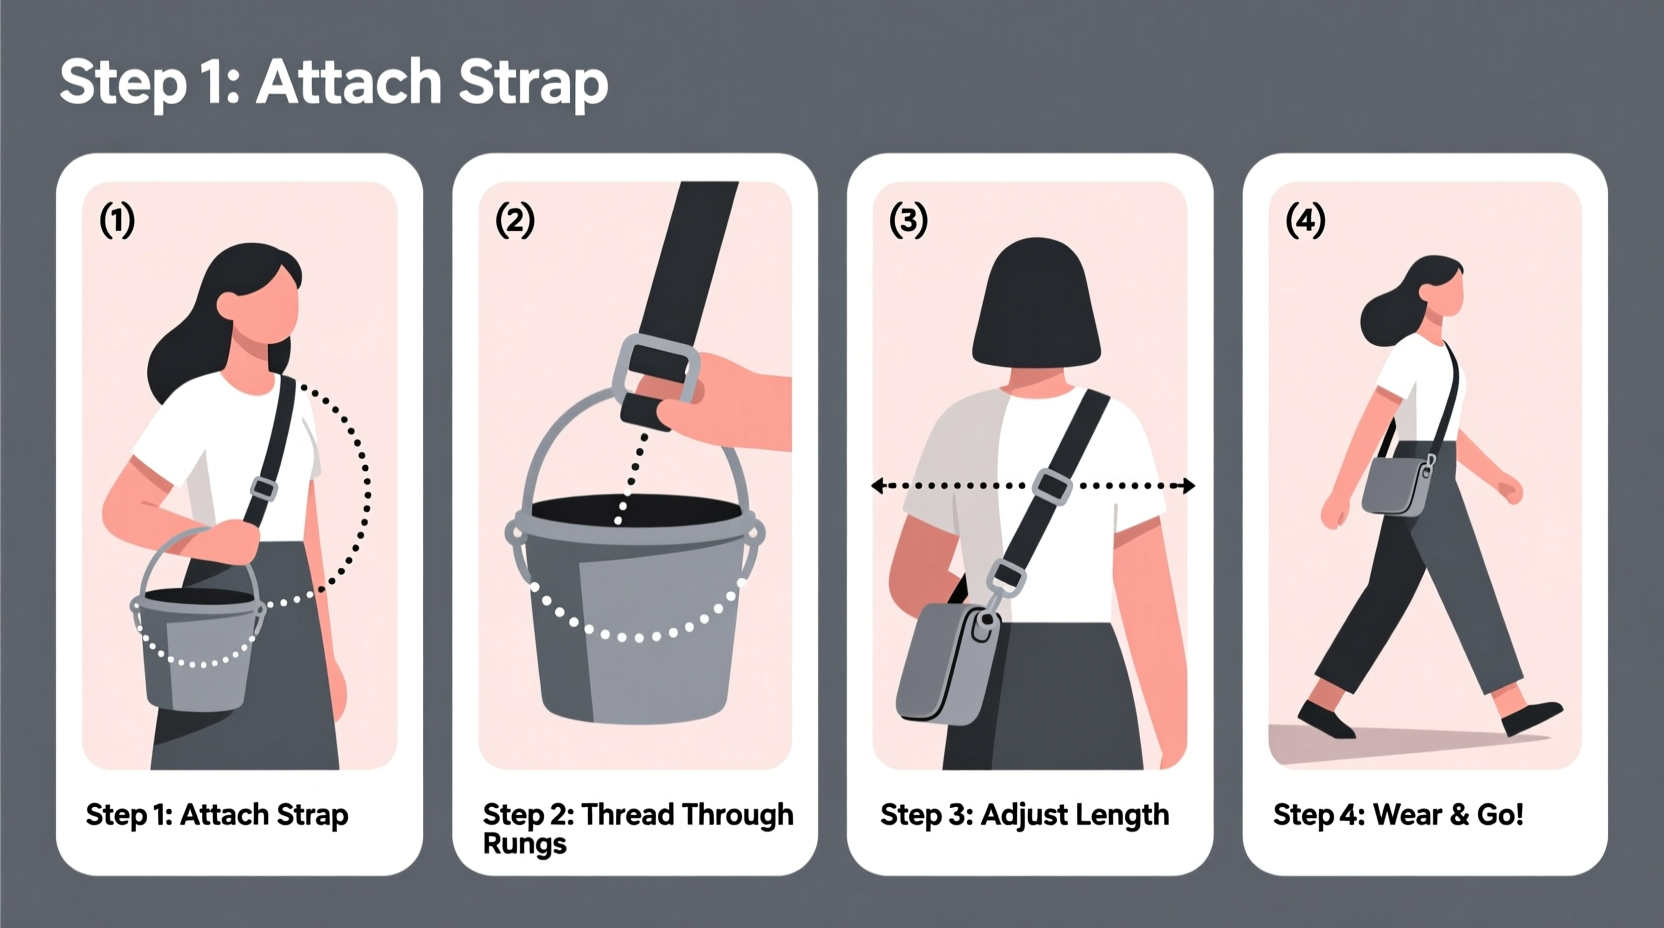
Step-by-Step Conversion Process
Follow this clear sequence to safely and effectively convert your bucket bag:
- Evaluate the bag’s structure: Inspect the top rim or handle attachment points. Look for sturdy loops, metal grommets, or reinforced stitching where a strap can be secured.
- Measure your ideal crossbody length: Stand naturally and measure from one shoulder, across the back, to the opposite hip. Subtract 4–6 inches to allow for clip attachment. Most women find 48–54 inches optimal.
- Select and adjust the strap: Use an adjustable strap and set it to your measured length. Try it on with the empty bag first to confirm comfort and positioning.
- Attach the strap temporarily: Clip or loop the strap onto existing hardware. Ensure both sides are even and the bag sits centered when worn.
- Test for stability and balance: Walk around, simulate bending, and check how the bag moves. Adjust length or attachment points as needed.
- Secure permanently (optional): If satisfied, sew or rivet D-rings near the top edge of the bag and attach the strap ends securely. Reinforce stitching with double thread or adhesive backing for leather.
This process typically takes under an hour. No sewing? No problem—many stylish, detachable straps come with strong clips compatible with most bucket bag openings.
Do’s and Don’ts When Modifying Your Bag
| Do’s | Don’ts |
|---|---|
| Use straps with anti-slip padding or textured backs | Attach straps to weak or decorative stitching |
| Reinforce new anchor points with washers or bar tacks | Over-tighten clips that could damage leather |
| Choose neutral or matching strap colors for seamless look | Ignore weight distribution—overloading pulls straps down |
| Opt for breakaway clasps for added security | Use elastic or stretchy materials that sag over time |
Real-Life Example: Transforming a Popular Designer Bucket Bag
Sophie, a freelance photographer based in Portland, owned a high-end canvas bucket bag she loved for its roomy interior but hated carrying. “It kept sliding off my shoulder, and I’d end up clutching it all day,” she said. After researching DIY solutions, she purchased a 50-inch padded leather crossbody strap with swivel clasps.
She clipped it onto the bag’s existing top-ring handles, adjusted the length so the base rested at her hip, and tested it during a full-day shoot. “The difference was instant. My shoulders didn’t ache, and I could access my gear without readjusting every few minutes.” Encouraged, she later sewed small brass D-rings inside the bag’s upper seam for a cleaner, permanent fix.
Now, her once-underused bag is her go-to for errands and travel. “It’s like getting a whole new bag for $25 and 20 minutes of work.”
“Modifying existing accessories is smarter than buying new ones. A well-placed strap can transform function without sacrificing style.” — Lena Torres, Sustainable Fashion Consultant
Checklist: Convert Your Bucket Bag in One Session
- ☐ Assess your bag’s attachment points
- ☐ Measure your ideal crossbody length
- ☐ Choose a durable, adjustable strap
- ☐ Temporarily attach and test fit
- ☐ Confirm balance and comfort during movement
- ☐ Decide between removable or permanent installation
- ☐ Reinforce new hardware if sewing or riveting
- ☐ Clean and condition leather after modification
Frequently Asked Questions
Can I ruin my bag by adding a crossbody strap?
Only if you attach the strap to weak areas like thin fabric or ornamental stitching. Always anchor to reinforced seams, metal grommets, or built-in loops. When in doubt, use removable clips instead of permanent alterations.
What if my bucket bag has no side loops or hardware?
You can still convert it. Sew or rivet D-rings just below the top edge on both sides. Alternatively, use a wide crossbody strap that drapes over the entire top opening like a sling, preventing slippage through friction.
Are there straps designed specifically for bucket bags?
Yes. Brands like Bag Jackie, StrapChic, and Miansai offer universal-fit crossbody straps with wide clamps or magnetic anchors tailored for open-top bags. Look for terms like “bucket bag converter” or “top-handle extender.”
Final Thoughts and Next Steps
Converting your bucket bag into a crossbody style is a small change with significant impact. It enhances usability, extends the life of your favorite accessory, and aligns with sustainable fashion principles—making the most of what you already own. Whether you opt for a temporary clip-on solution or a permanent upgrade, the key is thoughtful execution and proper fit.
Start today: pull out that stylish but impractical bucket bag, measure your ideal length, and pick up a quality strap. In less than an hour, you’ll have a hands-free, balanced, and effortlessly chic companion for daily adventures.


 浙公网安备
33010002000092号
浙公网安备
33010002000092号 浙B2-20120091-4
Comments
No comments yet. Why don't you start the discussion?