
Keychains are more than just functional—they're personal. Whether it’s a sentimental charm, a branded fob, or a practical multi-tool, losing the metal ring that holds everything together can feel like losing the anchor of your daily carry. Fortunately, replacing a broken or worn-out keyring isn’t complicated. With the right tools and a bit of patience, you can restore your keychain in minutes. This guide walks you through the entire process with clear instructions, safety considerations, and professional insights to ensure your repair lasts.
Why Replace the Metal Ring?
The metal ring—often called a split ring or key ring—is the circular component that connects keys, fobs, and accessories. Over time, constant twisting, pulling, and friction weaken the metal. Signs it's time for replacement include:
- A visible gap where the ends no longer meet tightly
- Difficulty attaching or removing keys due to deformation
- Keys slipping off unexpectedly
- Rust or corrosion compromising structural integrity
Ignoring these signs risks losing your keys entirely. Replacing the ring proactively prevents accidents and extends the life of your accessories.
Tools and Materials You’ll Need
Gathering the right supplies ensures a smooth, safe replacement. Most items are commonly found at home or available at hardware stores.
| Tool/Material | Purpose | Alternative (if unavailable) |
|---|---|---|
| Needle-nose pliers | Opening and closing the split ring securely | Tweezers (for small rings only) |
| New split ring (matching size) | Replacement component | Reused ring from an old keychain |
| Flat-head screwdriver (small) | Assisting in prying open stubborn rings | Exacto knife (use with caution) |
| Work mat or soft cloth | Protects surfaces and prevents parts from rolling away | Folded towel |
| Rubber gloves (optional) | Improves grip and protects fingers | None needed for light-duty work |
Choose a replacement ring made of stainless steel or brass for durability. Sizes typically range from 15mm to 32mm in diameter—measure your original or test fit before purchasing.
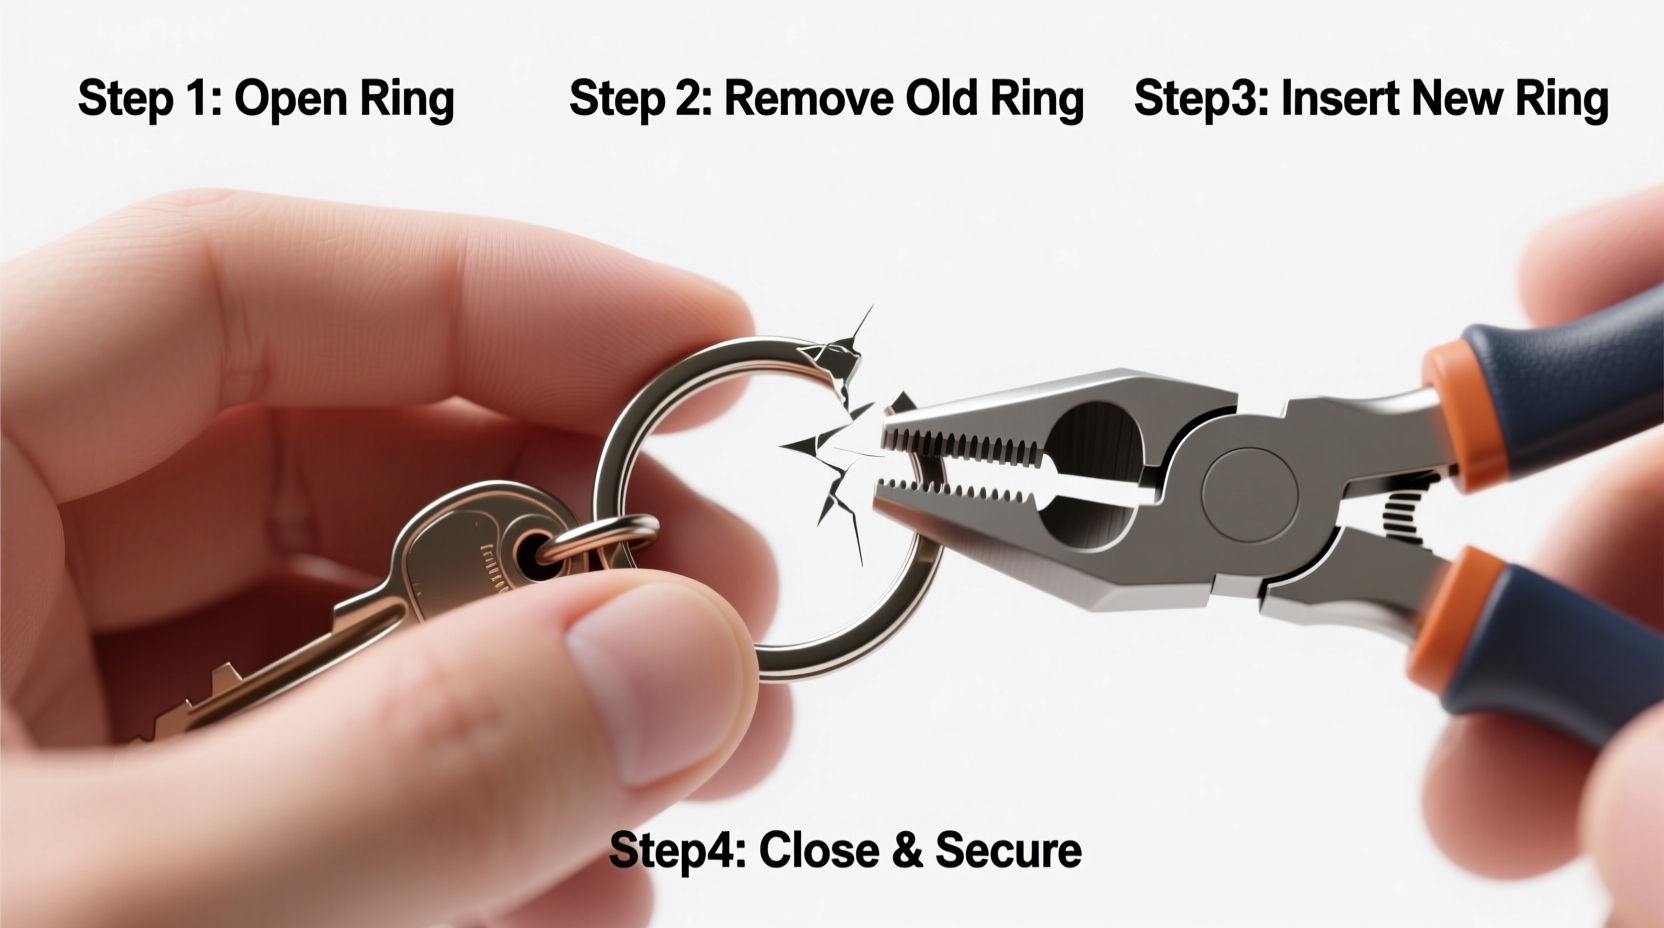
Step-by-Step Replacement Process
Follow this sequence carefully to avoid injury or damage to your keys and attachments.
- Remove all accessories from the old ring. Lay out keys, fobs, and charms on your work mat in order. This makes reassembly easier and prevents misplacement.
- Inspect the old ring for sharp edges. If corroded or bent, use pliers to gently twist it open fully and discard it safely. Do not leave loose metal pieces where they could be stepped on or ingested.
- Select the new split ring. Ensure it matches the diameter and thickness of the original. A slightly thicker ring adds strength but may be harder to manipulate.
- Open the new split ring using needle-nose pliers. Grip one end of the ring firmly. Twist outward—not sideways—to create a gap just wide enough to slide on your first key. Avoid over-opening, which weakens the metal.
- Add each key and accessory in your preferred order. Slide them onto the open ring one by one. Keep frequently used items near the outer edge for easier access.
- Close the ring completely. Once all items are attached, use the pliers to twist the open end back into alignment. The two ends should meet flush with no gap. Test by gently pulling apart—there should be resistance.
- Test functionality. Rotate the keys manually. They should move smoothly without wobbling or catching. Attach to your belt loop or bag to confirm comfort and security.
Common Mistakes to Avoid
Even simple repairs can go wrong if basic precautions are ignored. Here’s what experienced users consistently warn against:
- Using excessive force: Forcing the ring open can deform it permanently or snap it.
- Mixing incompatible sizes: A too-small ring strains keys; a too-large one looks unbalanced and slips easily.
- Skipping closure checks: An improperly closed ring will unravel under stress.
- Reusing damaged components: Don’t try to “fix” a bent ring—it’s safer and cheaper to replace it.
“Most keychain failures happen not from wear, but from improper installation. Taking 60 seconds to align the ends correctly doubles the ring’s lifespan.” — Daniel Reyes, Hardware Technician & Key System Designer
Real-World Example: Recovering a Family Heirloom Keychain
Mark, a teacher from Portland, inherited a vintage keychain from his grandfather—a brass fob with a leather tag and three keys. After years of daily use, the split ring cracked during winter commute, scattering the keys across a snowy sidewalk. One was lost before he could recover them.
Determined not to repeat the mistake, Mark researched replacements and upgraded to a 22mm stainless steel ring. He added a silicone sleeve to reduce noise and prevent scratches. Now, he inspects the ring every few months and keeps a spare in his desk drawer. “It’s not just about function,” he said. “That keychain carries memory. Fixing it properly felt like honoring my grandfather’s attention to detail.”
Do’s and Don’ts Summary
| Do | Don't |
|---|---|
| Use pliers with smooth jaws to avoid scratching metal | Use teeth or improvised tools to open the ring |
| Replace rings every 1–2 years with heavy use | Wait until the ring breaks completely |
| Keep a spare ring in your wallet or toolkit | Overload the ring beyond its capacity |
| Clean the ring periodically with rubbing alcohol | Expose it to moisture without drying |
FAQ
Can I reuse the old split ring after opening it?
No. Once a split ring is opened, the metal undergoes stress that weakens its structure. Even if it appears intact, repeated bending increases the risk of sudden failure. Always replace it with a new one.
Are there different types of key rings besides split rings?
Yes. Alternatives include:
- Key clips: Spring-loaded metal clips ideal for flat fobs.
- O-rings: Rubber or silicone loops, quiet and scratch-resistant.
- Quick-release bars: Push-button mechanisms for rapid detachment.
However, traditional split rings remain the most secure for holding multiple keys.
How do I know what size ring to buy?
Measure the outer diameter of your current ring with a ruler or caliper. Common sizes are 18mm, 22mm, and 28mm. When in doubt, bring the old ring to a hardware store for comparison. Alternatively, count how many standard house keys you plan to carry—2–4 keys fit well on a 22mm ring.
Final Checklist Before You Begin
- Clear a clean, well-lit workspace
- Gather needle-nose pliers and replacement ring
- Remove all keys and organize them nearby
- Discard the damaged ring safely
- Open the new ring with controlled twisting motion
- Slide on accessories in desired order
- Close the ring fully and test tension
- Verify smooth rotation and secure closure
Conclusion
Replacing a metal keyring is a small task with significant impact. It restores reliability, preserves sentimental value, and prevents frustrating losses. With basic tools and careful execution, anyone can complete this repair in under ten minutes. The key—literally—is consistency and attention to detail. Don’t wait for a mishap to remind you how much you rely on your keychain. Take control today, upgrade your hardware, and carry with confidence.


 浙公网安备
33010002000092号
浙公网安备
33010002000092号 浙B2-20120091-4
Comments
No comments yet. Why don't you start the discussion?