
Adding a beaded keychain to your backpack is more than just a decorative touch—it’s a way to personalize your everyday carry, make your bag easier to identify in a crowd, and express your unique style. Whether you’ve made the keychain yourself or received it as a gift, attaching it securely without damaging your backpack is essential. This guide walks you through the entire process, from choosing the right attachment point to ensuring long-term durability. With clear instructions and practical insights, you’ll be able to complete the task in minutes and enjoy a charming addition that lasts.
Selecting the Right Attachment Point
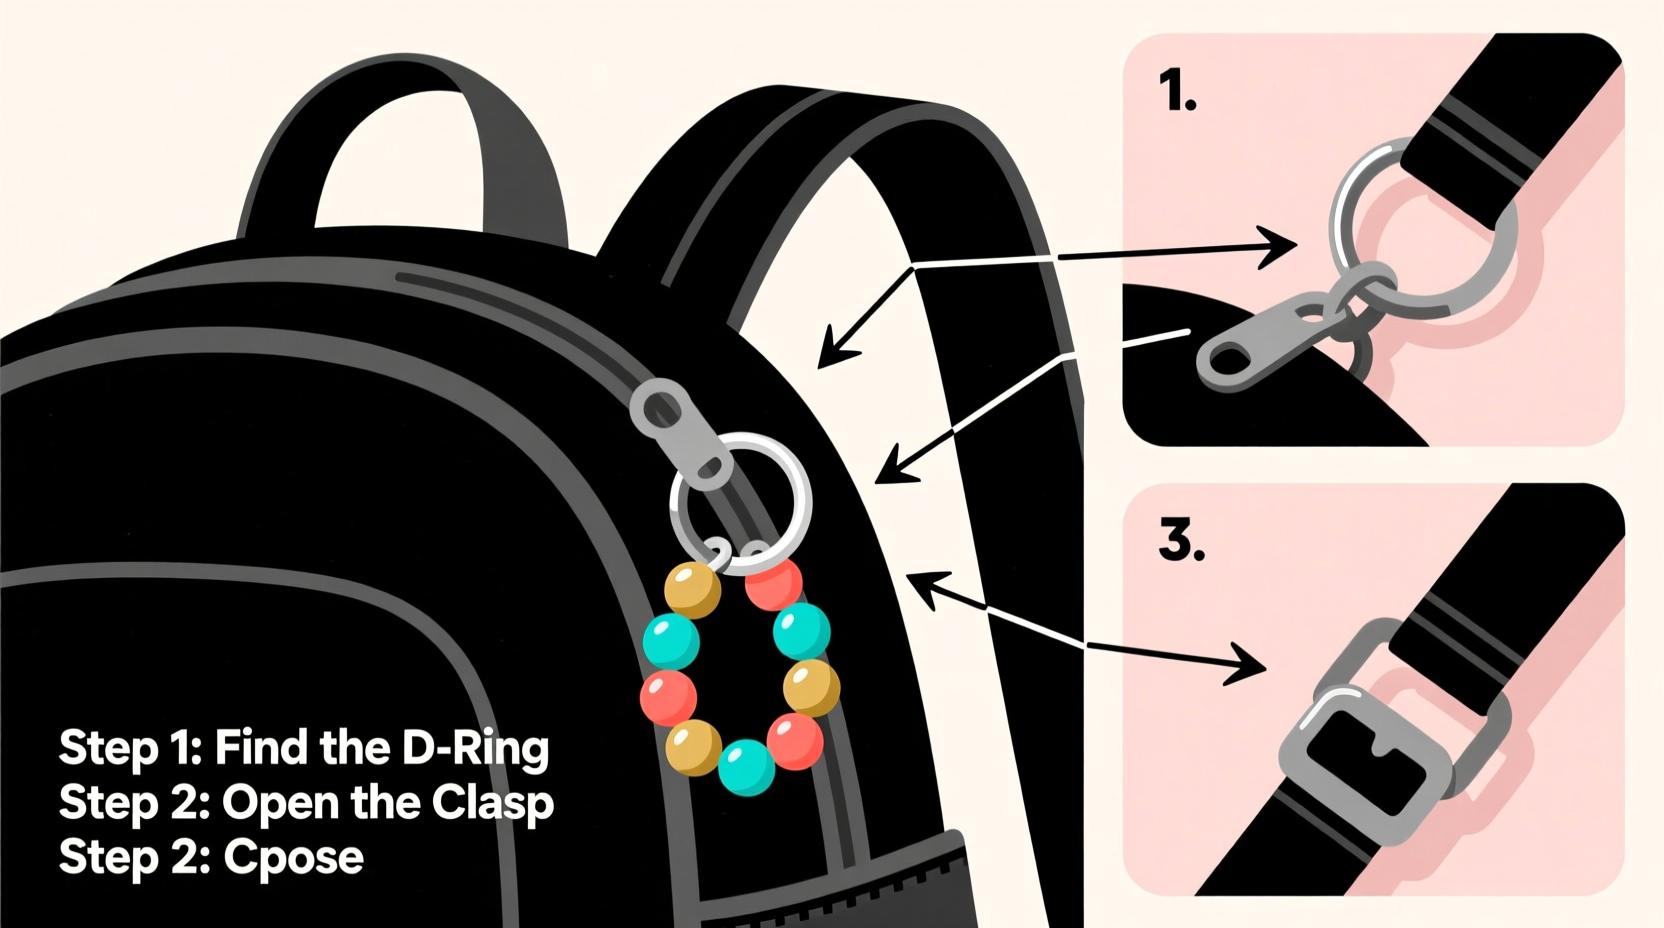
The first decision you’ll make is where on your backpack to place the keychain. The ideal location balances visibility, balance, and structural integrity. Most backpacks come with built-in loops, zipper pulls, or D-rings specifically designed for accessories.
- D-rings: Metal or plastic rings commonly found on the top, sides, or bottom of backpacks. These are the most secure and versatile attachment points.
- Zipper pulls: Found on main compartments or front pockets. Ideal if you want the keychain to double as a functional pull tab.
- Straps or buckles: Some people loop keychains through shoulder strap webbing, though this can cause shifting during movement.
Consider Weight and Balance
A beaded keychain adds weight. If it's particularly long or dense with glass or stone beads, placing it on one side only could cause your backpack to tilt when carried. For heavier designs, consider symmetrical placement or opt for a central point like the top handle loop.
Tools and Materials You’ll Need
You don’t need many tools for this project, but having the right ones ensures a clean, professional result. Here’s what to gather before beginning:
| Item | Purpose | Alternatives |
|---|---|---|
| Beaded keychain with jump ring or lobster clasp | Main accessory to attach | S-hook, split ring, or ribbon loop |
| Needle-nose pliers | Open and close jump rings or clasps | Fine-tipped tweezers (less effective) |
| Small keychain split ring (optional) | Add extra security or multiple attachments | Mini carabiner |
| Scissors (if using ribbon or cord) | Cut excess material cleanly | Nail clippers or small knife |
If your beaded keychain doesn’t already have a connector (like a jump ring or clasp), you can add one. Open jump rings are inexpensive and widely available at craft stores. Use pliers to twist them open sideways—never pull them apart, as this weakens the metal.
Step-by-Step Attachment Process
Follow these steps carefully to ensure your beaded keychain stays put through daily wear and tear.
- Inspect the keychain connector. Confirm whether it has a lobster clasp, spring ring, jump ring, or open loop. This determines how easily it attaches to your backpack.
- Choose your attachment point. Refer back to the earlier section. Top D-rings or zipper pulls are typically best for visibility and stability.
- Open the connector (if needed). Using needle-nose pliers, gently twist the end of a jump ring sideways to create an opening. Do not pry it outward.
- Slide the connector onto the chosen loop. Whether it’s a D-ring or zipper pull, ensure the metal ring fully passes through.
- Close the jump ring securely. Use pliers to twist the open ends back into alignment. There should be no gap or wobble.
- Test the connection. Gently tug the keychain to confirm it won’t slip off. Wiggle it side to side to simulate real-world motion.
Alternative Method: Looping Through Zipper Pulls
If your keychain lacks a clasp, you can thread it directly onto a zipper pull. Remove the existing pull tab if possible, slide the keychain’s loop through, then reattach. Alternatively, tie a small knot in a ribbon or cord attached to the keychain so it won’t slip off.
Ensuring Long-Term Security and Style
Attaching the keychain is just the beginning. To keep it looking great and functioning well over time, follow these maintenance practices.
- Check monthly for wear. Inspect jump rings, clasps, and bead integrity. Replace any cracked beads or weakened connectors.
- Remove during washing or travel. If you ever need to machine-wash your backpack (rare but possible), detach all accessories to prevent snagging or corrosion.
- Match aesthetics to function. A delicate glass-bead chain might look stunning but isn’t ideal for hiking. Reserve fragile designs for urban use.
“Personalization increases emotional attachment to belongings, which leads to better care and longer product life.” — Dr. Lena Torres, Behavioral Design Researcher
Mini Case Study: Sarah’s Commuter Backpack Upgrade
Sarah, a graphic designer in Portland, struggled to pick her backpack out of the office coatroom every day. After making a colorful beaded keychain featuring her favorite gemstone colors, she attached it to the top D-ring using a jump ring. Not only did she instantly spot her bag, but coworkers began complimenting her style. Six months later, she reports no issues with the attachment, even after daily subway commutes and occasional rain exposure. She credits the durable jump ring and regular checks for its longevity.
Common Mistakes and How to Avoid Them
Even simple tasks can go wrong without attention to detail. Here are frequent errors and how to prevent them.
| Mistake | Consequence | Solution |
|---|---|---|
| Forcing a stiff jump ring open | Metal weakens, risk of breakage | Use pliers to twist sideways, not pull apart |
| Attaching to flimsy fabric loops | Tearing or stretching over time | Use reinforced D-rings or zipper hardware |
| Ignoring clasp closure | Keychain falls off unnoticed | Always verify the clasp clicks shut |
| Overloading with multiple heavy charms | Unbalanced bag, stress on stitching | Limits to one or two lightweight pieces |
FAQ
Can I attach a beaded keychain to a leather backpack?
Yes, but avoid piercing the leather. Use existing D-rings or zipper pulls. If none exist, consider a removable clip-on charm instead of permanent modification.
What if my keychain doesn’t have a clasp?
You can add a jump ring or split ring using pliers. Alternatively, tie it to a zipper pull with a durable micro-cord or silk thread, securing it with a surgeon’s knot.
Will the beads scratch my backpack?
Hard beads like glass, metal, or stone may cause micro-scratches on coated fabrics over time. To minimize contact, let the keychain hang freely and avoid letting it swing against the surface constantly.
Final Checklist Before You Finish
- ✅ Chose a secure, balanced attachment point
- ✅ Used proper tools (especially pliers for jump rings)
- ✅ Ensured the clasp or ring is fully closed
- ✅ Tested the connection with a firm tug
- ✅ Matched the keychain style to your backpack’s use case
Make It Yours—and Keep It Secure
A beaded keychain transforms your backpack from generic to uniquely yours. Beyond aesthetics, it adds a tactile reminder of creativity, memory, or personal taste. By following these steps, you ensure that your accessory remains both beautiful and functional. Whether it’s a handmade gift, a souvenir from a trip, or a DIY project, taking a few extra moments to attach it properly makes all the difference. Your backpack carries more than your belongings—it carries your identity. Let it show.


 浙公网安备
33010002000092号
浙公网安备
33010002000092号 浙B2-20120091-4
Comments
No comments yet. Why don't you start the discussion?