
Shoulder bags are stylish, practical, and versatile—but they don’t always stay put. Slipping off the shoulder, shifting forward during movement, or weighing down one side of your body can turn convenience into discomfort. The solution? Convert your shoulder bag into a crossbody. This small adjustment redistributes weight, enhances stability, and keeps your hands free. The best part? You don’t need special tools or expensive accessories. With a few clever techniques and minor modifications, you can transform almost any shoulder bag into a balanced, secure crossbody in minutes.
Why Switch to a Crossbody Style?
The crossbody carry isn’t just a fashion trend—it’s an ergonomic upgrade. When worn diagonally across the torso, the bag rests against your lower back and hip, anchoring it securely. This position reduces strain on your shoulders and neck while improving balance, especially when walking or commuting.
Fashion designers and ergonomics experts alike advocate for this style. As Maria Thompson, accessory designer at Urban Stride Studio, explains:
“Crossbody wear aligns the bag’s center of gravity with your core, minimizing postural stress. It’s not only more comfortable—it’s smarter design in motion.” — Maria Thompson, Accessory Designer
Beyond comfort, crossbody bags offer better security. Positioned in front or at your side, they’re harder for pickpockets to access unnoticed. Whether you're navigating a crowded subway, exploring a new city, or running errands, the crossbody setup gives peace of mind.
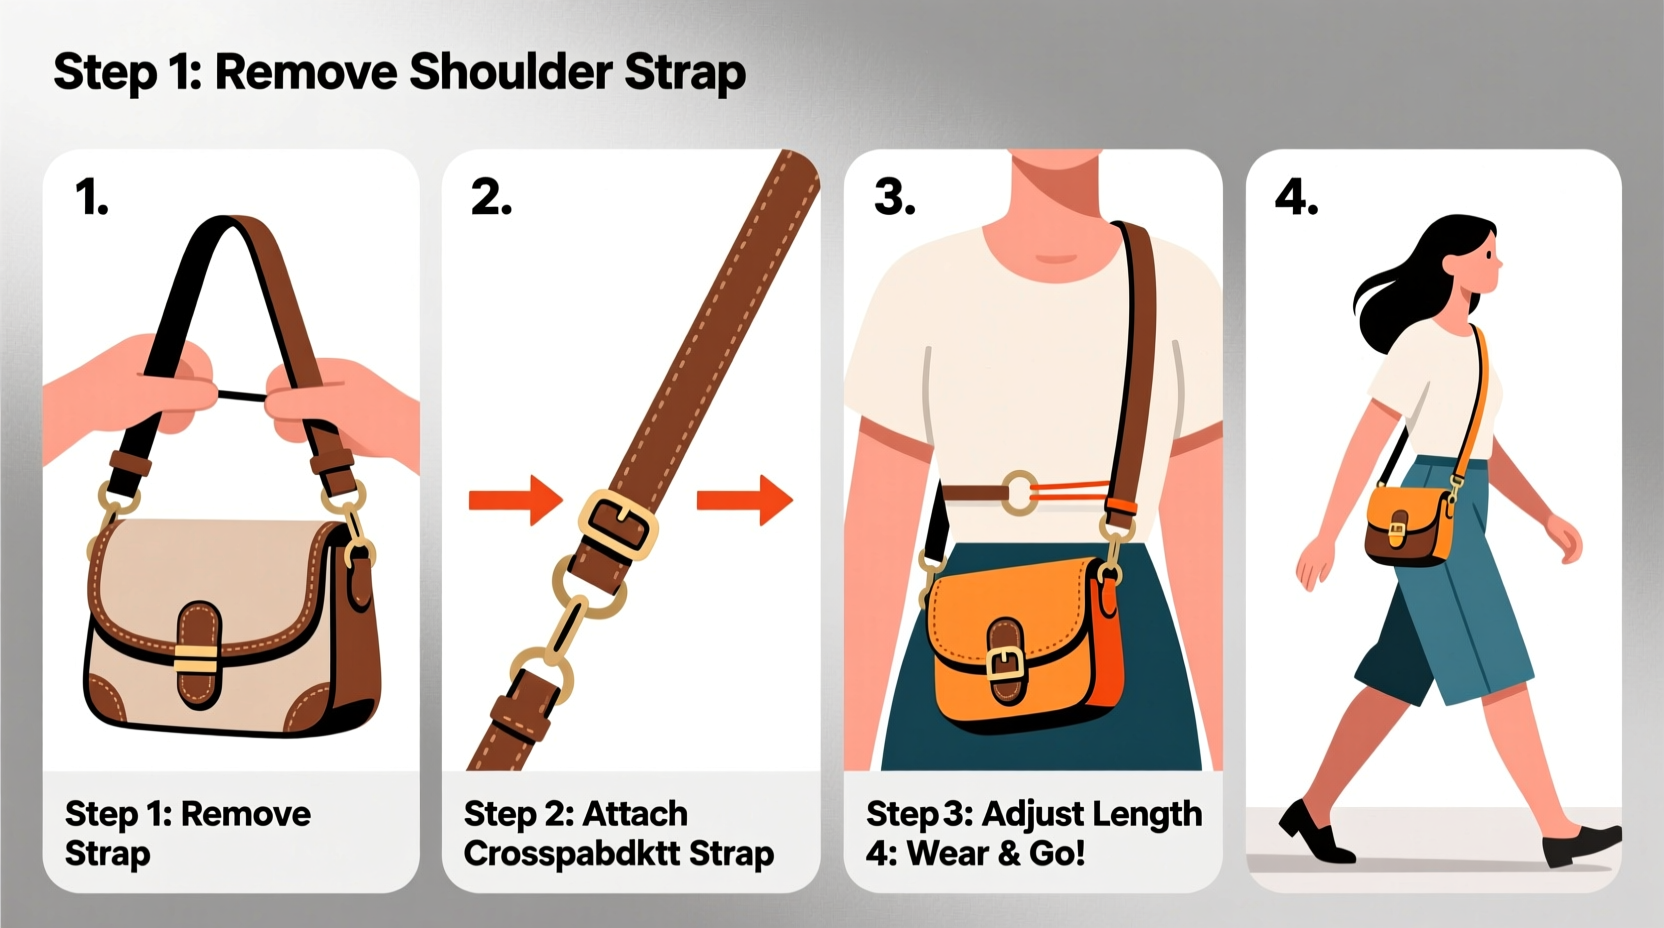
Step-by-Step Guide: Converting Your Shoulder Bag
Not all shoulder bags come with adjustable straps designed for crossbody wear. But most can be adapted using these proven methods. Follow this timeline-based approach for seamless transformation.
- Evaluate Strap Length (2–5 minutes)
Measure your current strap. For true crossbody use, the ideal length allows the bag to rest between your hip and mid-thigh when worn diagonally. If the strap is too short, proceed to extension techniques. If too long, learn how to shorten it safely. - Determine Attachment Points (3 minutes)
Inspect where the strap connects to the bag. Look for reinforced metal rings, stitching anchors, or D-rings. These points must support added tension from diagonal pulling. Avoid modifying bags with weak or frayed connectors. - Adjust or Extend the Strap (10–15 minutes)
Use one of the following methods based on your bag’s design:- Add a detachable chain or leather extender via snap hooks.
- Sew on a fabric extension panel if you have basic stitching skills.
- Replace the original strap with a longer, adjustable one compatible with your attachment system.
- Test Fit and Balance (5 minutes)
Put on the bag diagonally from one shoulder to the opposite hip. Walk naturally. The bag should remain stable, not swing excessively or ride up. Adjust strap length incrementally until optimal positioning is achieved. - Secure Loose Ends (Optional, 3–7 minutes)
Tuck excess strap length behind the bag or use a strap clip to prevent dangling. This improves aesthetics and prevents snagging.
Smart Modifications: Do’s and Don’ts
Improper alterations can damage your bag or compromise safety. Use this table to guide your decisions wisely.
| Do’s | Don’ts |
|---|---|
| Use reinforced connectors like lobster clasps or carabiners rated for weight | Attach extensions with flimsy plastic clips or rubber bands |
| Choose materials that match your bag’s texture (e.g., suede with suede) | Mix incompatible materials that may rub and cause wear |
| Check stitching integrity monthly after modification | Ignore signs of fraying or stretched anchor points |
| Opt for reversible changes when possible (e.g., clip-on extenders) | Sew permanent alterations into vintage or high-value bags without backup plans |
Real-Life Example: From Annoyance to All-Day Comfort
Jessica, a graphic designer in Portland, relied on her structured leather shoulder bag for client meetings and coffee shop work sessions. “It looked professional,” she said, “but by noon, my right shoulder would ache, and I was constantly hiking the strap back up.”
After reading about crossbody conversion, she purchased a 12-inch leather strap extender with brass snap hooks. She attached it to her existing strap, increasing the total length to 52 inches. Now, she wears the bag across her body, resting it near her left hip.
“The difference was instant. No more adjusting, no shoulder pain. Even with my tablet and sketchbook inside, it feels balanced. I wish I’d done this months ago.”
Essential Checklist Before You Begin
Before modifying your bag, run through this checklist to ensure success and safety:
- ✅ Confirm the bag’s weight when fully loaded
- ✅ Inspect strap attachments for wear or weakness
- ✅ Measure current strap length from end to end
- ✅ Determine desired crossbody drop (hip level is ideal)
- ✅ Choose extension method: clip-on, sewn, or full strap replacement
- ✅ Test fit with typical contents before finalizing changes
- ✅ Secure loose strap ends to prevent tripping hazards
Frequently Asked Questions
Can I convert a non-adjustable shoulder strap into a crossbody?
Yes. Even fixed-length straps can be extended using add-on pieces. Clip-on extenders made of chain, nylon webbing, or leather are widely available and easy to attach without tools. Just ensure the connector matches your bag’s ring size and can handle the load.
Will altering my bag void its warranty?
Potentially. Most manufacturers consider structural modifications—especially drilling, cutting, or sewing—as user alterations that void warranty coverage. For luxury or branded bags, consult customer service first. Opt for non-invasive solutions like detachable straps whenever possible.
Is the crossbody style suitable for larger tote-style shoulder bags?
With caution, yes. Larger bags can work as crossbodies if properly balanced. However, avoid overloading them. Distribute weight evenly and choose models with dual handles and a single long strap option. Extra-wide straps (at least 1.5 inches) help prevent digging into your shoulder.
Final Thoughts: Make Comfort Part of Your Daily Carry
Converting your shoulder bag into a crossbody isn’t just about convenience—it’s about rethinking how you interact with your everyday accessories. A well-fitted crossbody reduces physical strain, enhances mobility, and adds effortless flair to your look. The process takes little time, costs next to nothing, and delivers lasting benefits.
You don’t need a new bag to solve carrying discomfort. Often, a simple adjustment is all it takes to unlock better function and comfort. Whether you're upgrading a favorite old bag or optimizing a recent purchase, take the few minutes today to make the switch. Your shoulders—and your stride—will thank you.


 浙公网安备
33010002000092号
浙公网安备
33010002000092号 浙B2-20120091-4
Comments
No comments yet. Why don't you start the discussion?