
Transforming a pair of plain knee high boots into a wearable work of art is more accessible than you might think. With embroidery, you can add intricate patterns, meaningful symbols, or bold motifs that reflect your personal style. Unlike mass-produced designs, hand-embroidered boots carry a unique narrative—one stitch at a time. This guide walks you through the entire process, from selecting the right materials to finishing touches, so you can confidently create custom footwear in your own space.
Choosing the Right Boots for Embroidery
Not all boots are equally suited for embroidery. The material, texture, and structure determine how well the fabric will hold stitches and maintain integrity over time. Leather, suede, and heavy-duty canvas are ideal because they offer stability and durability. Avoid overly stiff or synthetic materials that resist needle penetration or lack breathability for thread.
When shopping for boots to embroider, prioritize:
- Natural fibers: Cotton, wool, or genuine leather allow better needle control and thread grip.
- Smooth surfaces: While textured leather has charm, smooth finishes make stitching more predictable.
- Flat panels: Look for boots with wide shafts or flat side areas—these provide ample real estate for detailed designs.
Essential Tools and Materials
Embroidering on boots requires slightly different tools than traditional fabric embroidery due to thickness and rigidity. Using improper supplies can lead to broken needles, puckered seams, or uneven tension.
| Tool/Material | Purpose | Recommended Type |
|---|---|---|
| Needles | Pierce thick material without bending | Chenille or leather needles (size 18–22) |
| Thread | Durable colorfast stitching | Rayon or polyester embroidery floss |
| Hoops | Keep fabric taut during stitching | Adjustable wooden or plastic (5–7 inch) |
| Transfer Tools | Apply design to boot surface | Water-soluble pen or iron-on transfer paper |
| Thimble | Protect finger when pushing needle | Metal thimble with dimpled surface |
“Hand embroidery on footwear combines fashion and craftsmanship. The key is patience—each stitch builds character.” — Lena Reyes, Textile Artist & Footwear Designer
Design Planning and Transfer Process
Before touching needle to boot, plan your design carefully. Start with a sketch on paper, considering symmetry, balance, and how the pattern wraps around the curve of the leg. Popular themes include floral vines, geometric borders, celestial motifs, or initials.
To transfer your design:
- Trace your sketch onto tracing paper.
- Place carbon transfer paper (shiny side down) on the boot shaft.
- Lay the tracing on top and retrace lines with a stylus or ballpoint pen.
- Remove layers and inspect transferred lines. Use a water-soluble pen to refine any faint areas.
Mini Case Study: Sarah’s Botanical Boots
Sarah, a graphic designer from Portland, wanted to personalize her black suede knee highs for a winter wedding. She sketched a climbing ivy pattern with small white flowers wrapping from ankle to mid-calf. Using an iron-on transfer sheet, she applied the design to one boot first. After adjusting spacing based on fit, she mirrored the layout on the second boot. Over three weekends, she stitched using stem stitch for vines and French knots for blooms. The result was elegant, cohesive, and completely one-of-a-kind—earning compliments at every event.
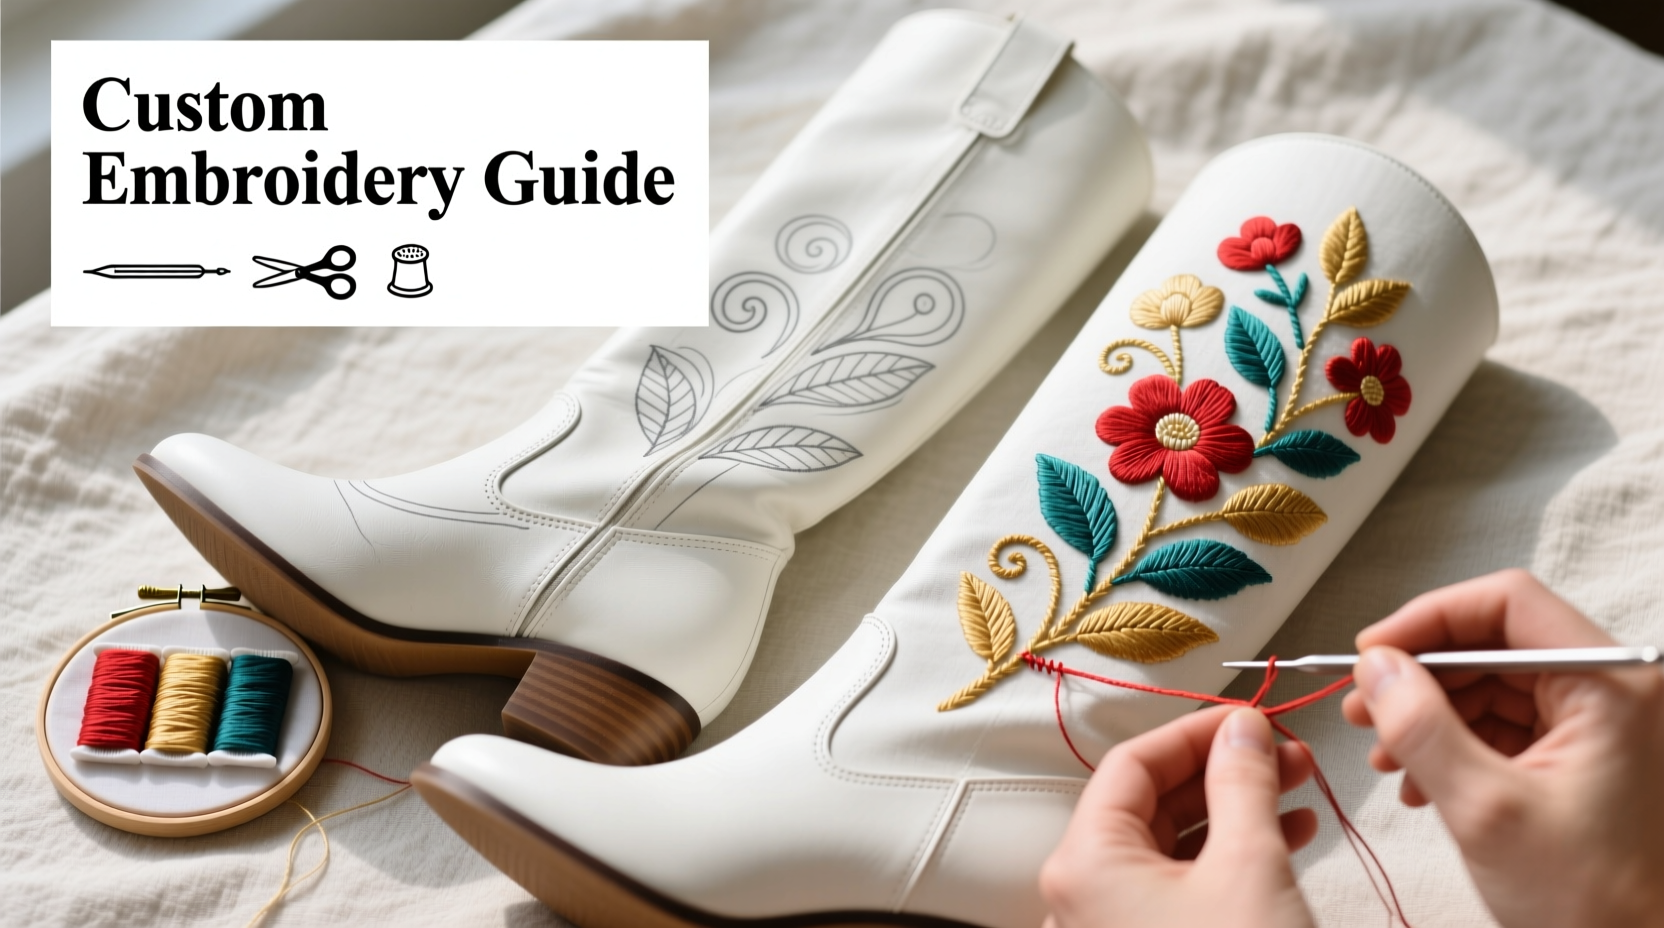
Step-by-Step Embroidery Technique
Follow this sequence to ensure clean, durable results:
- Secure the Boot in a Hoop: Loosen the hoop screw, place the boot shaft between rings, and tighten gently. Avoid over-tightening, which can distort leather.
- Thread Your Needle: Use double strand (about 18 inches) of embroidery floss. Knot one end securely.
- Begin Stitching: Start from the backside of the material. Pull the needle through so the knot rests beneath the surface.
- Select Stitches Based on Design:
- Backstitch: Ideal for outlines and fine details.
- Stem stitch: Great for curved lines like stems or letters.
- Satin stitch: Covers shapes smoothly (e.g., petals).
- French knots: Add dimension for flower centers or stars.
- Anchor Threads Carefully: On the reverse side, run the thread under existing stitches instead of making knots whenever possible. This prevents lumps inside the boot.
- Switch Colors as Needed: Finish one color section before moving on. Trim excess thread close to the fabric after securing.
- Work in Sections: Complete one area (like a leaf cluster) before shifting the hoop to another zone.
Finishing and Protecting Your Work
Once all stitching is complete, inspect both sides. Trim stray threads and gently press the embroidered area with a cool iron over a cotton cloth—never directly on stitches. For leather or suede, apply a fabric sealant spray designed for embroidery to protect against moisture and friction.
Frequently Asked Questions
Can I embroider on faux leather or vegan boots?
Yes, but be cautious. Faux leather can split if punctured too densely. Use smaller stitches and pre-poke holes with a leather awl to reduce tearing.
How do I keep my embroidery from unraveling?
Always secure thread ends by weaving them under existing stitches on the backside. Avoid surface knots, and consider adding a drop of fabric glue (like Aleene’s Fabric Fusion) on thread tails for extra hold—use sparingly.
Is machine embroidery possible on boots?
Possible, but not recommended for beginners. Home machines often struggle with boot thickness and curved shapes. Hand embroidery offers greater control and portability.
Final Checklist Before You Begin
- ✅ Choose boots made of natural, embroiderable material
- ✅ Gather chenille needles, quality floss, and a sturdy hoop
- ✅ Sketch and transfer your design accurately
- ✅ Practice stitches on a scrap swatch first
- ✅ Work in a well-lit area with comfortable seating
- ✅ Allow 3–6 hours total for detailed embroidery
- ✅ Seal and store finished boots properly
Craft Something That Tells Your Story
Embroidering your own knee high boots isn’t just about aesthetics—it’s an act of self-expression. Each loop and line becomes part of your daily narrative, turning functional footwear into heirloom-quality pieces. Whether you're marking a milestone, celebrating heritage, or simply indulging creativity, the process connects you to centuries of textile tradition. Don’t wait for perfection; start small, learn with each project, and let your boots speak where words fall short.


 浙公网安备
33010002000092号
浙公网安备
33010002000092号 浙B2-20120091-4
Comments
No comments yet. Why don't you start the discussion?