
Kombucha has surged in popularity over the past decade, prized for its tangy flavor, effervescence, and potential health benefits. But store-bought bottles can be expensive—and often contain added sugars or preservatives. The good news? You can brew high-quality, safe, and delicious kombucha right in your kitchen with minimal investment and a little patience.
Fermenting kombucha at home is both rewarding and empowering. When done correctly, it's a low-risk process that yields a refreshing, probiotic-rich beverage. However, like any fermentation practice, hygiene, proper ingredients, and attention to detail are crucial to ensure safety and consistency.
This guide walks you through every stage of brewing kombucha—from selecting starter materials to bottling your first batch—with an emphasis on safety, clarity, and practical troubleshooting.
Understanding Kombucha: What It Is and How It Works
Kombucha is a fermented tea made using a symbiotic culture of bacteria and yeast (SCOBY). This living culture feeds on sugar and caffeine in sweetened tea, converting them into organic acids, trace alcohol, carbon dioxide, and beneficial compounds. The result is a lightly tart, fizzy drink rich in acetic acid, gluconic acid, and live cultures.
The fermentation occurs in two stages: primary and secondary. During the primary fermentation (usually 7–14 days), the SCOBY consumes most of the sugar, producing acids that preserve the brew and create its signature tang. In the secondary fermentation, bottled kombucha is sealed with added fruit or juice to enhance carbonation and flavor.
Proper fermentation inhibits harmful microbes due to the acidic environment created by the SCOBY. A healthy pH—ideally between 2.5 and 3.5 after a few days—is essential for food safety. This acidity prevents mold and pathogenic bacteria from thriving.
“Home fermentation isn’t about sterility—it’s about creating conditions where good microbes dominate.” — Dr. Emily Foster, Microbiologist and Fermentation Scientist
Essential Equipment and Ingredients Checklist
Before starting, gather all necessary tools and ingredients. Using clean, non-reactive materials ensures a safe and effective fermentation.
Equipment Needed
- 1-gallon glass jar (wide-mouth preferred)
- Breathable cover: tightly woven cloth, coffee filter, or paper towel
- Rubber band or jar ring to secure the cover
- Wooden or plastic spoons (no metal)
- Measuring cups and spoons
- Bottles for second fermentation (glass swing-top bottles recommended)
- Funnel (plastic or glass)
- Thermometer (optional but helpful)
- pH test strips (ideal for monitoring safety)
Ingredients Required
- Filtered or spring water (chlorine-free)
- Black or green tea (plain, unflavored; avoid herbal teas for the first ferment)
- Cane sugar (white granulated; avoid honey or artificial sweeteners)
- Starter tea (from raw kombucha or a previous batch)
- Live SCOBY
Optional Additions for Second Fermentation
- Fresh or frozen fruit (e.g., berries, ginger, citrus)
- Fruit juice (unsweetened preferred)
- Herbs or spices (mint, turmeric, cinnamon)
Step-by-Step Brewing Process
Follow this timeline carefully to produce safe, flavorful kombucha. Each phase builds on the last, so skipping steps or compromising cleanliness increases risk.
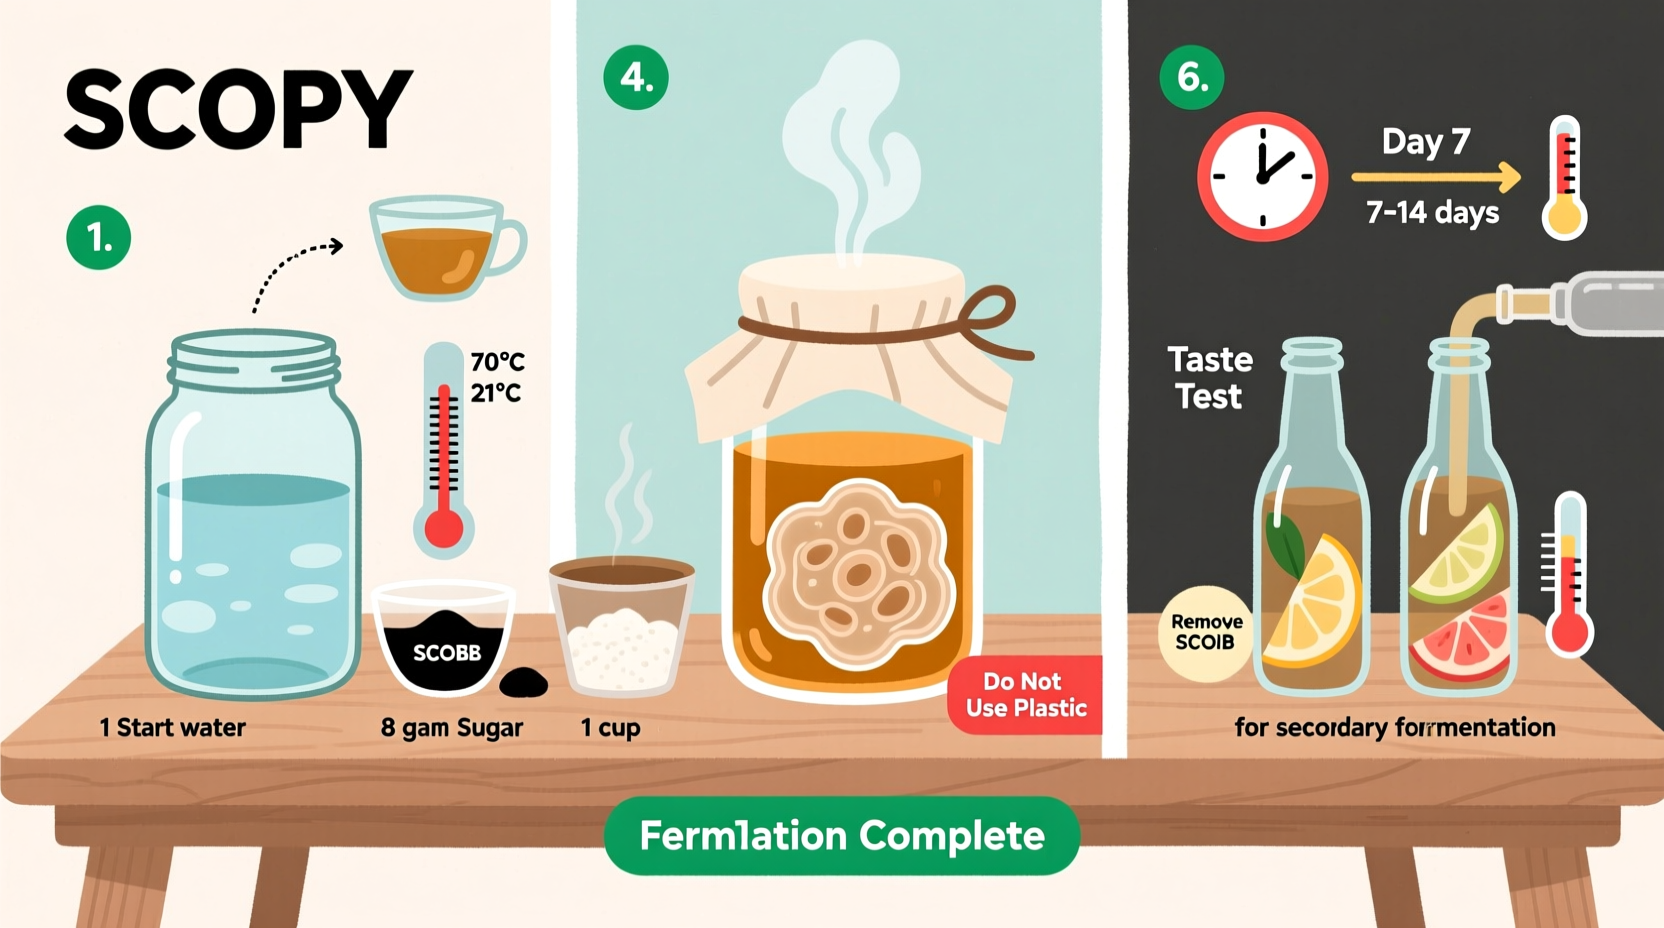
Day 1: Prepare Sweet Tea and Cool
- Boil 4 cups of filtered water.
- Add 1 cup of cane sugar and stir until fully dissolved.
- Add 4–6 tea bags (or 2 tablespoons loose tea) and steep for 10–15 minutes.
- Remove tea and add 8 more cups of cool water to bring the total volume to 1 gallon.
- Let the sweet tea cool completely to room temperature (below 85°F / 29°C).
Day 1 (cont.): Combine with Starter Tea and SCOBY
- Pour cooled sweet tea into the clean glass jar.
- Add 1–2 cups of starter tea (raw kombucha from a previous batch or store-bought unpasteurized kombucha).
- Gently place the SCOBY into the jar with clean hands or sanitized tongs.
- Cover the jar with a breathable cloth and secure with a rubber band.
- Store in a warm (75–85°F / 24–29°C), dark place away from direct sunlight and strong odors.
Days 2–14: Primary Fermentation
Leave the jar undisturbed. Over the next 7–14 days, the SCOBY will begin forming a new layer on the surface, and the liquid will become less sweet and more vinegary.
After day 7, begin tasting daily. Use a clean straw to siphon a small sample from beneath the SCOBY. The ideal balance is slightly sweet with noticeable tartness. If too sweet, ferment longer. If too sour, shorten future batches.
Use pH strips to confirm safety: aim for pH below 3.0 by day 7. Above 4.0 increases contamination risk.
Day 7–14: End of First Ferment
- Once the desired taste and acidity are reached, remove the SCOBY and 1–2 cups of liquid to use as starter tea for your next batch.
- Reserve the SCOBY in a clean bowl with some starter liquid while bottling.
- Pour the remaining kombucha through a funnel into bottles, leaving 1–2 inches of headspace.
Day 14–21: Second Fermentation (Flavor & Carbonation)
- Add flavorings: 1–2 tablespoons of chopped fruit, juice, or spices per 16 oz bottle.
- Seal bottles tightly with airtight lids.
- Store at room temperature for 3–7 days to build carbonation.
- Burp bottles daily (open briefly to release excess pressure) to prevent explosions.
- After 3–7 days, refrigerate all bottles to halt fermentation.
Safety Guidelines and Common Pitfalls
While kombucha is generally safe when brewed properly, contamination can occur if hygiene is neglected. Awareness of warning signs helps prevent illness.
| Do’s | Don’ts |
|---|---|
| Use filtered or spring water | Use chlorinated tap water (kills SCOBY) |
| Clean all equipment with vinegar or hot water | Use soap residue on jars or bottles |
| Keep fermentation area stable and draft-free | Place near open windows or mold-prone areas |
| Monitor pH regularly (aim for ≤3.5) | Ignore mold or off smells |
| Refrigerate after second ferment | Leave bottled kombucha at room temp indefinitely |
Mold appears as fuzzy spots—white, green, blue, or black—on the SCOBY or surface. Unlike normal yeast spotting (brown or beige specks), mold has a distinct texture and smell. If mold is present, discard the entire batch and SCOBY immediately.
Another red flag is a rotten or putrid odor. Healthy kombucha should smell like apple cider vinegar—sharp but clean. A foul or ammonia-like scent suggests bacterial contamination.
“If your kombucha smells wrong, trust your nose. It’s one of your best safety tools.” — Lila Chen, Home Fermentation Educator
Troubleshooting and Real-World Example
Even experienced brewers face challenges. Understanding common issues helps maintain confidence and consistency.
Mini Case Study: Sarah’s First Failed Batch
Sarah, a first-time brewer in Portland, followed a kombucha recipe she found online. After 10 days, she noticed white, fuzzy patches on her SCOBY and a sharp chemical smell. Concerned, she posted in a fermentation forum.
Experts quickly identified the issue: her kitchen was too cold (68°F), allowing mold to outcompete the SCOBY. She had also used a loosely woven dishcloth, which let airborne spores enter. Her water contained chlorine, weakening the culture from the start.
She restarted with filtered water, moved the jar to a warmer pantry, and switched to a coffee filter cover. Her second batch succeeded, developing a firm new SCOBY and balanced flavor in 12 days. Today, she brews weekly and shares extra SCOBYs with neighbors.
Common Problems and Fixes
- Slow fermentation: Increase ambient temperature. Use a seedling mat if needed.
- No carbonation: Ensure bottles are airtight and include enough sugar/fruit in second ferment.
- Vinegar-like taste: Shorten next batch’s first ferment. Save over-fermented kombucha as cleaning vinegar.
- SCOBY sinking: Normal. As long as fermentation progresses, position doesn’t matter.
- Yeast clumps: Harmless. Stir gently before bottling if desired.
Frequently Asked Questions
Can I use flavored or herbal tea?
For the primary ferment, stick to plain black or green tea. They provide the nitrogen and caffeine the SCOBY needs. Herbal, oily, or flavored teas can disrupt the culture. In secondary fermentation, however, herbal infusions are excellent for flavoring.
How do I know if my SCOBY is healthy?
A healthy SCOBY is firm, creamy white to light tan, and may have bubbles, wrinkles, or brown stringy yeast strands underneath. These are normal. Avoid any with dark mold, slimy texture, or foul odor.
Is homemade kombucha alcoholic?
All kombucha contains trace alcohol (usually 0.5% or less) as a natural byproduct of fermentation. Longer ferments increase alcohol slightly but remain non-intoxicating. For zero alcohol, consume early and refrigerate promptly.
Final Tips for Long-Term Success
Once you’ve mastered the basics, kombucha becomes a sustainable habit. Here are key practices to maintain quality and safety over time:
- Always save 1–2 cups of finished kombucha as starter tea for your next batch.
- Keep a “SCOBY hotel”—a spare jar with several SCOBYs in starter liquid—for backups and sharing.
- Clean bottles thoroughly between uses. Residual yeast can over-carbonate future batches.
- Rotate your brewing location seasonally. Avoid placing near ovens, AC units, or humid bathrooms.
- Share extra SCOBYs responsibly. Many communities have fermentation swap groups.
Conclusion: Start Small, Brew with Confidence
Fermenting kombucha at home is more than a hobby—it’s a return to traditional food practices that support gut health and self-reliance. With attention to cleanliness, temperature, and acidity, anyone can produce safe, delicious kombucha without special skills or expensive gear.
Your first batch might not be perfect, and that’s okay. Every brew teaches you something new about microbial balance, patience, and flavor development. The SCOBY is resilient, forgiving, and eager to thrive under the right conditions.


 浙公网安备
33010002000092号
浙公网安备
33010002000092号 浙B2-20120091-4
Comments
No comments yet. Why don't you start the discussion?