
A dripping faucet isn’t just annoying—it’s costly. The U.S. Environmental Protection Agency estimates that a single leaky faucet can waste more than 3,000 gallons of water per year. That adds up in both environmental impact and utility bills. The good news? Most faucet leaks are caused by worn-out internal components that you can replace yourself with basic tools and under $20 in parts. With a bit of patience and the right approach, you can stop the drip for good—without making a service call.
Understanding the Problem: Why Faucets Leak
Faucet leaks typically stem from wear and tear on internal seals, washers, cartridges, or O-rings. Over time, constant exposure to water pressure and mineral buildup degrades these small but critical parts. The type of faucet you have determines which component is likely at fault and how you’ll go about repairing it.
There are four common faucet types:
- Compression faucets: Found in older homes. These use rubber washers that compress against a valve seat to stop water flow. Frequent use wears out the washer, causing drips.
- Ball faucets: Single-handle designs with a rotating ball inside. Leaks often come from worn springs or seals.
- Cartridge faucets: Use a replaceable cartridge to control water flow. Cartridge degradation leads to leaks.
- Ceramic disk faucets: Modern and durable, but sediment buildup or cracked disks can still cause issues.
Identifying your faucet type is the first real step toward an effective repair. Look at the handle configuration and number of knobs. Compression and cartridge models usually have two handles; ball and disk types often have one.
Tools and Materials You’ll Need
You don’t need a full toolbox for this job. Most repairs require only a few standard household tools. Here’s what to gather before starting:
| Tool/Material | Purpose | Alternative Options |
|---|---|---|
| Adjustable wrench | Removing nuts and securing parts | Pipe wrench (use carefully) |
| Screwdrivers (flathead and Phillips) | Removing handle screws | Multi-bit screwdriver |
| Allen wrench set | For set screws on lever handles | N/A – often required |
| Plumber’s grease | Lubricating new seals and O-rings | Silicone-based lubricant |
| Replacement washers, cartridges, or O-rings | Replacing worn components | Brought from hardware store after ID’ing model |
| Vinegar and rag | Cleaning mineral deposits | Lemon juice (less effective) |
| Rag or towel | Protecting sink surface | Old cloth |
Pro tip: Bring the old washer or cartridge to your local hardware store. Matching it physically ensures compatibility better than guessing based on brand names.
“Over 70% of faucet leaks are due to failed washers or O-rings—parts that cost less than a dollar but save hundreds in water waste.” — Greg Thompson, Master Plumber with 25 years of residential experience
Step-by-Step Repair Process
The following repair sequence applies to most compression and cartridge-style faucets—the most common types found in kitchens and bathrooms. Adjust slightly for ball or disk models, but the core principles remain the same.
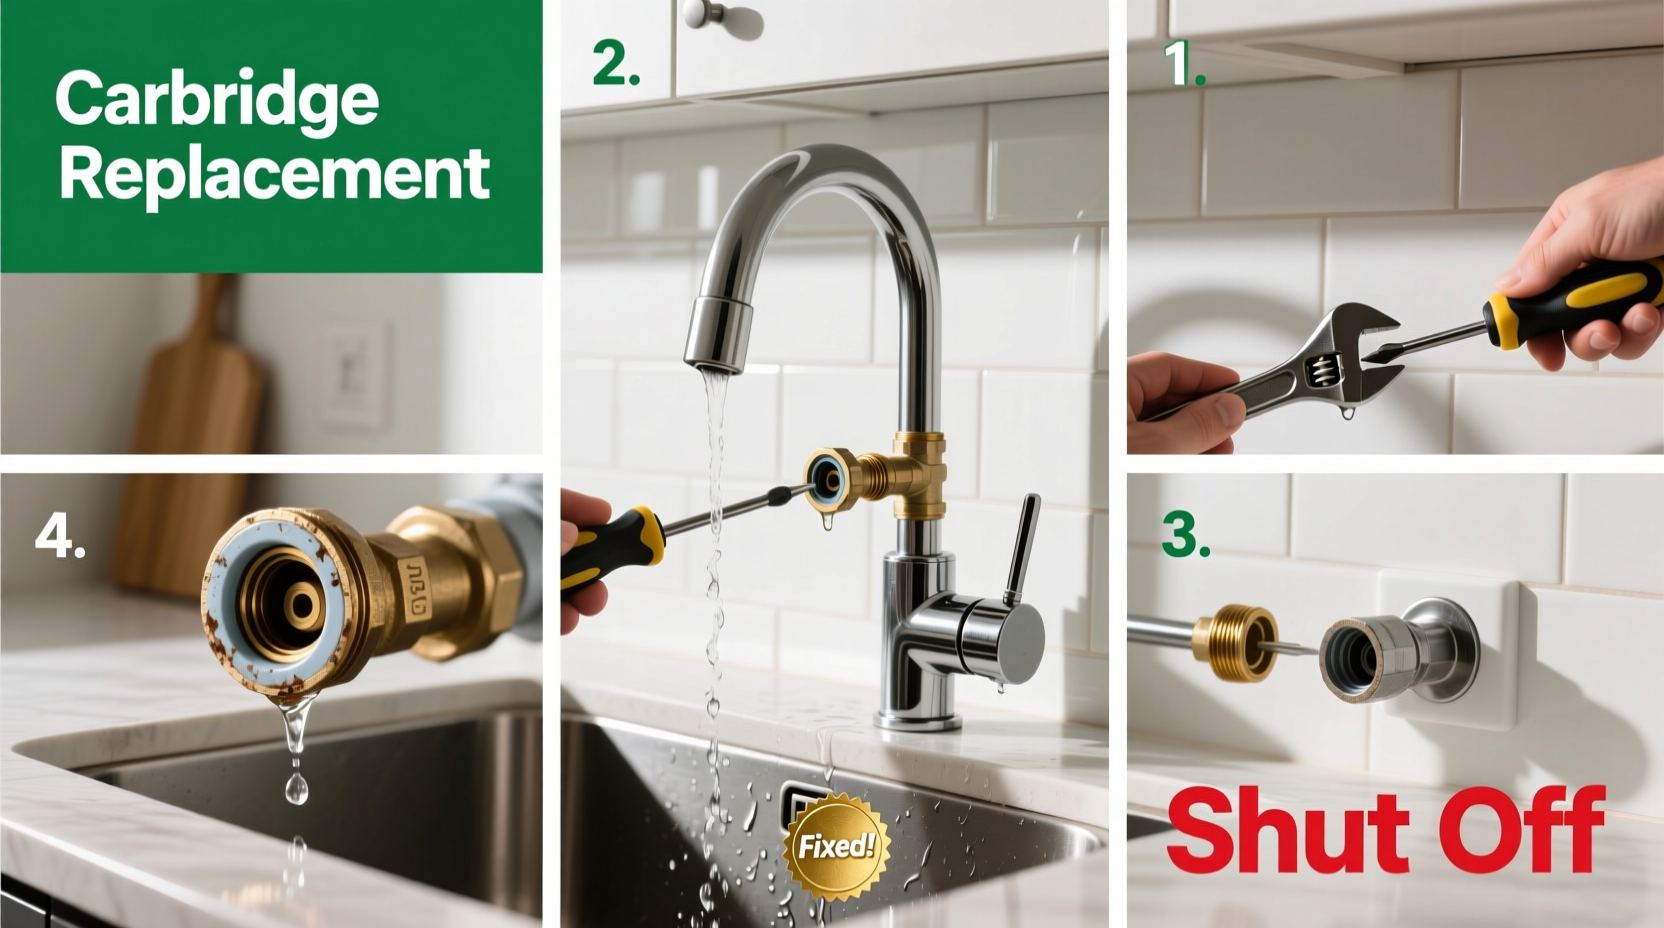
- Turn off the water supply
Locate the shut-off valves under the sink. Turn them clockwise until tight. Open the faucet to release any remaining water and pressure. If no shut-off valves exist, turn off the main water supply to the house. - Plug the drain
Place a rag or stopper in the sink drain. This prevents small screws or washers from falling in and vanishing down the pipe. - Remove the faucet handle
Look for a decorative cap on top of the handle. Pry it off gently with a flathead screwdriver. Underneath, you’ll find a screw. Unscrew it using the appropriate tool. For lever handles, a small Allen wrench is often needed. Once the screw is removed, lift the handle off. - Disassemble the faucet body
Use an adjustable wrench to loosen the packing nut. Remove it by hand if possible to avoid scratching. Pull out the stem (in compression faucets) or cartridge (in cartridge models). Inspect for cracks, warping, or erosion. - Inspect and replace damaged parts
In compression faucets, remove the old washer secured by a brass screw. Check the valve seat below—if pitted or uneven, use a seat wrench to replace it. For cartridge faucets, pull out the entire cartridge and take it to a hardware store for an exact match. Replace O-rings if cracked or flattened, and always apply plumber’s grease before reinserting. - Reassemble and test
Reverse the disassembly process. Reinstall the stem or cartridge, tighten the packing nut securely but not excessively, reattach the handle, and restore water supply. Slowly turn the valves back on and test the faucet. Check for leaks around the base and spout.
Common Mistakes and How to Avoid Them
Even experienced DIYers make errors when repairing faucets. Awareness of these pitfalls improves success rates significantly.
- Mixing up hot and cold components: When working on double-handle faucets, keep parts separated. Label them with tape if necessary.
- Skipping the valve seat inspection: A worn seat will ruin a new washer quickly. If the seat is rough or grooved, replace it.
- Using the wrong replacement parts: Not all washers are the same. Size, thickness, and material matter. Rubber, neoprene, and silicone each have different durability profiles.
- Ignoring mineral buildup: Hard water leaves calcium deposits that interfere with seals. Soak parts in white vinegar for 30 minutes to dissolve residue.
- Forgetting to lubricate: Dry O-rings fail faster. A small amount of plumber’s grease extends their life and ensures smooth operation.
If the faucet still leaks after reassembly, don’t panic. Double-check that all parts are seated correctly and that the cartridge or stem is fully inserted. Sometimes, a slight misalignment causes persistent drips.
Mini Case Study: Sarah’s Kitchen Faucet Fix
Sarah noticed her kitchen faucet dripping steadily overnight—about one drop per second. Her water bill had crept up over three months, and she suspected the faucet was the culprit. She turned off the water, removed the handle, and discovered a mushy rubber washer inside the stem. After replacing it with a nylon-reinforced washer from the hardware store and cleaning mineral deposits with vinegar, she reassembled the faucet. The drip stopped completely. Sarah saved $180 compared to the plumber’s minimum service fee and reduced her household water waste by an estimated 2,500 gallons per year.
Troubleshooting Tips and Pro Advice
Not every leak behaves the same way. The location and timing of the drip offer clues about the underlying issue.
| Drip Location | Most Likely Cause | Solution |
|---|---|---|
| From the spout when off | Worn washer, cartridge, or valve seat | Replace internal sealing component |
| From the base/handle | Failed O-ring or loose packing nut | Replace O-ring and tighten nut moderately |
| Only when hot water is used | Hot-side washer degradation | Inspect and replace hot water cartridge or washer |
| Intermittent drip | Mineral buildup or partial seal failure | Disassemble, clean, and inspect all parts |
If your faucet continues to leak despite part replacement, consider internal corrosion or a cracked housing. In such cases, a full faucet replacement may be more cost-effective than further repairs.
FAQ: Common Questions About Faucet Repairs
How long does a faucet repair usually take?
For a first-time DIYer, plan for 45 to 90 minutes. Experienced individuals can complete the job in 20–30 minutes. Time varies based on faucet complexity and accessibility of shut-off valves.
Can I use Teflon tape on faucet connections?
Teflon tape is designed for threaded pipe joints, not internal faucet mechanisms. Use it only on supply line connections under the sink, not on cartridge stems or valve bodies.
Is it worth repairing an old faucet?
If the faucet is more than 15 years old, frequently clogs, or shows visible corrosion, replacement may be better. Modern faucets are more water-efficient and easier to service. However, minor repairs on vintage fixtures are often worthwhile for aesthetic or sentimental reasons.
Final Checklist Before You Begin
- ✅ Shut-off valves are functional and accessible
- ✅ Water supply is turned off
- ✅ Drain is plugged
- ✅ Tools and replacement parts are ready
- ✅ Work area is dry and well-lit
- ✅ Old parts are saved for reference
- ✅ Plumber’s grease is on hand
Conclusion: Take Control of Your Home Maintenance
Fixing a leaky faucet is one of the most rewarding DIY home repairs. It requires minimal investment, delivers immediate savings, and builds confidence for future projects. By understanding your faucet’s design, using the correct parts, and following a methodical process, you can eliminate wasteful drips and avoid unnecessary plumbing bills. Every drop counts—both for your wallet and the planet. Now that you have the knowledge, grab your wrench and make the fix today.


 浙公网安备
33010002000092号
浙公网安备
33010002000092号 浙B2-20120091-4
Comments
No comments yet. Why don't you start the discussion?