
Holiday lighting transforms homes into festive retreats, and few decorations capture the winter spirit like icicle lights. Their cascading strands mimic frozen droplets, adding depth and sparkle to rooftops, gutters, and porches. But achieving that picture-perfect look requires more than just draping wires. Done incorrectly, icicle lights can pose electrical hazards, damage property, or create a tangled mess come January. This comprehensive guide walks through every stage of installation—from planning to takedown—with an emphasis on safety, durability, and visual impact.
Plan Your Layout Before Hanging
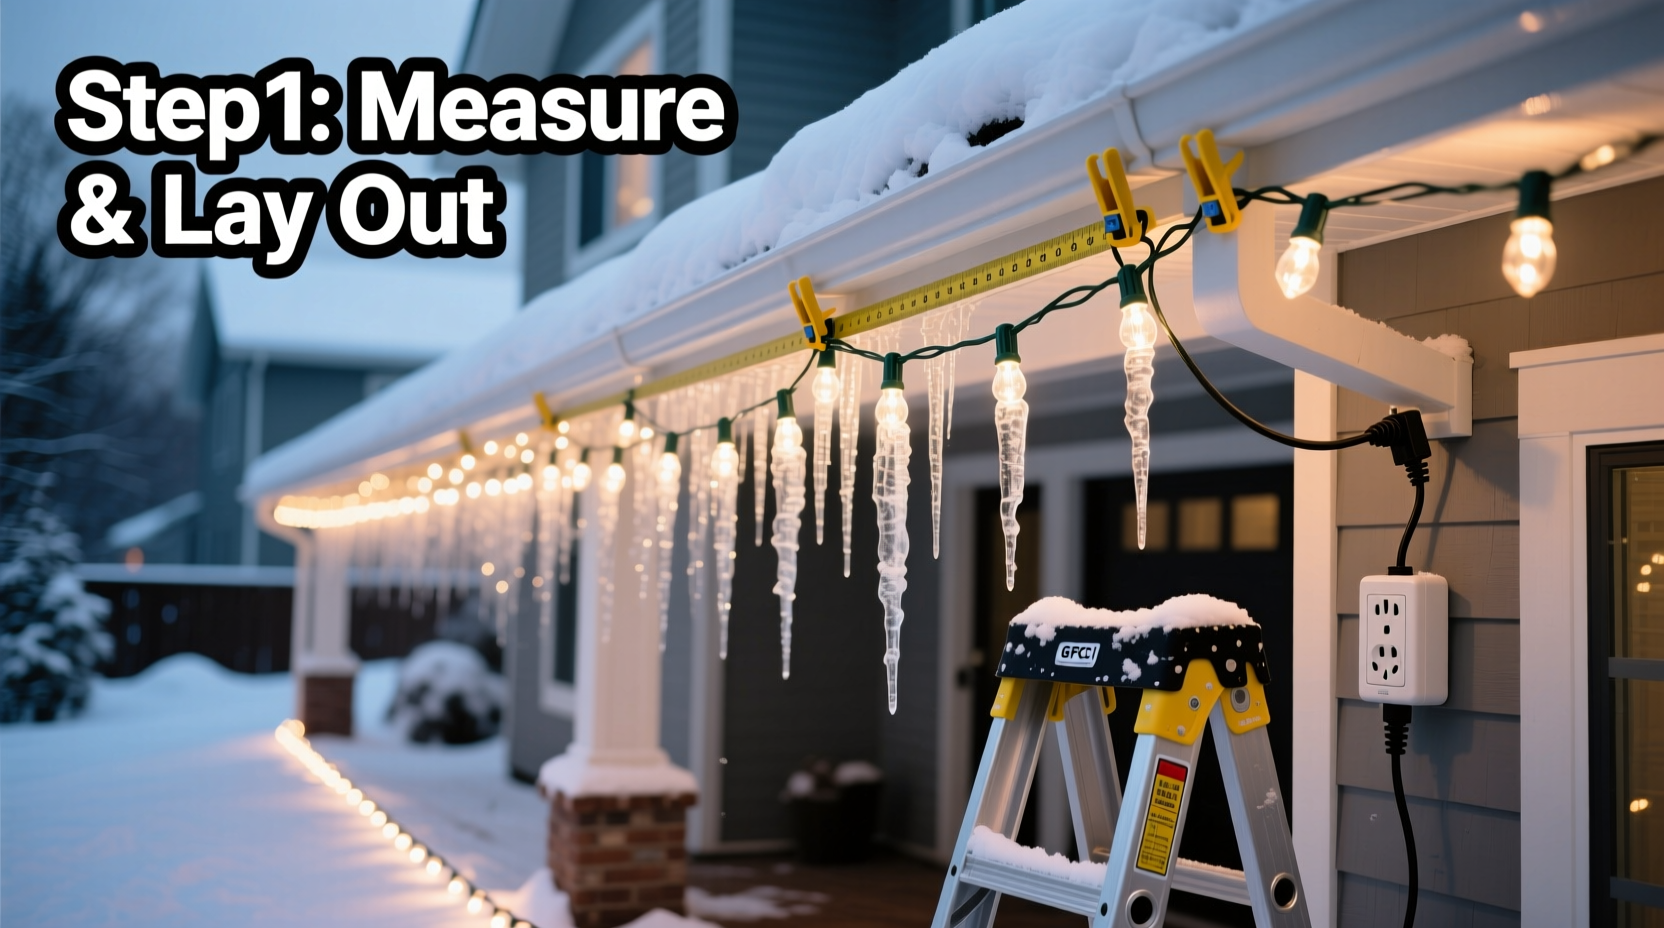
Before you unbox a single strand, assess your home’s exterior. Icicle lights work best when they follow architectural lines: rooflines, eaves, windows, or porch edges. Measure the areas where you intend to hang them. Most icicle light sets range from 6 to 25 feet in length, with 30 to 100 individual \"icicles\" spaced 6 to 12 inches apart. Knowing your dimensions ensures you buy enough lights without overloading circuits.
Sketch a rough diagram of your house’s front view. Mark where each string will begin and end. Consider symmetry—centering displays over doors or windows creates balance. Also, think about power access. Extension cords should run along safe, dry paths, avoiding high-traffic zones or where water might pool.
Gather the Right Tools and Materials
Using proper equipment prevents damage to your home and reduces injury risk. Avoid staples or nails, which can pierce wire insulation and cause shorts. Instead, invest in plastic clips designed for outdoor lights. These come in several types:
- Gutter clips: Snap into gutters and hold lights securely.
- Rain gutter hangers: Ideal for deeper gutters; prevent sagging.
- Roof shingle clips: Slide under shingles without nails, perfect for roofline installations.
- Hook-and-loop adhesive mounts: For surfaces where drilling isn’t possible (e.g., vinyl siding).
You’ll also need:
- Measuring tape
- Digital multimeter (to test outlets and continuity)
- Weatherproof extension cords (rated for outdoor use)
- Outlet covers with drip loops
- Ladder with stabilizer bar (for two-story homes)
- Gloves and non-slip shoes
| Tool/Material | Purpose | Recommended Type |
|---|---|---|
| Icicle Lights | Main decoration | LED, UL-listed, with spare bulbs/fuses |
| Light Clips | Secure without damage | Plastic, weather-resistant |
| Extension Cord | Power delivery | 14-gauge or lower, outdoor-rated |
| Ladder | Access height | Fiberglass (non-conductive) |
| Timer | Automate operation | Weatherproof, digital |
Step-by-Step Installation Process
Follow this sequence to install icicle lights safely and efficiently:
- Test all light strands indoors first. Plug them in to check for dark bulbs or flickering. Replace fuses if needed.
- Identify power sources. Use a multimeter to confirm outdoor outlets are functional and grounded. Install a GFCI outlet if necessary.
- Begin at the power source. Attach the first clip near the outlet. Feed the male plug through so it remains accessible and protected.
- Install clips along the intended path. Space gutter clips every 12–18 inches. For rooflines, slide shingle clips under the second row of shingles, angled downward to shed water.
- Hang the first strand. Hook the top loop of the icicle set into the first clip. Let the “icicles” hang freely, ensuring even spacing.
- Connect additional strands. Never exceed the manufacturer’s maximum connectable limit (usually 3–5 sets). Overloading causes overheating.
- Create a drip loop. Before plugging in, loop the cord downward below the outlet to prevent water from running into it.
- Secure cords with cable ties or cord clips. Keep them off walkways and driveways. Do not run cords under mats or rugs.
- Install a timer. Set lights to turn on at dusk and off at bedtime (e.g., 6 PM–11 PM). This saves energy and extends bulb life.
- Inspect the full setup. From ground level, check for gaps, tangles, or uneven lengths. Adjust as needed.
“Improperly installed holiday lights account for over 7,000 U.S. home fires annually. Using non-metallic fasteners and checking load limits can prevent most incidents.” — National Fire Protection Association (NFPA)
Avoid Common Mistakes
Even experienced decorators make errors that compromise safety or aesthetics. Watch out for these pitfalls:
- Overloading circuits: A single circuit typically handles 1,440 watts (12 amps). Calculate total wattage of all connected lights.
- Mixing indoor/outdoor lights: Indoor-only sets lack weather resistance and degrade quickly outside.
- Ignoring snow and ice buildup: Heavy accumulation can pull down lights or damage gutters. Clear debris gently with a broom handle from the ground.
- Leaving lights up year-round: UV exposure and temperature swings shorten lifespan. Remove within six weeks after the holidays.
- Using damaged cords: Frayed wires or cracked plugs are fire hazards. Discard and replace immediately.
Real-World Example: The Johnson Family Porch Makeover
The Johnsons live in a two-story colonial with a wraparound porch. Last year, their icicle lights sagged and flickered due to overloaded circuits and poor clip placement. This year, they followed a structured plan. They measured 48 linear feet of eave space and purchased six 8-foot LED icicle sets (288 total bulbs). They used 36 gutter clips spaced 16 inches apart and connected only three strands per circuit across two separate outlets. They added a smart timer linked to sunset times. The result? A uniform, shimmering cascade that stayed bright and secure through December—even during a winter storm. Neighbors commented on the professional appearance, and the family saved 40% on electricity compared to previous years.
End-of-Season Care and Storage
When it’s time to take down your display, do so carefully. Unplug everything first. Remove clips gently—don’t yank strands. Coil each set loosely around your hand (12-inch diameter), then place in a labeled plastic bin. Store in a cool, dry area away from rodents. Wrap cords separately if needed.
Clean any dust or bird residue with a soft cloth before storing. Inspect for wear: cracked sockets, exposed wires, or brittle sections. Repair or retire damaged sets. Proper storage can extend the life of quality LED icicle lights to 5–7 seasons.
Frequently Asked Questions
Can I hang icicle lights on vinyl siding?
Yes, but avoid piercing the surface. Use adhesive-backed hooks rated for outdoor use and cold temperatures. Test adhesion on a small area first. Alternatively, use magnetic clips if there’s metal underneath.
How many icicle lights can I connect together?
Check the manufacturer’s tag. Most allow 3–5 sets end-to-end. Exceeding this risks overheating and voids warranties. When in doubt, plug additional strands into a separate circuit via a power strip with surge protection.
Are icicle lights safe in the rain or snow?
If they are UL-listed for outdoor use and properly installed with drip loops and grounded outlets, yes. However, avoid submerging plugs and inspect regularly for moisture ingress. Turn off during severe storms.
Final Tips for a Stunning, Safe Display
Beautiful holiday lighting doesn’t happen by accident. It’s the result of thoughtful planning, correct materials, and attention to detail. Prioritize safety as much as sparkle. Use only outdoor-rated components, respect electrical limits, and never cut corners on fasteners. With the right approach, your icicle lights will drape elegantly, shine brightly, and withstand winter’s challenges—all while bringing joy to your household and passersby.


 浙公网安备
33010002000092号
浙公网安备
33010002000092号 浙B2-20120091-4
Comments
No comments yet. Why don't you start the discussion?