
Installing a dog door is one of the most practical upgrades a pet owner can make. It grants pets independence, reduces accidents, and minimizes constant door requests. While it may seem like a complex project, with the right tools and approach, you can install a dog door in nearly any home—wooden doors, sliding glass panels, metal exteriors, or even exterior walls. This guide walks through every phase, from selecting the right model to final installation, tailored to your specific home type.
Choosing the Right Dog Door Model
The first decision determines the rest of the process: which type of dog door suits your pet and home? Models vary by material compatibility, insulation quality, security features, and size. Measure your dog from the ground to their shoulders and add 1–2 inches to determine the minimum flap height. Width should allow comfortable passage without excessive gaps.
Common types include:
- Pet panel inserts – Ideal for sliding glass doors; no permanent modifications.
- Wall-mounted units – Best for homes where routing through an interior room to an exterior wall is possible.
- Door-mounted flaps – Designed for wood or metal entry doors; require cutting but offer durability.
- Double-flap systems – Provide better weather resistance and insulation for colder climates.
Tools and Materials Checklist
Before beginning, gather all necessary tools. Having everything ready prevents interruptions and ensures precision during cutting.
“Preparation is half the job when installing a dog door. Measure twice, cut once.” — Carlos Mendez, Home Renovation Contractor with 15+ years of experience
Dog Door Installation Checklist
- Dog door unit (with frame and flap)
- Tape measure and level
- Masking tape and pencil
- Hole saw or jigsaw
- Drill with bits
- Safety goggles and gloves
- Weatherproof sealant (for exterior installations)
- Screwdriver or power driver
- Insulation foam (for wall-through installations)
- Flashing kit (for siding or stucco walls)
Step-by-Step Installation by Home Type
Installation varies significantly depending on your home’s construction. Below are detailed instructions for the most common scenarios.
1. Wooden Exterior Door
Wood doors are the easiest for dog door installation due to their workability and accessibility.
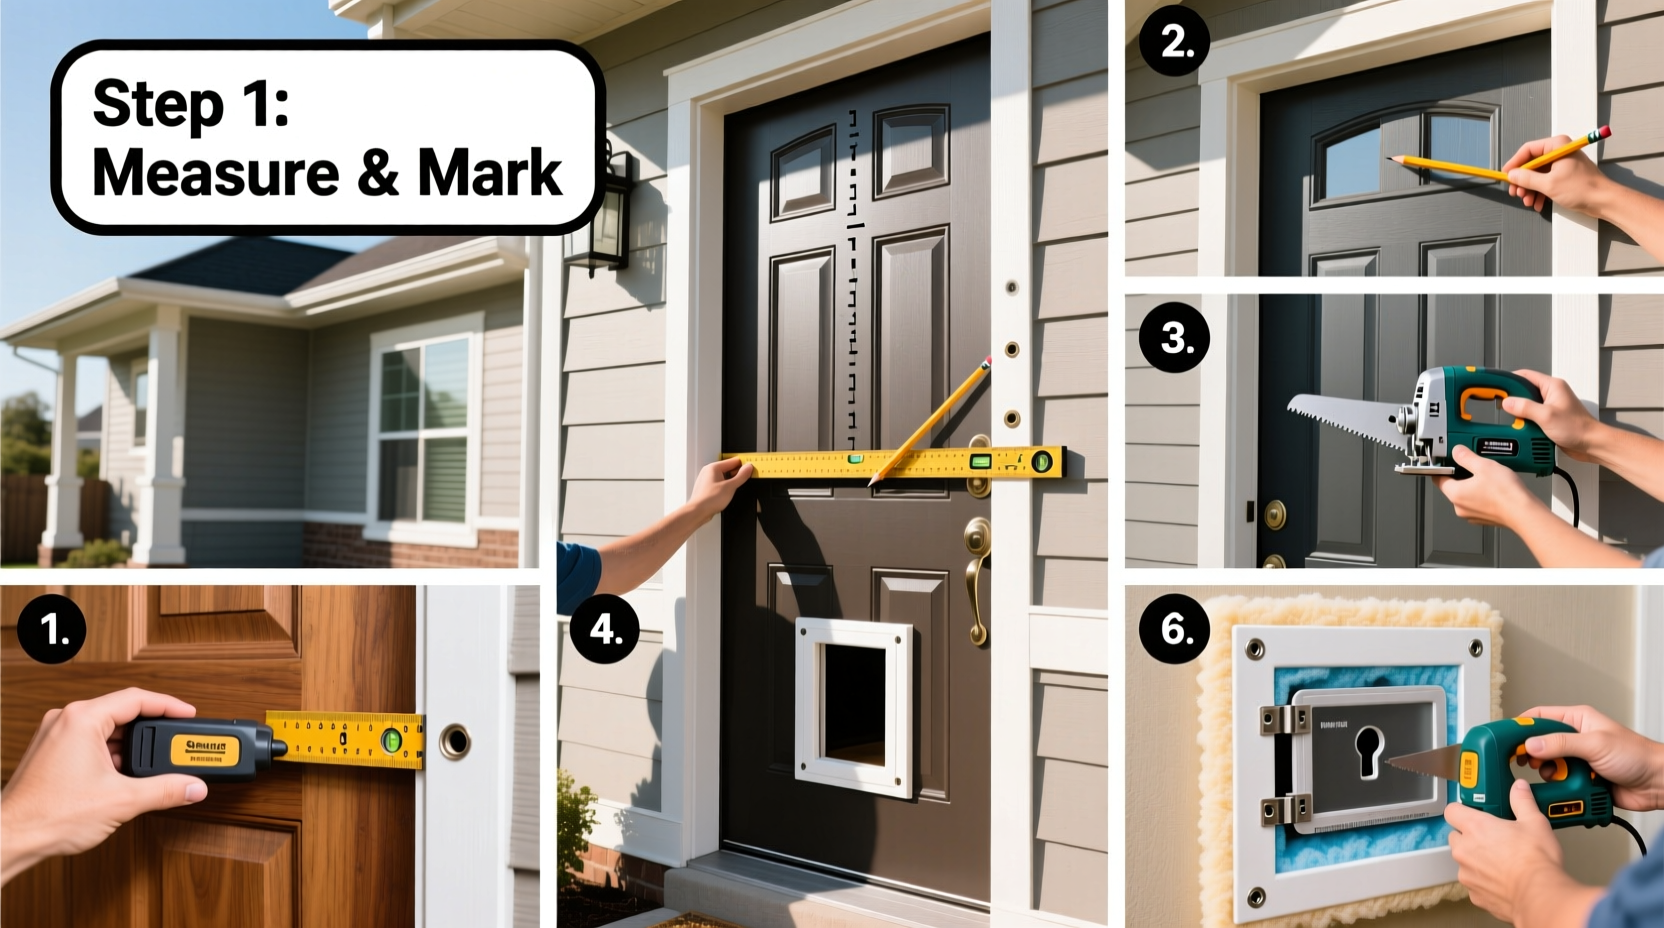
- Place your dog door template (included with most kits) on the lower portion of the door, ensuring at least 2 inches above the threshold.
- Use a level to align the template horizontally.
- Mark screw holes and outline the cutout with masking tape to reduce splintering.
- Drill starter holes in each corner of the outline.
- Cut along the lines using a jigsaw.
- Test-fit the frame. Adjust if needed.
- Screw the outer and inner frames into place.
- Apply silicone sealant around the exterior edges to prevent moisture ingress.
2. Sliding Glass Door
These installations don’t require cutting into glass. Instead, they use a panel insert that fits within the track.
- Measure the height and width of your sliding door’s open track area.
- Select a telescoping pet door insert compatible with your dimensions.
- Adjust the side rails until snug against the top and bottom tracks.
- Lock the rails in place using built-in knobs or levers.
- Ensure the flap swings freely and latches securely.
- Install a draft guard if included, especially in colder regions.
3. Metal or Steel Door
Metal doors, such as insulated steel entries, require more effort due to thickness and internal reinforcement.
- Use a hole saw rated for metal or a reciprocating saw with a metal-cutting blade.
- Mark the cutout using the template, then drill pilot holes at corners.
- Cut slowly to avoid overheating the blade; apply light pressure.
- Deburr sharp edges with a file or sandpaper.
- Secure the frame with provided screws—use washers to distribute pressure.
- Seal all gaps with outdoor-rated caulk to maintain thermal efficiency.
4. Exterior Wall Installation
This method is ideal when no suitable door exists or when you want direct yard access from a room.
- Choose a location avoiding studs, electrical wires, or plumbing (use a stud finder).
- Mark the cutout on both interior and exterior surfaces.
- Cut through drywall, insulation, and siding using a drywall saw or reciprocating saw.
- Install the tunnel section of the dog door according to manufacturer specs.
- Seal exterior joints with flashing and waterproof membrane to prevent leaks.
- Insulate around the frame and patch interior drywall if needed.
Do’s and Don’ts During Installation
| Do’s | Don’ts |
|---|---|
| Use a level to ensure the flap hangs correctly | Install too low, risking water entry during rain |
| Seal all exterior gaps with silicone caulk | Leave insulation exposed to moisture |
| Check local building codes for wall modifications | Force-fit a frame that doesn’t align properly |
| Train your dog gradually to use the new door | Allow children or other pets unsupervised access initially |
Real Example: Installing a Wall-Mounted Door in a Brick Ranch Home
Jessica R., a homeowner in Austin, TX, wanted her Labrador, Max, to access the backyard directly from the laundry room. Her front door faced a busy street, making it unsafe for unsupervised exits. She chose a double-flap wall-through model rated for high winds.
After locating a stud-free zone near the back corner of the room, she cut through the drywall, brick veneer, and insulation. Using a masonry bit and angle grinder, she created a clean opening. She installed flashing around the exterior frame and sealed it with elastomeric coating to handle Texas heat cycles. The entire process took one Saturday morning. Within two days, Max was confidently using the door, and Jessica noticed a significant drop in barking at the back window.
Training Your Dog to Use the New Door
A flawless installation means little if your dog won’t use it. Start with the flap removed or propped open. Encourage passage with treats and praise. Gently guide your dog through while saying a command like “Go out.” Once consistent, reintroduce the flap, holding it up initially. Gradually let it swing freely as confidence builds.
For timid dogs, practice during calm times of day. Avoid forcing them through. Some models come with magnetic closures or transparent flaps, which can ease anxiety by improving visibility.
Frequently Asked Questions
Can I install a dog door in a rented home?
Yes, but consult your landlord first. For non-permanent solutions, consider a sliding glass door insert or a freestanding pet gate with a built-in door. These can be removed without damage.
Will a dog door compromise my home’s security?
Not if installed correctly. Many modern units have lockable covers and reinforced flaps. Avoid large openings for small dogs—choose a size that only your pet can fit through. Motion-sensor lights or cameras near the door add extra deterrence.
How do I prevent cold drafts in winter?
Opt for a double-flap model with insulated panels. Check seals annually and replace worn flaps. Adding a secondary indoor cover during extreme weather helps retain heat.
Final Steps and Maintenance Tips
After installation, inspect the unit quarterly. Look for cracks in the flap, loose screws, or degraded sealant. Clean the frame with mild soap and water—avoid harsh solvents that degrade plastic or rubber components. In snowy regions, clear snow buildup promptly to prevent ice dams behind the flap.
Over time, wear and tear are normal. Most manufacturers offer replacement flaps and hardware kits, extending the life of the unit for a decade or more with proper care.
Conclusion
Installing a dog door is a manageable DIY project that enhances both pet independence and household convenience. Whether you’re working with wood, glass, metal, or an exterior wall, the right preparation and tools lead to a secure, weather-tight result. By following this guide, you ensure a smooth process and long-term satisfaction—for both you and your furry companion.


 浙公网安备
33010002000092号
浙公网安备
33010002000092号 浙B2-20120091-4
Comments
No comments yet. Why don't you start the discussion?