
If your General Electric dryer is making a thumping noise, not tumbling properly, or has completely stopped rotating, the issue may be a worn or broken dryer belt. Replacing the belt is one of the most common—and most cost-effective—dryer repairs you can perform at home. With basic tools and a few hours of your time, you can restore full function to your appliance without hiring a technician.
This comprehensive guide walks you through each stage of replacing a dryer belt on a typical GE model. From safety precautions to reassembly, every detail is covered so you can complete the job confidently and correctly.
Understanding the Dryer Belt’s Role
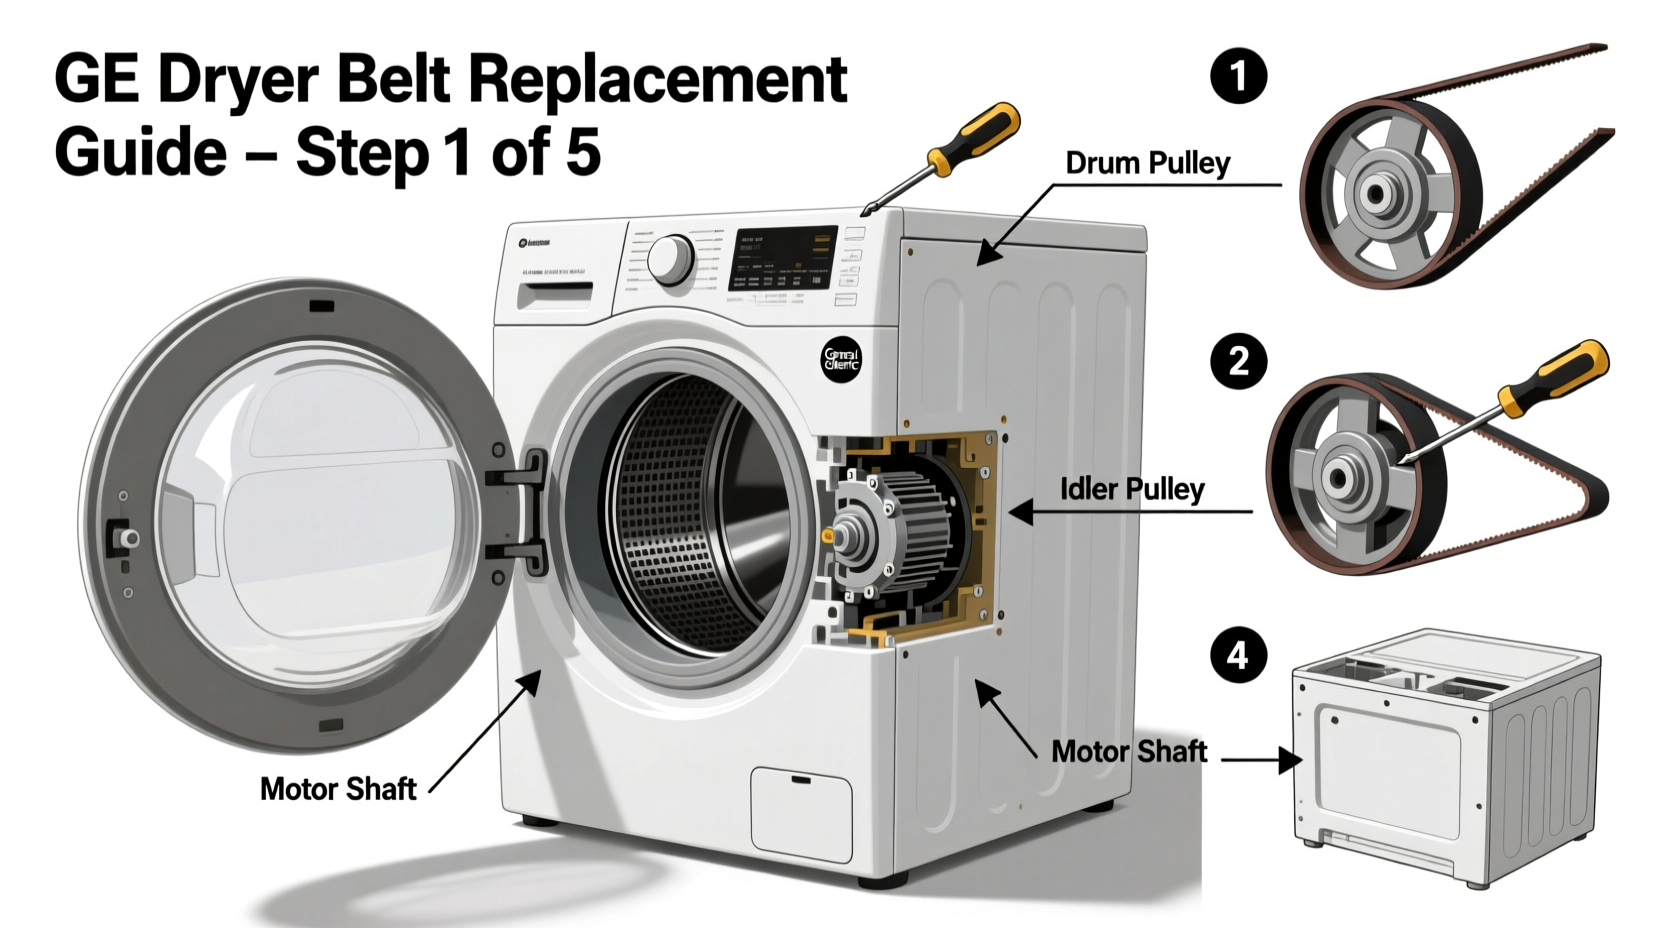
The dryer belt wraps around the drum and connects to the drive motor via a pulley system. As the motor spins, the belt turns the drum, allowing clothes to tumble evenly through heated air. Over time, repeated use causes the belt to stretch, fray, or snap. When that happens, the drum won’t rotate—even if the heating element and fan continue to operate.
A faulty belt often produces distinct symptoms:
- Drum doesn’t turn but you hear the motor running
- Loud squealing or slapping noises during operation
- Burning smell from overheated rubber or motor strain
Before assuming the belt is the culprit, verify these signs aren't caused by a failed idler pulley, motor, or drum rollers. However, in many cases, especially with older units (7+ years), the belt is the primary failure point.
“Over 60% of dryer service calls for non-tumbling issues end up being belt-related. It's a high-wear component that should be inspected during annual maintenance.” — Mark Reynolds, Appliance Repair Technician with 18 years of field experience
Tools and Materials You’ll Need
Gathering the right supplies before starting ensures a smooth process. Here’s what you’ll need:
| Item | Purpose | Notes |
|---|---|---|
| New GE dryer belt (model-specific) | Replaces worn original | Check your model number; common part numbers include WE1X923 or WE1X1058 |
| Socket wrench set (1/4\" and 5/16\") | Removes screws and bolts | A ratchet saves time and effort |
| Phillips-head screwdriver | Access panel removal | Magnetic tip helps prevent dropped screws |
| Putty knife or plastic pry tool | Release front panel clips | Avoid metal tools that scratch surfaces |
| Gloves and safety glasses | Protect hands and eyes | Essential when working near sharp edges |
| Vacuum with hose attachment | Clean lint and debris | Prevents fire hazards and improves airflow |
Step-by-Step Installation Process
Follow this sequence carefully. Work slowly and deliberately—rushing increases the risk of damaging components or misaligning parts.
- Unplug the dryer. Never work on an energized appliance. Disconnect from the power outlet. If hardwired, shut off the circuit breaker.
- Move the dryer away from the wall. Pull it forward to access the back and allow room to open panels safely.
- Remove the top panel. On most GE models, two Phillips screws are located at the back of the unit. Once removed, slide the top cover backward and lift it off.
- Detach the front panel. Remove the screws securing the front corners to the side panels. Use a putty knife to gently release the retaining clips at the base. Carefully tilt the panel outward—don’t force it.
- Inspect and remove the old belt. Locate the broken belt around the drum. Note how it was routed through the idler pulley and motor pulley. Lift it off carefully.
- Check the idler pulley and drum rollers. Spin them by hand. If they feel gritty, wobbly, or resist movement, consider replacing them now to avoid future breakdowns.
- Position the new belt onto the drum. Loop the belt around the center of the drum while it’s still supported by the rear bearing. The grooved side should face the drum.
- Route the belt through the idler pulley assembly. This is the trickiest part. Slide the belt behind the idler pulley, which applies tension. You may need to manually compress the idler arm to create slack.
- Engage the motor pulley. With the belt looped correctly, rotate the drum slightly to guide the belt onto the motor pulley at the bottom of the cabinet.
- Reinstall the front panel. Align the clips and reattach the screws. Ensure the door switch harness is connected if applicable.
- Replace the top panel. Slide it into place and secure with screws.
- Plug in and test. Restore power and run a short cycle. Watch the drum spin smoothly and listen for abnormal sounds.
Common Mistakes and How to Avoid Them
Even experienced DIYers make errors during dryer repairs. Below are frequent pitfalls and how to sidestep them:
| Do’s | Don’ts |
|---|---|
| Double-check belt routing before closing panels | Assume all GE models have identical belt paths |
| Clean lint from beneath the drum and blower housing | Leave tools or screws inside the cabinet |
| Test the drum rotation by hand before powering on | Force panels into place if alignment feels wrong |
| Verify the door switch clicks when closed | Operate the dryer empty for more than 5 minutes during testing |
Mini Case Study: Sarah’s Weekend Fix
Sarah, a homeowner in Columbus, Ohio, noticed her GE dryer wasn’t tumbling. The heat worked, but clothes came out damp after cycles. She diagnosed the issue using online forums and confirmed the drum wouldn’t turn by hand.
She ordered a $17 replacement belt compatible with her model (GTDR420EDWW) and spent Saturday morning following a guide similar to this one. The entire process took 90 minutes, including vacuuming built-up lint behind the drum. After reassembly, the dryer ran quietly and efficiently. Sarah saved over $150 in service fees and felt empowered handling the fix herself.
“I was nervous about breaking something,” she said later, “but once I saw how simple the mechanism was, it felt like solving a puzzle. Now I check the belt and clean the vent twice a year.”
Frequently Asked Questions
How long does a dryer belt typically last?
Most dryer belts last between 7 and 10 years under normal use. Frequent drying of heavy loads (like towels or jeans) can shorten lifespan. Signs of wear include fraying, cracking, or visible glazing from heat exposure.
Can I use a universal belt instead of an OEM part?
Yes, many aftermarket belts fit multiple models. However, always match the length (usually 90–96 inches) and width (typically 1/4 inch). OEM belts (Original Equipment Manufacturer) offer the best fit and durability for GE appliances.
Why won’t my drum spin even after installing the new belt?
Possible causes include incorrect belt routing, a seized idler pulley, damaged drum rollers, or a faulty drive motor. Manually rotate the drum—if it sticks or grinds, inspect support components. Also confirm the belt isn’t riding off-center on the motor pulley.
Final Checklist Before Closing Up
Before restoring power, walk through this final verification list:
- ✅ Belt is seated fully on drum and motor pulley
- ✅ Idler pulley applies firm, even tension
- ✅ All screws are tightened, no loose parts inside
- ✅ Front and top panels are securely fastened
- ✅ Lint trap and exhaust duct are clear
- ✅ Drum rotates freely by hand
Conclusion
Replacing a dryer belt on your General Electric dryer is a practical skill that extends the life of your appliance and keeps household costs low. What might seem intimidating at first reveals itself as a logical, mechanical process once you understand the components involved. With careful attention to detail and adherence to safety practices, you can complete this repair successfully on your first attempt.


 浙公网安备
33010002000092号
浙公网安备
33010002000092号 浙B2-20120091-4
Comments
No comments yet. Why don't you start the discussion?