
In an age where smartphones are both essential tools and expensive investments, protecting them from accidental drops is more important than ever. One of the most effective yet underrated solutions is the finger strap—a simple accessory that enhances grip, reduces slippage, and adds a personalized touch to your device. Whether you're commuting, walking, or just scrolling one-handed, a securely installed finger strap can make a tangible difference in how confidently you hold your phone.
This comprehensive guide walks you through every aspect of selecting, preparing, and installing a finger strap on your phone case. From choosing compatible materials to troubleshooting common issues, this article ensures you achieve a professional-grade result without specialized tools or experience.
Why Use a Finger Strap?
Finger straps are increasingly popular among professionals, travelers, and everyday users who value both functionality and peace of mind. Unlike bulky grips or pop sockets, finger straps offer minimal bulk while maximizing control. They loop around one finger, anchoring the phone securely during use and preventing it from falling when set down or jostled.
The benefits extend beyond drop prevention. A well-installed strap improves one-handed usability, especially on larger phones. It also serves as a convenient carrying loop—ideal for crowded environments like subways, festivals, or grocery stores where keeping your phone visible and secure matters.
“Adding a finger strap is one of the simplest upgrades for phone safety. It’s low-cost, reversible, and highly effective.” — Jordan Lee, Mobile Device Ergonomics Consultant
Choosing the Right Finger Strap and Case Compatibility
Not all finger straps work with all cases. The key to a successful installation lies in compatibility between the strap attachment method and your existing case type. Most straps fall into two categories: adhesive-mounted and screw-mounted.
| Strap Type | Best For | Installation Method | Lifespan (Typical) |
|---|---|---|---|
| Adhesive-backed | Slim cases, glass backs, non-removable battery phones | Strong double-sided tape or 3M adhesive | 6–12 months |
| Screw-mounted | Rugged cases with built-in mounting points | Mini screws into pre-drilled holes | Indefinite (if case supports it) |
If your current case lacks mounting support, consider switching to a rugged model designed for accessories. Brands like OtterBox Defender Pro and UAG Pathfinder include integrated slots or threaded inserts specifically for add-ons like lanyards and finger loops.
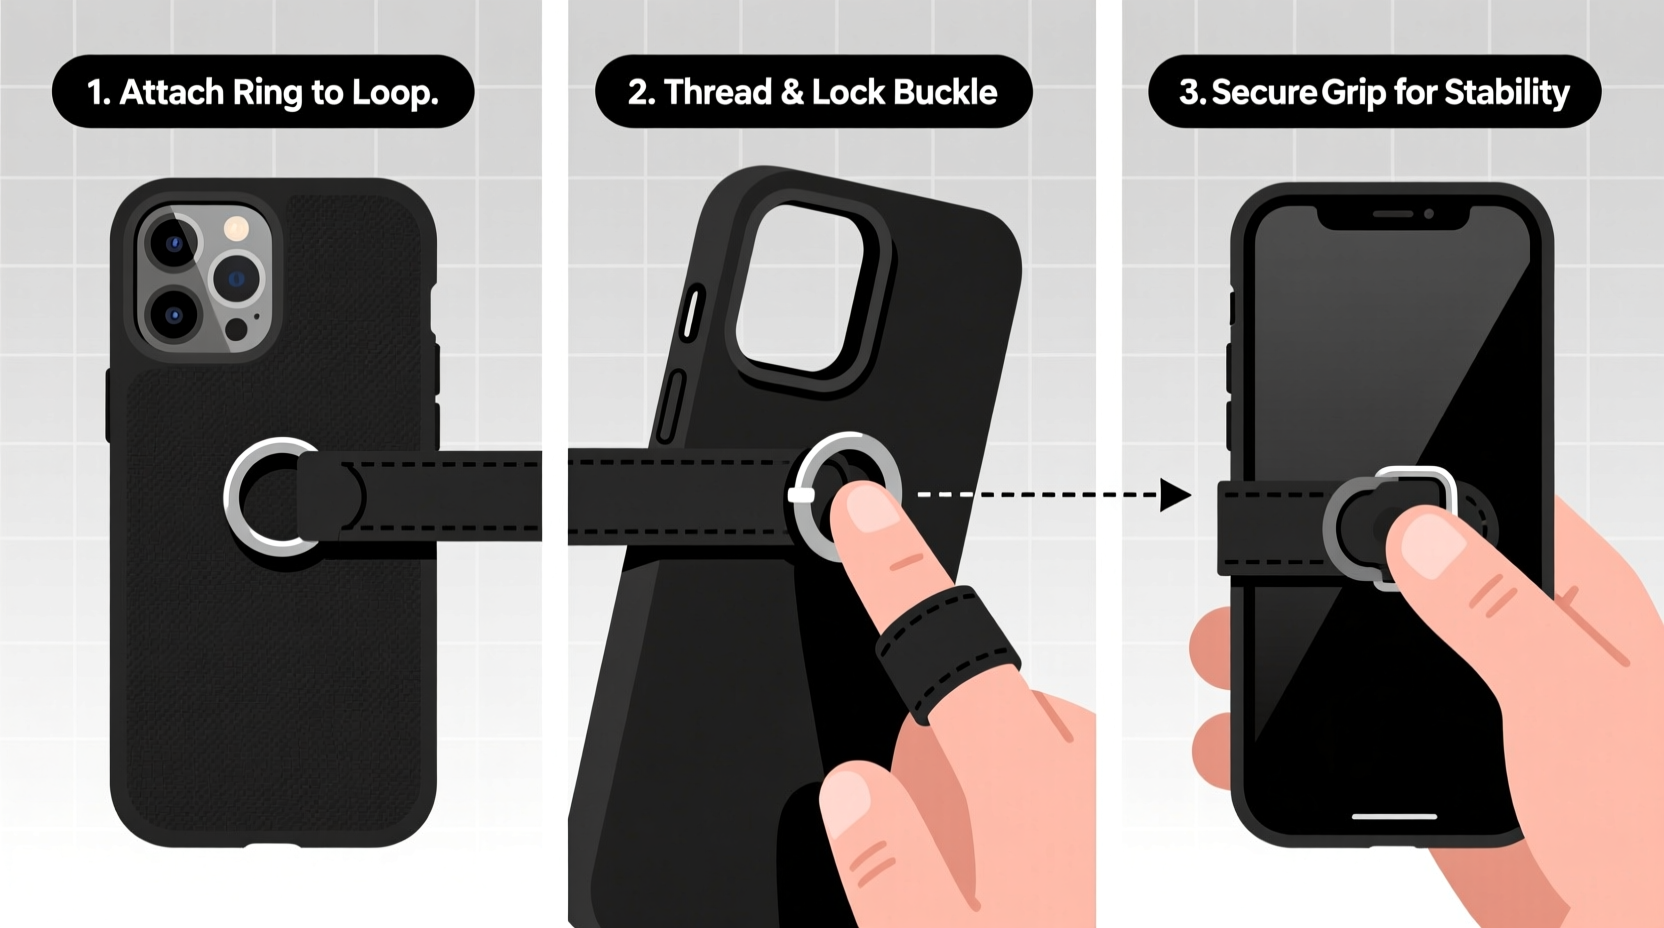
Step-by-Step Installation Guide
Follow these steps carefully to ensure a secure, long-lasting installation. This process applies to adhesive-based finger straps—the most common type available for consumer use.
- Gather your materials: finger strap kit, microfiber cloth, isopropyl alcohol (70% or higher), cotton swab, ruler or measuring tape, masking tape (optional).
- Power off your phone: While not required, turning off the device minimizes risk if you accidentally press buttons during handling.
- Remove the phone from its case: This allows better access to the back surface and prevents misalignment.
- Determine optimal placement: Position the strap near the bottom third of the case, centered horizontally. When worn, the loop should sit comfortably below your pinky when holding the phone naturally.
- Clean the surface: Wipe the attachment zone thoroughly with alcohol using a cotton swab. Let dry completely—about 60 seconds.
- Peel and position: Remove the protective liner from the adhesive pad. Align the baseplate precisely and press down firmly for 30 seconds without sliding.
- Avoid use for 24 hours: Allow full adhesive cure time before threading your finger through the loop or subjecting it to stress.
For screw-mounted versions, refer to your case’s manual for correct screw size and torque. Over-tightening can crack plastic housings, while under-tightening leads to wobble and eventual detachment.
Troubleshooting Common Issues
- Adhesive fails prematurely: Likely due to improper cleaning or surface contamination. Reapply after degreasing with alcohol.
- Strap feels loose or wobbly: Check for uneven pressure during application. If adhesive has already set, replace the mount.
- Interference with wireless charging: Some thick metal-reinforced straps block Qi signals. Opt for nylon or thin polymer models if charging frequency is high.
Real-World Example: Commuter Safety Upgrade
Sophie, a graphic designer in Seattle, frequently uses public transit to commute. Her iPhone had slipped from her hand twice—once into a puddle at a bus stop. After researching grip solutions, she chose a minimalist black nylon finger strap with 3M VHB adhesive backing.
She followed the cleaning and curing steps meticulously. Within days, she noticed improved confidence when standing on moving buses. Six months later, the strap remains intact despite daily use and occasional rain exposure. “It’s barely noticeable until I need it,” she says, “but now I wouldn’t go back.”
Do’s and Don’ts of Finger Strap Maintenance
| Do | Don't |
|---|---|
| Inspect adhesive monthly for lifting edges | Use solvents like acetone to remove residue |
| Wipe strap regularly with damp cloth | Attach heavy accessories to the loop (e.g., keys) |
| Replace adhesive pad every 9–12 months | Force the strap into tight pockets |
| Store phone with strap facing outward in bag | Expose adhesive to moisture during first 24 hours |
Frequently Asked Questions
Can I install a finger strap on a silicone or TPU case?
Yes, but adhesion may be weaker due to the oily nature of soft plastics. For best results, choose a strap with reinforced adhesive or consider using a hard-shell inner case beneath the soft one.
Will removing the strap damage my phone case?
Most high-quality adhesives leave minimal residue. To remove cleanly, gently heat the area with a hairdryer and peel slowly. Use a small amount of rubbing alcohol on a cloth to wipe away leftover stickiness.
Are finger straps safe for children’s devices?
They can be, provided supervision is maintained. Ensure the strap length doesn’t pose entanglement risks, and avoid sharp-edged hardware. Elastic or breakaway designs are safer options for younger users.
Final Checklist Before You Begin
- ✅ Confirm your phone case material and thickness
- ✅ Select a strap compatible with your usage pattern (daily carry vs. outdoor activity)
- ✅ Purchase a reputable brand with strong adhesive or secure mounting
- ✅ Set aside 15 minutes for installation and 24 hours for curing
- ✅ Keep rubbing alcohol and a lint-free cloth handy
Conclusion: Secure Your Phone, Simplify Your Day
Installing a finger strap isn’t just about avoiding costly screen repairs—it’s about reclaiming control in a world where distractions pull us in every direction. With careful selection and proper installation, this small addition delivers outsized returns in convenience, safety, and usability.
Take a few moments today to evaluate your current phone setup. If you’re still white-knuckling your device every time you stand up, it’s time for a change. Follow the steps outlined here, apply the tips thoughtfully, and enjoy the confidence that comes with knowing your phone isn’t going anywhere.


 浙公网安备
33010002000092号
浙公网安备
33010002000092号 浙B2-20120091-4
Comments
No comments yet. Why don't you start the discussion?