
The Apple Watch Series 9 remains one of the most refined smartwatches on the market, combining advanced health tracking with sleek design. One of the easiest ways to elevate its look is by switching to a metal band—whether it’s stainless steel, Milanese loop, or a link bracelet. However, installing a metal strap correctly isn’t just about aesthetics; it’s about comfort, security, and long-term durability. A poorly fitted strap can lead to discomfort, accidental drops, or even damage to the watch lugs.
This guide walks you through every stage of installing a metal iWatch strap on your Series 9, ensuring a flawless fit that feels as good as it looks. From choosing the right tool to adjusting links and verifying alignment, each step is designed for precision and ease.
Understanding Your Metal Strap Options
Before installation, it’s essential to know what type of metal strap you’re working with. Not all metal bands are created equal, and compatibility varies based on attachment mechanism and adjustability.
- Milanese Loop: Magnetic mesh band with infinite adjustability. Attaches via a pin-and-tuck system.
- Link Bracelet: Solid metal links that require removal or addition for sizing. Uses spring bars or integrated connectors.
- Oyster or Jubilee Style: Rigid metal bands with folding clasps. Typically found in third-party accessories.
Apple’s official stainless steel link bracelet and Milanese loop are engineered specifically for seamless integration with the Series 9. Third-party options may vary slightly in lug width (20mm for 41mm models, 22mm for 45mm), so verify compatibility before purchase.
What You’ll Need Before Starting
Proper tools make all the difference when handling precision devices like the Apple Watch. Rushing this process without the right equipment risks scratching the case or damaging the spring bars.
📋 **Installation Checklist**- Apple Watch Series 9 (charged and ready)
- Metal strap compatible with your model
- Micro-size spring bar removal tool (or fine-tipped tweezers)
- Soft microfiber cloth
- Small container for storing removed pins or links
- Bright, well-lit workspace
Avoid using household items like paperclips or knives—they lack precision and increase the risk of slipping and scratching the polished finish of your watch.
Step-by-Step Installation Process
🕒 **Timeline & Actions**- Power Down (Optional but Recommended) – 1 minute
While not required, turning off your Series 9 prevents accidental screen activation during handling. Press and hold the side button, then slide to power off. - Remove the Existing Strap – 3–5 minutes
Flip the watch over and locate the release buttons on the current strap’s connectors. These are small ridges near the lug ends. Press firmly while sliding the strap outward. Repeat for both sides.
For bands secured with spring bars (common in third-party straps), use the spring bar tool to compress the pin and gently slide the strap free. - Prepare the Metal Strap – 2–3 minutes
Inspect the new metal strap’s connectors. Most metal bands come with quick-release pins already inserted. Ensure they’re seated properly and move smoothly.
If your strap includes removable links (e.g., link bracelets), lay out the band and count how many need removal based on your wrist size. Measure your wrist with a tape measure and compare to the manufacturer’s sizing chart. - Attach the New Metal Strap – 4–6 minutes
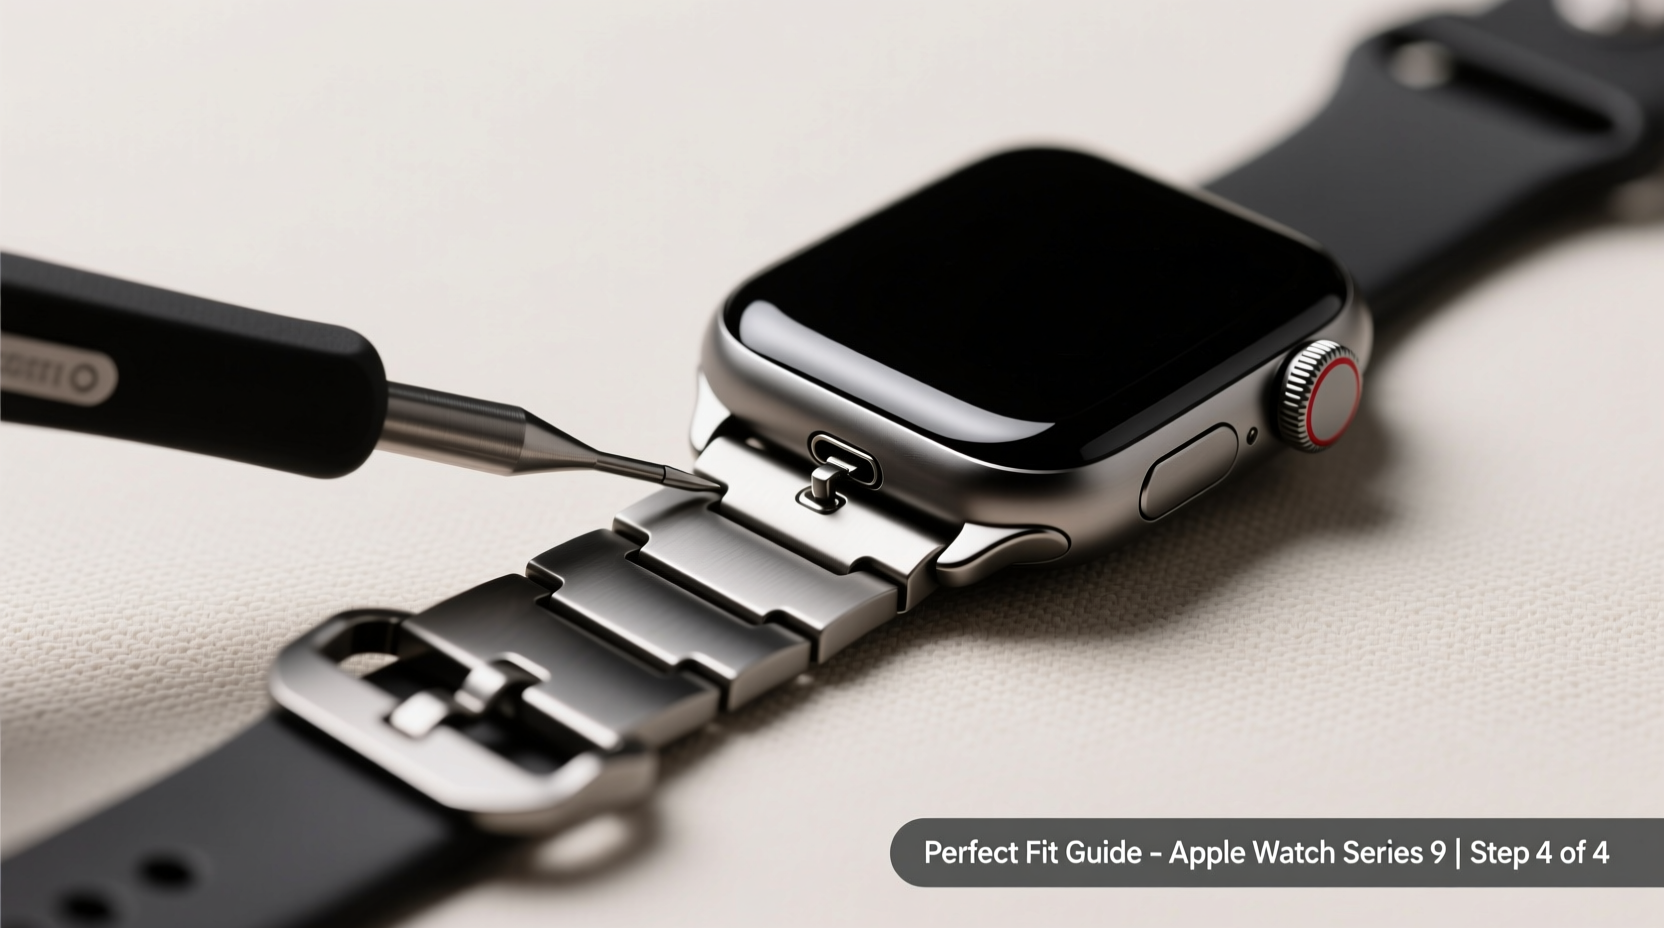
Align one end of the metal strap with the watch lug. Press the release button on the connector and slide it into place until it clicks. Do not force it.
Repeat on the opposite side. You should hear a distinct snap as the connector locks in. Gently tug both ends to confirm secure attachment. - Adjust Fit and Test Comfort – 3–5 minutes
Fasten the clasp or magnetic closure. The band should sit snugly but allow room to slip a finger underneath.
Move your wrist through natural motions—typing, lifting your arm, checking the time—to ensure no pinching or excessive movement.
“A properly installed metal strap should feel like an extension of the watch, not an add-on. Misalignment is the first sign of improper installation.” — Daniel Reyes, Wearable Design Engineer at a leading accessory lab
Common Mistakes and How to Avoid Them
Even experienced users can make errors when swapping straps. These issues are often preventable with awareness and care.
| Mistake | Why It’s a Problem | How to Avoid |
|---|---|---|
| Forcing the connector | Can damage the internal latch mechanism or scratch the casing | Ensure the release button is fully depressed before sliding |
| Incorrect link removal | Leads to asymmetry or uneven tension on the clasp | Remove links from both sides equally; follow the manufacturer’s guide |
| Ignoring dust or debris | Particles can interfere with connector seating | Clean the lugs with a dry microfiber cloth before attaching |
| Over-tightening the clasp | Causes discomfort and skin irritation | Leave slight play—your wrist expands slightly throughout the day |
Real-World Example: Fixing a Loose Fit
💬 **Mini Case Study** Sarah, a fitness instructor, upgraded her 45mm Series 9 to a stainless steel link bracelet for a more professional appearance. After installation, she noticed the band felt loose during high-intensity workouts, occasionally rotating on her wrist. She revisited the setup and realized she hadn’t removed enough links. By carefully disassembling two additional links—removing one from each side—she achieved balanced tension. She also discovered that tightening the micro-adjustment screws on the clasp provided incremental control, eliminating slippage without compromising circulation. The result? A secure, personalized fit that stayed put during spin classes and looked sharp during client meetings.Frequently Asked Questions
Can I install a metal strap without any tools?
Yes, if it uses Apple’s quick-release system. Simply press the release button on the current strap and slide it out. No tools are needed for attachment or removal. However, for link adjustment, you’ll need a precision tool set.
How tight should my metal strap be?
It should stay securely on your wrist during movement but allow you to slide one finger comfortably between the band and your skin. Over-tightening can restrict blood flow and cause irritation over time.
Will a metal strap affect my heart rate readings?
No. The optical sensor is located on the back of the watch and functions independently of the strap material. However, ensure the watch sits flush against your skin—excessive gap due to poor fit may impact accuracy.
Final Thoughts and Next Steps
A metal iWatch strap transforms the Series 9 from a functional device into a statement piece. But true elegance lies in execution: a perfectly aligned, securely fastened, and precisely sized band speaks volumes about attention to detail.
Now that your metal strap is installed with confidence, take a moment to appreciate the craftsmanship—not just of Apple’s engineering, but of your own careful work. Whether you're wearing it to the office, the gym, or a weekend outing, your watch should feel like a natural part of your daily rhythm.


 浙公网安备
33010002000092号
浙公网安备
33010002000092号 浙B2-20120091-4
Comments
No comments yet. Why don't you start the discussion?