
Upgrading your Apple Watch with a metal band can instantly elevate its look from casual to sophisticated. Whether you're switching to a stainless steel link bracelet, Milanese loop, or a two-tone design, the process of installation is simple—but it requires precision. A misaligned connection or forced attachment can damage the lugs or compromise the security of your device. This guide walks you through every detail, ensuring a smooth, safe, and professional-looking result.
Why Choose a Metal Watch Band?
Metal bands offer durability, elegance, and a timeless aesthetic that complements both formal and everyday wear. Unlike sport bands, metal options resist stretching and degradation over time, making them ideal for long-term use. They also provide better ventilation than silicone, reducing sweat buildup during extended wear. However, their rigidity means installation demands more care than flexible bands.
Apple designs all official metal bands with proprietary connectors that align perfectly with the watch’s lugs. Third-party alternatives often replicate this system but vary in quality—choosing a reputable brand ensures compatibility and longevity.
Tools and Preparation
No special tools are required for standard metal band installation, but having a clean workspace and good lighting improves accuracy. Most metal bands come with built-in release mechanisms—either a sliding pin or spring-loaded lever—that disengage the links from the watch body.
Prepare your environment by placing a soft cloth on your work surface. This prevents scratches if the watch slips. Power down your Apple Watch if you’re concerned about accidental input, though it's not necessary for the physical installation.
What You’ll Need:
- Your Apple Watch
- New metal watch band (compatible with your model)
- Clean, flat surface
- Microfiber cloth (optional, for grip and protection)
- Small container (to store removed bands safely)
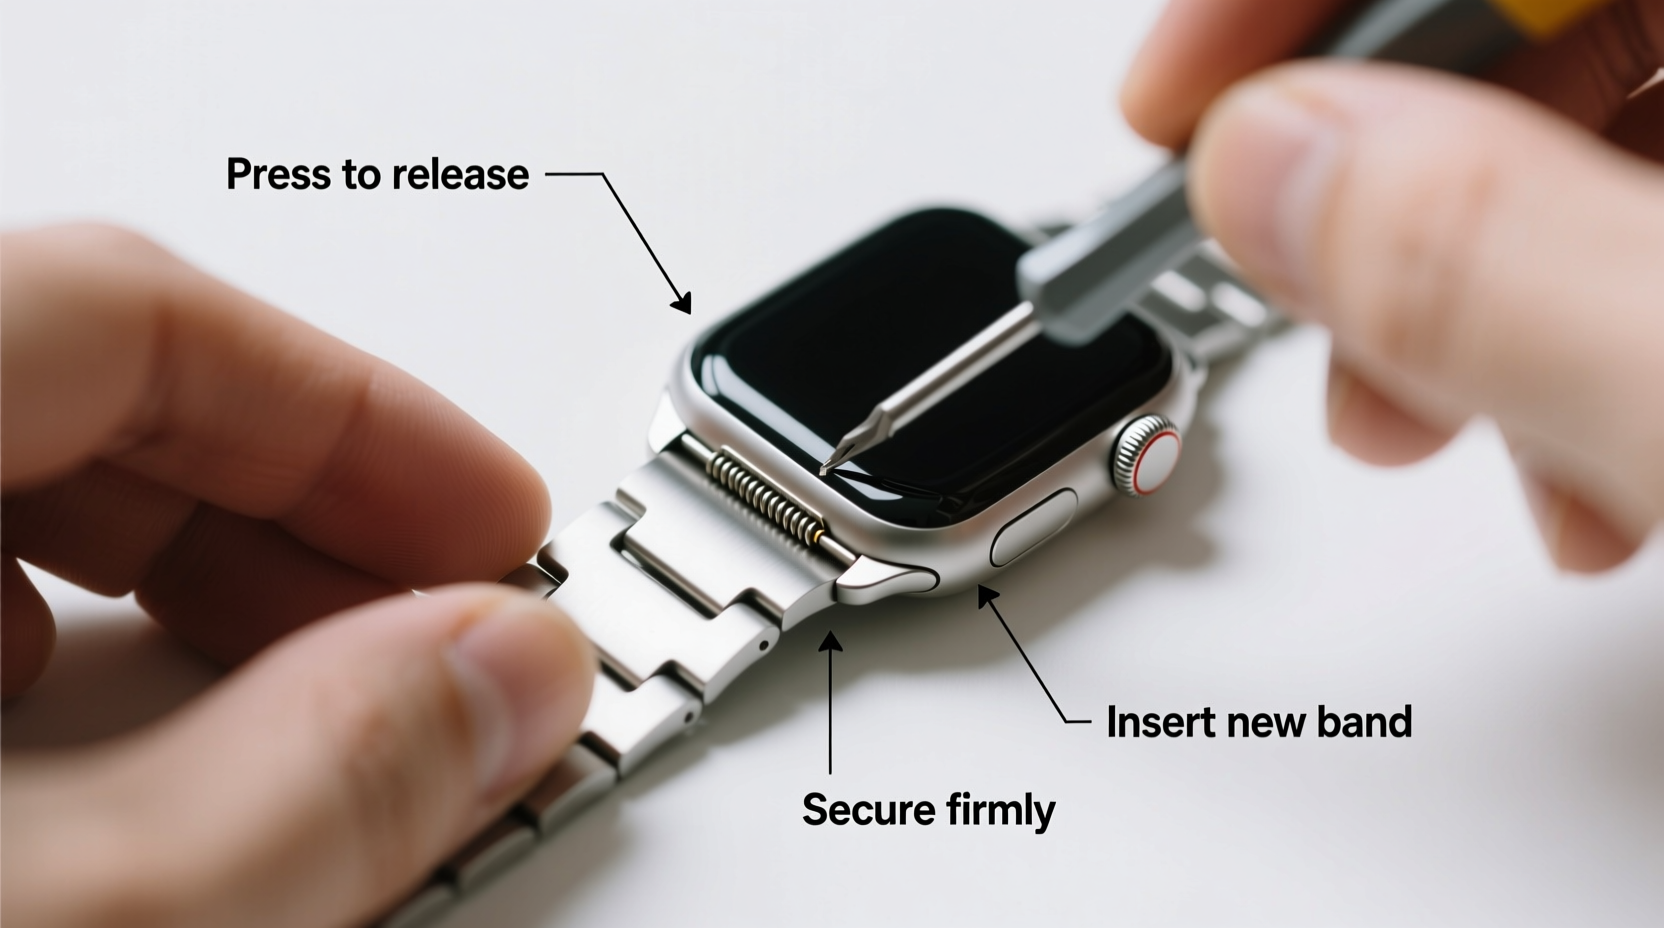
Step-by-Step Installation Process
Follow these steps carefully to attach your metal band without damaging the connectors or casing.
- Position the Watch Face-Down
Lay your Apple Watch face-down on the microfiber cloth. This protects the display and gives clear access to the band connectors on the sides. - Release the Existing Band (if applicable)
If replacing an old band, press the release button or slide the eject mechanism on the current band near the watch body. Gently pull the band straight away from the lug. Repeat for the other side. - Inspect the Metal Band Connectors
Examine the ends of the new metal band. Each side will have a small latch or pin. Ensure they move freely and are not obstructed by packaging residue. - Align One Side First
Take the metal band and align one connector with the corresponding lug on the watch. The grooves should match precisely. Apply gentle pressure until you hear a soft click—this indicates the pin has seated securely. - Attach the Second Side with Care
Holding the first side firmly in place, angle the second connector toward the opposite lug. Do not force it. Slide it in smoothly, ensuring the alignment is straight. Once fully inserted, confirm the click. - Test the Connection
Gently tug on the band from both sides. There should be no wobbling or separation. If movement occurs, detach and reattach, checking for debris or misalignment.
Adjusting Fit and Comfort
Most metal bands allow size adjustments. Link bracelets typically require a tool kit to remove or add links, while Milanese loops use magnetic sliders. Follow the manufacturer’s instructions for resizing. Over-tightening can cause discomfort; under-tightening risks slippage.
For optimal comfort, the band should rest snugly against your wrist without pressing into the skin. You should be able to fit one finger between the band and your wrist. Adjust throughout the day as needed, especially in warmer climates where swelling may occur.
Do’s and Don’ts of Metal Band Handling
| Do’s | Don’ts |
|---|---|
| Align connectors before applying pressure | Force the band into place |
| Clean the connectors monthly with a dry cloth | Use water or cleaning agents near the lug area |
| Check tightness weekly for daily wear | Wear the watch while swimming unless rated for it |
| Store the watch flat when not in use | Dangle the watch by the band when removing |
Expert Insight: Precision Matters
“Even high-end metal bands can fail prematurely if improperly installed. The connectors are engineered for exact alignment—forcing them causes micro-fractures that lead to sudden detachment.” — Daniel Reeves, Wearable Device Engineer
This insight underscores why patience is essential. Rushing the process risks damaging both the band and the watch itself, potentially voiding warranties or requiring costly repairs.
Real-World Example: Sarah’s Upgrade Experience
Sarah, a marketing executive in Chicago, recently upgraded her Series 8 Apple Watch to a polished stainless steel link band for client meetings. She attempted to install it over her kitchen sink, working quickly before a call. Misaligned on the second connector, she pushed harder—and snapped the release pin inside the lug.
She ended up visiting an Apple Store, where a technician explained that excessive lateral pressure had bent the internal spring. The repair cost $79. After learning the correct method, Sarah now installs all her bands on a padded desk, taking her time. “Five minutes of caution saved me money and stress,” she says.
Troubleshooting Common Issues
Even with careful handling, issues can arise. Here’s how to resolve them:
- Band won’t click into place: Check for dust or lint in the lug slot. Use a soft-bristled brush to clean gently.
- Uneven alignment: Detach both sides and reattach one at a time, ensuring full insertion before moving to the next.
- Loose feeling after attachment: Confirm the latch is fully engaged. Some third-party bands have weaker springs and may require replacement.
Frequently Asked Questions
Can I use any metal band on my Apple Watch?
Only bands designed specifically for Apple Watch will fit correctly. While some universal bands claim compatibility, they often lack precise engineering and may damage the lugs over time. Stick to Apple-certified or well-reviewed brands.
How often should I inspect the band connections?
Monthly inspection is recommended for regular users. Look for signs of wear, such as looseness, discoloration, or difficulty clicking in. Early detection prevents accidents like sudden detachment.
Is it safe to wear a metal band while exercising?
It depends on the activity. Light workouts are generally fine, but intense movement increases the risk of impact damage. Sweat can also corrode certain metals over time. For heavy exercise, consider switching back to a breathable sport band.
Final Checklist Before Wearing
- ✅ Band is compatible with your Apple Watch size and model
- ✅ Connectors are clean and undamaged
- ✅ Both sides are securely clicked into place
- ✅ No wobbling or gaps when gently tugged
- ✅ Band is adjusted to comfortable fit on your wrist
Conclusion: Confidence in Every Click
Installing a metal watch band on your Apple Watch isn't complicated—but it does reward attention to detail. With the right technique, you ensure both the safety of your device and the longevity of your accessory. Whether you're dressing up for a special occasion or simply enjoying a sleeker daily look, a properly installed metal band enhances both function and style.


 浙公网安备
33010002000092号
浙公网安备
33010002000092号 浙B2-20120091-4
Comments
No comments yet. Why don't you start the discussion?