
Riding a motorcycle is as much about the journey as it is about the destination. But communication—whether with a passenger, fellow rider, or GPS navigation—can often be compromised by wind noise, distance, and safety concerns. A well-installed helmet communication system transforms the riding experience, enabling clear voice transmission, real-time navigation, music streaming, and intercom connectivity between riders. This guide walks you through every stage of selecting and installing a reliable communication system, ensuring optimal performance without compromising safety or comfort.
Why a Helmet Communication System Matters
Modern motorcycle communication systems do more than just allow conversation. They integrate Bluetooth technology, noise cancellation, voice commands, and smartphone connectivity into a compact unit designed specifically for high-speed environments. Whether you're touring in a group, commuting daily, or taking weekend rides with a passenger, these systems enhance coordination, reduce distractions, and improve situational awareness.
However, simply purchasing a system isn't enough. Improper installation can lead to poor audio quality, loose components, battery drain, or even structural compromise of the helmet. That’s why a methodical installation process is essential.
Selecting the Right Communication System
Before touching tools or wires, choosing the right device is critical. Not all systems are compatible with every helmet model, and features vary widely in terms of range, battery life, and microphone effectiveness.
| Feature | Entry-Level Systems | Premium Systems |
|---|---|---|
| Intercom Range | 300–500 meters | Up to 1,600 meters |
| Battery Life | 6–8 hours | 10–14 hours |
| Noise Cancellation | Basic wind reduction | Advanced DSP filtering |
| Mounting Type | Adhesive pads | Screw-in or modular clips |
| Price Range | $80–$150 | $200–$400+ |
Popular brands like Sena, Cardo, and Scala Rider offer models tailored to different riding styles. For example, the Sena SRL2 is ideal for single riders needing GPS and phone integration, while the Cardo Packtalk Bold excels in group communication with mesh networking.
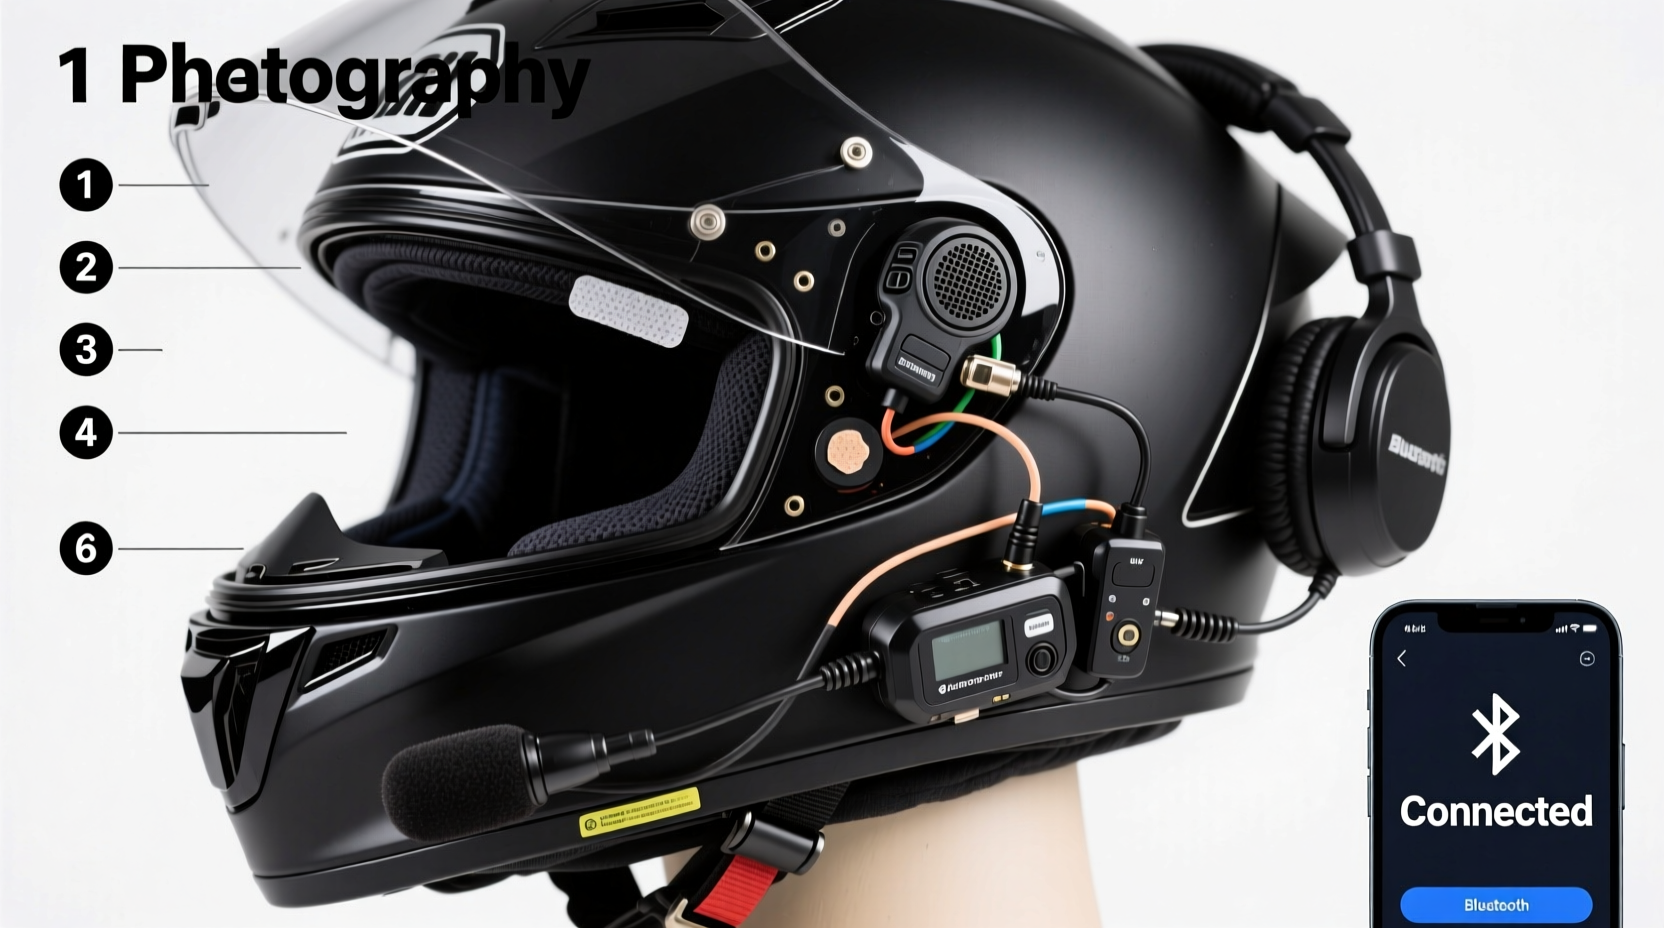
Installation Step-by-Step Guide
Installing a communication system requires patience and precision. Follow this sequence to ensure a secure, functional setup.
- Unbox and inspect all components: Check for speakers, control unit, microphone, wiring harness, charging cable, and mounting accessories.
- Power off and prepare the helmet: Ensure the helmet is clean and dry. Remove any existing liners or padding where components will be placed.
- Position the speakers: Place the speakers near the ear pockets inside the helmet. Adjust until they align comfortably with your ears without pressure points.
- Install the control unit: Most units attach to the outer rear or side of the helmet. Use manufacturer-provided adhesive pads or screws. Avoid drilling into structural areas.
- Route the wiring carefully: Thread wires along the inner edge of the helmet liner, tucking them behind padding. Never stretch or pinch cables.
- Attach the microphone: Position the mic near the mouth, typically on the chin bar or cheek pad. It should be 1–2 cm from your lips but not obstruct airflow.
- Secure all connections: Plug in speakers, mic, and control unit. Test fit before finalizing placement.
- Reassemble and test: Replace all padding. Power on the system and pair it with your phone or another headset.
“Improper speaker placement is the number one cause of muffled sound and listener fatigue. Take time to fine-tune positioning.” — Marcus Tran, Motorcycle Audio Integration Specialist
Testing and Calibration
After installation, thorough testing ensures reliability on the road. Conduct checks in multiple environments:
- Bluetooth pairing: Connect to your smartphone and verify that calls, music, and voice assistant functions work.
- Intercom function: If riding with others, test two-way communication at various speeds (idle, 30 mph, 60+ mph).
- Wind noise resistance: Ride on a quiet road and assess whether the microphone picks up excessive wind interference.
- Battery performance: Monitor usage over several short rides to confirm advertised battery life.
If audio is distorted or connection drops occur, revisit cable routing and component alignment. Sometimes a slight repositioning of the microphone boom arm dramatically improves clarity.
Real-World Example: Dual-Sport Touring Setup
Consider Alex, an adventure rider who frequently tours remote trails with a partner. He installed a Cardo Freecom 4+ on both his AGV and his passenger’s Shoei helmet. After initial setup, he noticed inconsistent intercom range in forested areas. By switching from standard Bluetooth mode to Dynamic Mesh Communication (DMC), the connection remained stable even when line-of-sight was blocked by terrain. He also adjusted the microphone angle downward slightly to reduce wind turbulence noise. These small refinements transformed their long-distance rides from frustrating to seamless.
This case illustrates that installation doesn’t end at physical mounting—optimization based on real use is equally important.
Do’s and Don’ts of Helmet Communication Installation
| Do’s | Don’ts |
|---|---|
| Use foam spacers to fine-tune speaker depth | Drill holes in the helmet shell |
| Check local laws regarding headphone use | Block ventilation ports with wiring |
| Update firmware regularly via USB | Overtighten mounting screws |
| Charge fully before first ride | Ignore firmware update notifications |
Essential Installation Checklist
- ☐ Confirm helmet compatibility with chosen system
- ☐ Gather tools: small screwdriver, tweezers, microfiber cloth
- ☐ Clean helmet interior before placing components
- ☐ Test-fit all parts without securing them permanently
- ☐ Route wires smoothly along natural seams
- ☐ Secure control unit using recommended method
- ☐ Calibrate microphone position for clearest voice pickup
- ☐ Perform full system test before extended rides
- ☐ Register product and download companion app (if available)
- ☐ Store backup charging cable in saddlebag
Frequently Asked Questions
Can I install a communication system on any helmet?
Most modern full-face and modular helmets accommodate aftermarket systems. However, some older or budget helmets lack internal space or padding retention. Always consult the manufacturer’s compatibility list before buying.
Will installing a system void my helmet warranty?
In many cases, yes—especially if you modify the shell or liner. Adhesive mounts usually don’t void warranties, but permanent alterations like drilling might. Check with the helmet maker first.
How do I maintain the system during off-season storage?
Remove the unit if possible and store it in a temperature-controlled environment. Charge the battery to around 60% before storing, and power it on monthly to prevent deep discharge.
Final Thoughts: Ride Smarter, Communicate Better
A properly installed helmet communication system does more than deliver music or enable chat—it enhances safety, coordination, and enjoyment on every ride. From careful selection to meticulous installation and ongoing calibration, each step contributes to a seamless experience. Whether you're navigating city streets or exploring backcountry trails, clear communication keeps you connected and alert.


 浙公网安备
33010002000092号
浙公网安备
33010002000092号 浙B2-20120091-4
Comments
No comments yet. Why don't you start the discussion?