
A cracked or scratched screen can ruin both the functionality and resale value of your smartphone. While modern devices come with durable glass, they're not immune to everyday wear. A premium-quality screen protector is one of the most effective ways to preserve your phone’s display—provided it's installed correctly. Poor installation leads to bubbles, dust interference, edge lifting, and reduced touch sensitivity. This guide walks you through the precise process of applying a high-end screen protector to ensure flawless clarity, long-term durability, and optimal performance.
Why Premium Screen Protectors Matter
Not all screen protectors are created equal. Budget options often use thin, low-grade materials that yellow over time, reduce screen brightness, or fail under minor impact. Premium protectors—especially tempered glass models with 9H hardness ratings—offer superior scratch resistance, optical clarity, and shock absorption. They’re engineered to mimic the feel of the original display while adding an extra layer of defense against drops and abrasions.
However, even the best protector performs poorly if applied incorrectly. Misalignment compromises edge adhesion, dust particles cause permanent bubbles, and improper cleaning leaves residue that degrades clarity. The difference between a professional-looking application and a flawed one lies in preparation, technique, and patience.
“Proper installation is just as important as the quality of the protector itself. A $40 protector applied poorly offers less protection than a $15 one installed perfectly.” — David Lin, Mobile Device Engineer at TechShield Labs
Essential Tools and Materials
Before beginning, gather everything you’ll need. Working efficiently without interruptions prevents dust from settling on the screen mid-process. Most premium kits include basic tools, but verify you have the following:
- Premium tempered glass screen protector (correct model for your device)
- Microfiber cleaning cloth (lint-free)
- Alcohol wipe or solution (70% isopropyl recommended)
- Adhesive dust remover stickers (pre-applied or peel-off tabs)
- Alignment tray or frame (included with many high-end kits)
- Squeegee tool (soft silicone edge)
- Bright, steady light source (to detect dust particles)
- Clean, flat workspace (preferably indoors with minimal airflow)
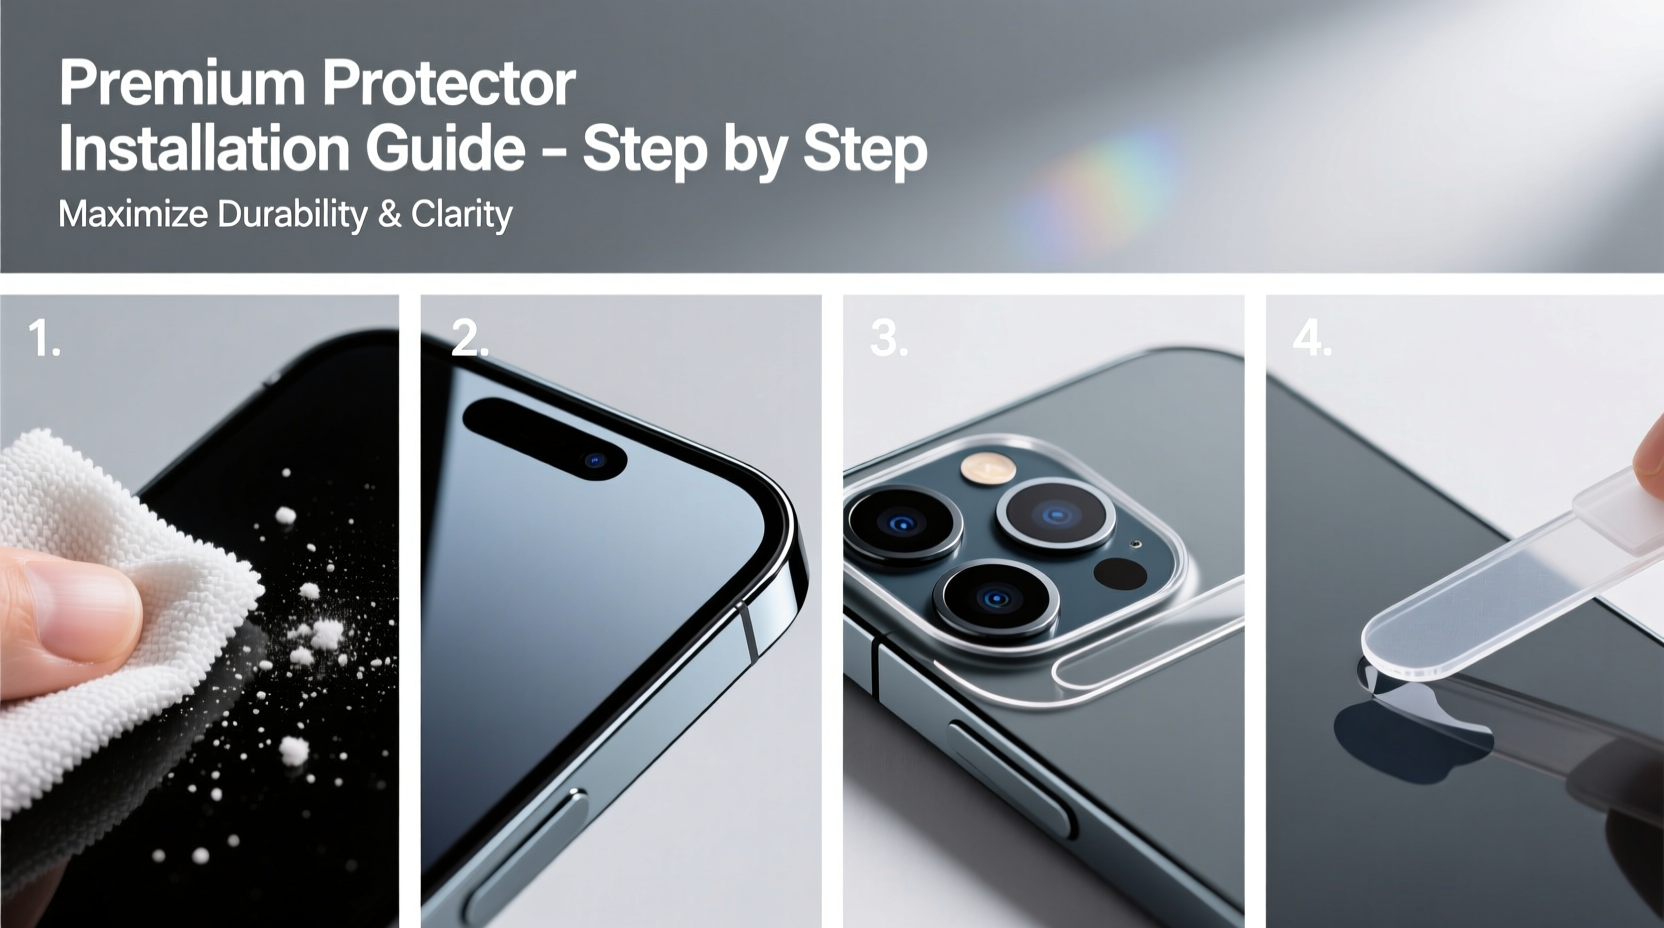
Step-by-Step Installation Process
Follow this timeline to achieve a bubble-free, perfectly aligned application:
- Power off your device. This prevents accidental touches during installation and makes dust more visible on a dark screen.
- Clean the screen with the microfiber cloth. Remove fingerprints, smudges, and loose debris using gentle circular motions.
- Use the alcohol wipe to disinfect the surface. Wipe in one direction across the entire screen, then let it air dry completely—do not rub with fabric afterward.
- Apply the dust removal stickers. Press each sticker firmly onto the screen, then lift slowly. Repeat until no more particles stick to the adhesive.
- Prepare the alignment frame (if included). Slide it over the phone edges to hold the protector in place during attachment.
- Peel the backing from the protector carefully. Hold it by the edges to avoid touching the adhesive side.
- Align the protector using cutouts for camera, sensors, and buttons. If using a tray, lower the protector into place; otherwise, position manually under bright light.
- Gently press the center first, then allow adhesion to spread outward. Do not slide or reposition once contact is made.
- Use the squeegee tool in circular motions to remove micro-bubbles. Apply moderate pressure from the center toward the edges.
- Inspect under angled light. Look for trapped dust or lifting edges. Small bubbles usually dissipate within 24 hours if the seal is intact.
Do’s and Don’ts During Installation
| Do’s | Don’ts |
|---|---|
| Work in a low-dust environment (e.g., closed room) | Install near open windows or fans |
| Use the alignment tray for precision | Freehand placement without guides |
| Wait 30 minutes after cleaning before applying | Apply immediately after wiping with alcohol |
| Press firmly around the edges for full adhesion | Lift and reattach the protector once placed |
| Test touch response and display clarity post-installation | Use sharp objects to remove bubbles |
Real-World Example: Fixing a Failed First Attempt
Jamal, a freelance photographer, purchased a military-grade tempered glass protector for his new smartphone. Excited to set up his device, he skipped the dust removal steps and applied the protector in his car. Within seconds, multiple bubbles formed along the bottom edge, and a speck of sand was visibly trapped beneath the film. Frustrated, he peeled it off—only to find the adhesive had already bonded unevenly.
He ordered a replacement kit and followed a meticulous indoor process: cleaned the screen twice, used all three dust stickers, and installed under a desk lamp. This time, the result was seamless. Two months later, after dropping his phone on concrete, the protector cracked—but the actual screen remained unharmed. “I learned that rushing costs more in the long run,” Jamal said. “Ten extra minutes of care saved me $200 in potential repair fees.”
Maintaining Your Protector for Long-Term Durability
Once installed, proper maintenance extends the life of your screen protector. Avoid exposing the phone to excessive moisture immediately after installation—wait at least 12 hours before using it near sinks or in humid conditions. Clean the surface weekly with a slightly damp microfiber cloth to prevent grime buildup.
If the protector sustains a crack or deep scratch, replace it promptly. Continuing to use a damaged protector reduces structural integrity and may create sharp edges. Many manufacturers offer lifetime replacement warranties when registered, so keep your proof of purchase.
Frequently Asked Questions
Can I reuse a screen protector if I apply it incorrectly?
No. Once the adhesive makes contact with any surface—even briefly—it begins to lose tackiness. Dust, oils, and microscopic debris compromise its ability to bond securely. Always discard and use a fresh protector if misaligned or contaminated.
Why does my screen protector feel different than the original glass?
Premium protectors aim to replicate OEM glass, but subtle differences in texture or oleophobic coating quality may be noticeable. Some users report a slightly “softer” glide when swiping. Over time, this sensation typically fades as you adjust to the new surface.
Do screen protectors affect facial recognition or fingerprint sensors?
High-quality protectors designed for your specific model should not interfere with biometric systems. However, thick or poorly manufactured films can disrupt under-display fingerprint scanners or infrared face detection. Always choose a protector certified for compatibility with your device’s security features.
Final Checklist Before You Begin
- ✅ Phone model matches protector specifications
- ✅ Work area is clean, well-lit, and free of drafts
- ✅ All tools unpacked and within reach
- ✅ Hands washed and dried
- ✅ Device powered off
- ✅ No rush—allow at least 20 minutes for careful execution
Conclusion
Installing a premium screen protector isn’t just about slapping on a piece of glass—it’s a precision task that protects your investment. With the right tools, environment, and methodical approach, you can achieve a factory-smooth finish that enhances durability without sacrificing clarity or responsiveness. Whether you're safeguarding a personal device or preparing a gift, taking the time to install it correctly ensures years of reliable performance.


 浙公网安备
33010002000092号
浙公网安备
33010002000092号 浙B2-20120091-4
Comments
No comments yet. Why don't you start the discussion?