
A leaking shower can lead to costly structural damage, mold growth, and compromised indoor air quality. The foundation of any durable, watertight bathroom is a properly installed shower base. Whether you're remodeling or building from scratch, getting this component right ensures long-term performance and peace of mind. This guide walks through every critical stage—from selection to final sealing—with expert-backed methods that deliver reliable results.
Choosing the Right Shower Base Material
The material of your shower base affects durability, maintenance, and installation complexity. Common options include acrylic, fiberglass, stone resin, and custom tile-ready mortar beds. Each has trade-offs in cost, weight, and longevity.
| Material | Pros | Cons | Lifespan |
|---|---|---|---|
| Acrylic | Lightweight, seamless, easy to clean, good adhesion for thinset | Can scratch if abrasive cleaners are used | 15–20 years |
| Fiberglass | Inexpensive, pre-sloped, quick install | Prone to flexing; may crack over time without solid support | 10–15 years |
| Stone Resin (Solid Surface) | Durable, non-porous, repairable surface | Heavier, more expensive | 20+ years |
| Mortar Bed (Custom Tile Base) | Full customization, strongest long-term solution | Labor-intensive, requires skilled tiling | 30+ years with proper waterproofing |
For most DIYers, an acrylic shower pan offers the best balance of affordability, ease of installation, and reliability—provided it's supported correctly on a level, rigid subfloor.
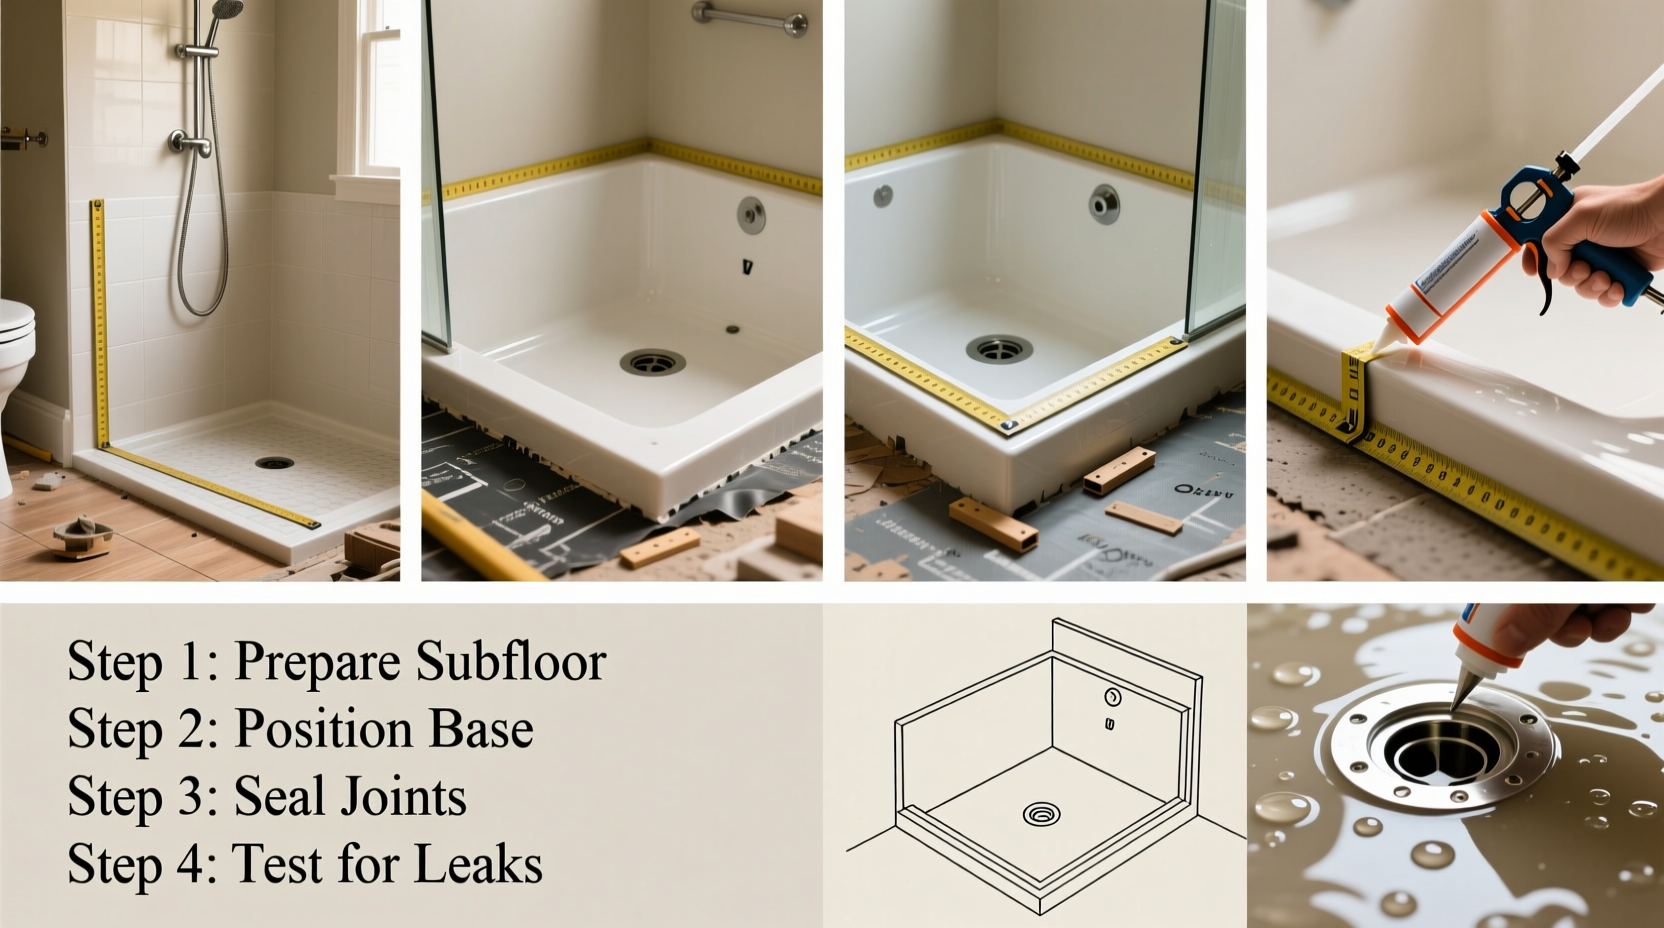
Preparation: Subfloor and Drain Alignment
No shower base will perform well on a weak or uneven subfloor. Before setting the base, ensure the structural platform beneath is sound. Use exterior-grade plywood (minimum ¾ inch) with cement backer board over top if additional rigidity is needed.
- Inspect the subfloor: Remove any existing flooring and examine for rot, warping, or soft spots. Replace damaged sections with new plywood fastened securely to floor joists.
- Check level and slope: The entire area must be level side-to-side but sloped toward the drain at ¼ inch per foot. Use a long level and laser level to verify.
- Position the drain pipe: Confirm the waste pipe aligns exactly with the shower base outlet. Adjust PVC piping as needed using couplings—not excessive force.
- Dry-fit the base: Place the shower pan in position without adhesive. Verify full contact across the bottom and unobstructed access to the drain.
If gaps exist between the base and subfloor, the pan may flex underfoot, leading to cracks or failed seals. Shim only where absolutely necessary and never rely on shims for primary support.
Installing the Shower Base: Step-by-Step Process
Once prep work is complete, proceed with installation using thinset mortar for maximum stability and water resistance.
- Mix polymer-modified thinset: Follow manufacturer instructions. The consistency should resemble peanut butter—workable but not runny.
- Trowel mortar onto subfloor: Spread a ¼-inch layer using a notched trowel. Work in small sections to prevent drying.
- Set the shower base carefully: Lower it into place, twisting slightly to ensure full mortar contact. Avoid walking on it immediately.
- Check alignment and slope: Use a level across multiple axes. Adjust gently if needed before the thinset sets.
- Seal the weep holes: Most bases have small drainage channels around the drain flange. These must remain open to allow moisture escape from beneath the tile surround.
- Cure for 24 hours: Do not disturb during curing. Keep area dry and temperature above 50°F (10°C).
After curing, connect the drain assembly according to local plumbing code. Apply plumber’s putty or a rubber gasket under the strainer body, then tighten securely without cracking the base.
“Improper bedding is the number one cause of premature shower base failure. Thinset isn’t optional—it’s essential.” — Mark Reynolds, Master Plumber & Building Inspector
Waterproofing Joints and Seams for Long-Term Protection
Even a perfectly installed base can leak if transitions aren’t sealed. Where the vertical walls meet the base, capillary action can draw water underneath unless properly protected.
- Apply a liquid waterproofing membrane (like RedGard or Laticrete Hydro Barrier) over cement backer board, extending 2–3 inches onto the shower curb and base flange.
- Use alkali-resistant mesh tape at inside corners before applying the membrane.
- Allow full cure time (usually 24 hours) before proceeding with tile installation.
Never use silicone alone as a waterproofing method. It degrades over time and doesn’t bond reliably to porous substrates. Instead, treat silicone as a secondary sealant for visible joints after tiling.
Real-World Example: A Basement Bathroom Retrofit
In a recent project in Portland, Oregon, a homeowner replaced a rusted steel tub/shower combo with a low-profile acrylic base. The original subfloor had sagged near the center, creating a reverse slope.
Rather than risk future leaks, the contractor sistered new joists from below and added ½-inch cement board over ¾-inch plywood. After leveling with self-leveling compound, the base was set in modified thinset. A liquid membrane was applied up the walls and tested before tiling.
Six months later, humidity readings remained stable, and no signs of moisture appeared in the basement below—proof that meticulous preparation pays off.
Essential Checklist for Leak-Free Installation
- ✅ Inspect and repair subfloor damage
- ✅ Verify correct drain location and height
- ✅ Dry-fit the base to confirm fit and slope
- ✅ Install base using polymer-modified thinset (not silicone or caulk)
- ✅ Allow 24-hour cure before connecting plumbing
- ✅ Seal all wall-to-base transitions with a certified waterproofing membrane
- ✅ Conduct a water test before tiling or enclosing walls
Frequently Asked Questions
Can I install a shower base directly on concrete?
Yes, but only if the slab is clean, level, and free of cracks. Etch the surface with muriatic acid or a grinder, then apply a bonding agent before spreading thinset. Ensure the slab slopes correctly toward the drain.
Do I need a pre-slope under a manufactured shower base?
No. Pre-slopes are used in custom tile shower pans with a liner. Manufactured bases already have the correct pitch built-in. Adding a pre-slope would interfere with proper seating.
What should I do if my base doesn’t sit flush with the floor?
If the gap exceeds 1/8 inch, re-evaluate subfloor flatness. Minor discrepancies can be filled with thinset, but large voids indicate structural issues that must be corrected first.
Final Thoughts: Build It Right the First Time
A leak-proof bathroom starts with a solid foundation—one that combines the right materials, precise preparation, and proven techniques. Skipping steps might save time today, but it invites headaches tomorrow. From choosing durable materials to verifying every seal, attention to detail separates a temporary fix from a lifelong solution.


 浙公网安备
33010002000092号
浙公网安备
33010002000092号 浙B2-20120091-4
Comments
No comments yet. Why don't you start the discussion?