
Protecting your iPhone from daily wear, accidental drops, and scratches is essential—especially if you rely on it throughout the day. A two-in-one iPhone film case combines a tempered glass screen protector with a precision-engineered protective case, offering seamless defense against impact and abrasion. Unlike traditional accessories installed separately, this hybrid system ensures perfect alignment, eliminates air gaps, and enhances touch sensitivity. Installing it correctly, however, requires attention to detail and a methodical approach. When done right, the result is a sleek, fully protected device that feels like it came straight from Apple’s lab.
Understanding the Two-in-One Film Case System
A two-in-one iPhone film case isn’t just another accessory—it’s an integrated protection solution. It typically includes a full-body TPU or polycarbonate case with built-in raised edges and a pre-aligned tempered glass screen protector attached via flexible adhesive rails or alignment brackets. The design eliminates misalignment issues common with standalone screen protectors and cases, ensuring the front camera, sensors, and buttons remain fully accessible.
These systems are engineered for specific iPhone models, so compatibility is crucial. Before beginning installation, verify that the kit matches your iPhone’s exact model—such as iPhone 15 Pro, iPhone 14, or iPhone SE (3rd gen). Mismatched kits can lead to poor fit, reduced drop protection, or obstructed functionality.
Essential Tools and Preparation
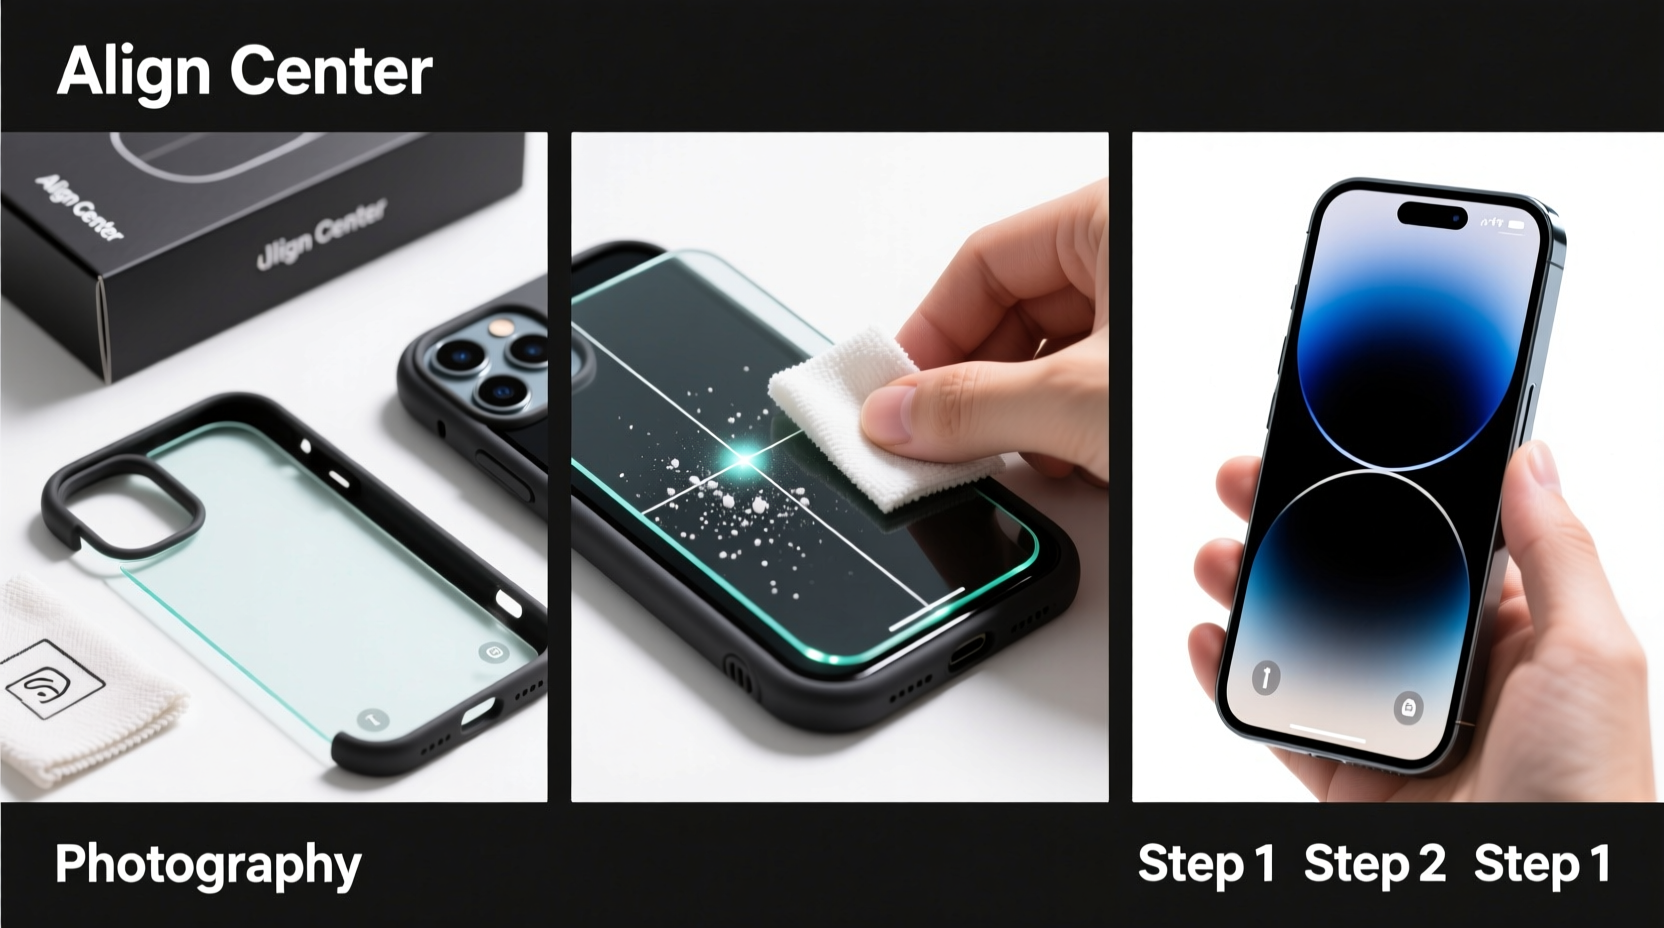
Before starting the installation, gather all necessary tools. Most two-in-one kits come with everything you need, but having extras on hand improves success rates. Here’s what to prepare:
- The two-in-one film case kit (case with attached screen protector)
- Microfiber cleaning cloth
- Alcohol wipe or screen cleaning solution
- Dust removal stickers or lint roller
- Plastic card (for smoothing)
- Well-lit, dust-free workspace
Cleanliness is critical. Even microscopic dust particles can create bubbles or interfere with adhesion. Choose a room with minimal airflow—avoid fans, open windows, or HVAC vents—to reduce airborne debris.
Pre-Installation Checklist
- Power off your iPhone to prevent accidental inputs during installation.
- Remove any existing case or screen protector.
- Clean the screen thoroughly using the alcohol wipe.
- Use the microfiber cloth to dry and polish the surface.
- Apply the dust removal sticker across the screen to lift invisible particles.
- Lay out all components in order of use.
Step-by-Step Installation Process
Follow these steps carefully to achieve a flawless application. Rushing or skipping stages increases the risk of errors that may require starting over.
Step 1: Align the Case Frame
Begin by placing your iPhone into the back portion of the case. Ensure the ports, speakers, and buttons align perfectly. Gently press until the phone clicks securely into place. This step establishes the foundation for accurate screen protector positioning.
Step 2: Activate the Screen Protector Mount
Most two-in-one systems feature a hinged or sliding mechanism that holds the tempered glass above the screen. Carefully lift or slide this component into position over the display. Do not remove the adhesive liner yet.
Step 3: Final Dust Inspection
Using a bright light at an angle, inspect the screen again. If you spot any specks, gently lift the protector slightly and use the dust removal sticker to extract them. Never attempt to blow on the screen—your breath carries moisture and particles.
Step 4: Apply the Screen Protector
Once the surface is pristine, peel away the rear adhesive liner from the screen protector. Slowly lower the glass onto the screen, starting from the top edge. Let gravity do the work—do not press down yet. As the adhesive makes contact, the glass will naturally spread outward, minimizing trapped air.
Step 5: Smooth and Seal
After the protector is fully seated, use the plastic card to gently sweep from the center outward. This removes residual micro-bubbles and ensures full adhesion. Avoid applying excessive pressure, which could crack the glass or dislodge the case alignment.
Step 6: Test Functionality
Turn on your iPhone and test the touchscreen, Face ID (if applicable), volume buttons, and charging port. Swipe across the screen to confirm responsiveness. If areas feel unresponsive, recheck for trapped debris or improper seating.
| Stage | Action | Common Mistake to Avoid |
|---|---|---|
| Alignment | Match case cutouts precisely | Forcing phone into misaligned case |
| Cleaning | Use alcohol wipe + dust sticker | Skipping final dust check |
| Application | Lower glass slowly from top | Pressing down too early |
| Finishing | Sweep bubbles outward | Using metal tools that scratch |
“Precision matters more than speed when installing hybrid protection systems. A single speck of dust can compromise the entire setup.” — Jordan Lee, Mobile Device Protection Specialist
Real-World Example: Sarah’s First Attempt
Sarah, a freelance photographer, purchased a two-in-one film case for her iPhone 15 after dropping her previous phone twice in one month. Excited to install it, she opened the kit in her car during a lunch break. Despite following the instructions, she noticed a large bubble near the front camera. Frustrated, she removed the protector—only to find a tiny grain of sand had settled on the screen during installation.
She tried again the next day at home, this time turning off the AC, wiping the screen twice, and using the dust sticker meticulously. The second attempt was flawless. Her takeaway? “The environment is just as important as the product. I now keep a small cleaning kit in my bag for future installations.”
Frequently Asked Questions
Can I reuse the screen protector if I make a mistake?
No. Once the adhesive is exposed or the glass is removed, the bond weakens significantly. Most manufacturers include one replacement protector in the package—use it wisely.
Will this affect wireless charging or MagSafe accessories?
High-quality two-in-one cases are designed to be MagSafe-compatible. The case thickness and materials allow magnetic attachment without interference. However, avoid stacking additional accessories, as that may reduce efficiency.
How do I clean the screen without damaging the protector?
Use a microfiber cloth lightly dampened with water or a screen-safe cleaner. Never spray liquid directly onto the phone. Avoid abrasive cloths or ammonia-based cleaners, which can degrade oleophobic coatings.
Maintenance Tips for Long-Term Protection
Even the best protection degrades over time without care. To extend the life of your two-in-one film case:
- Wipe the screen daily with a dry microfiber cloth.
- Remove the case weekly to clean dust from crevices.
- Inspect the edges of the screen protector for lifting.
- Replace the protector if it develops micro-cracks or loses oleophobic coating.
Final Thoughts and Next Steps
A properly installed two-in-one iPhone film case offers superior protection without sacrificing aesthetics or usability. By combining a precision-cut case with a factory-aligned screen protector, you gain peace of mind knowing your device is shielded from everyday hazards. The key to success lies in preparation, patience, and a clean environment.
Now that you’ve mastered the installation process, consider sharing your experience. Whether it’s a photo of your flawlessly applied protector or a tip that helped you succeed, your insights could help others avoid common pitfalls. Protect your investment—and help others do the same.


 浙公网安备
33010002000092号
浙公网安备
33010002000092号 浙B2-20120091-4
Comments
No comments yet. Why don't you start the discussion?