
Replacing or installing a garbage disposal is one of the most impactful upgrades you can make in your kitchen. A properly installed InSinkerator unit eliminates food waste efficiently, reduces odors, and prevents clogs. While many homeowners shy away from DIY plumbing, installing an InSinkerator garbage disposal is manageable with the right tools, knowledge, and safety precautions. This comprehensive guide walks you through every phase—from preparation to final testing—so you complete the job cleanly, safely, and like a licensed plumber.
Preparation: Gather Tools and Verify Compatibility
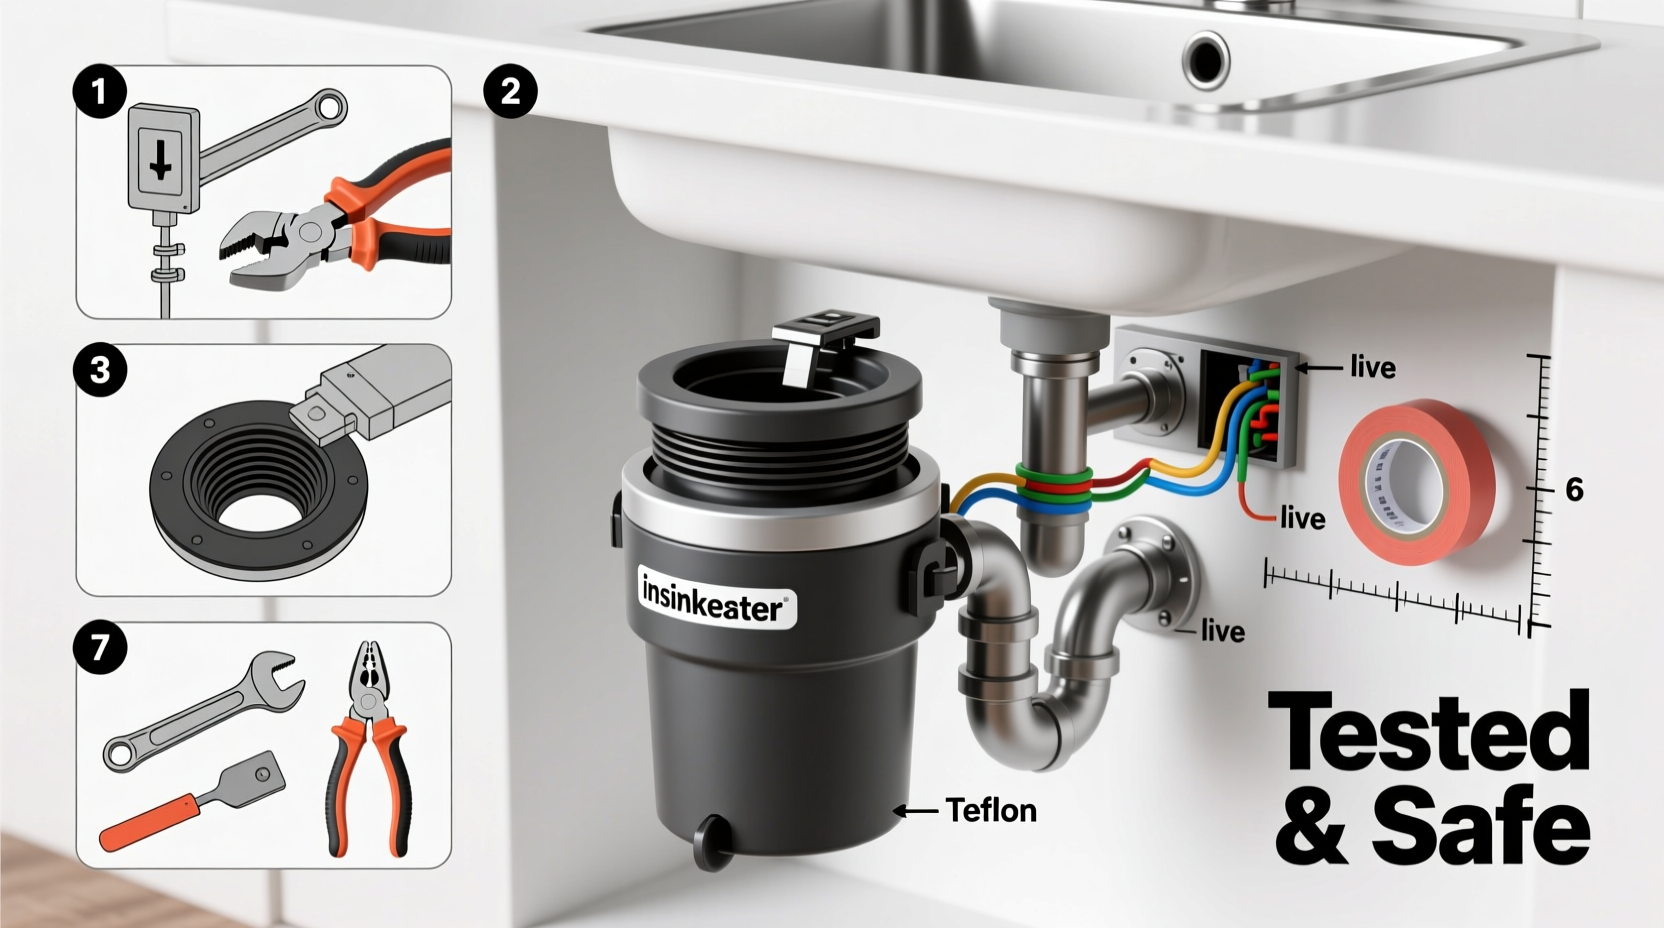
Before touching any pipes or wiring, ensure you have the correct model and tools. Not all disposals fit all sinks, and electrical requirements vary. Most InSinkerator models are designed for standard 3.5-inch drain openings and come with mounting assemblies that fit major sink brands.
Here’s what you’ll need:
- InSinkerator garbage disposal unit (e.g., Badger 5, Evolution series)
- Plumber’s putty or silicone sealant
- Adjustable wrench or basin wrench
- Screwdrivers (flathead and Phillips)
- Wire nuts and electrical tape
- Hacksaw or pipe cutter (if modifying drainpipe)
- Bucket and towels (for water spillage)
- Flashlight or headlamp
- Work gloves and safety glasses
Confirm your sink has a three-bolt mounting assembly—standard on most stainless steel and composite sinks. If replacing an old unit, check whether it uses a dishwasher inlet; if so, ensure your new model supports that connection.
Step-by-Step Installation Process
Follow this logical sequence to install your InSinkerator without complications.
- Shut off power and water supply. Locate the circuit breaker and switch off the kitchen outlet powering the disposal. Place a note on the panel to prevent accidental reactivation. Turn off the water if you’re working near connected lines.
- Disconnect the old unit (if applicable). Place a bucket under the P-trap to catch residual water. Disconnect the discharge tube and remove the P-trap. Use a wrench to loosen the snap ring or mounting bolts securing the disposal to the sink flange. Carefully lower the unit.
- Clean the sink flange area. Scrape off old plumber’s putty or sealant. Inspect the sink flange for cracks or corrosion. Replace if damaged.
- Install the new sink flange. Apply a bead of plumber’s putty around the underside of the new flange. Insert it into the drain hole from above and press firmly. From below, secure it with the provided gasket and locknut. Wipe away excess putty.
- Assemble the mounting bracket. Attach the red gasket and backup ring to the disposal’s top. Align the mounting ears with the sink flange and rotate the unit into place. Tighten the mounting screws evenly until snug—do not overtighten.
- Connect the discharge tailpipe. Cut the discharge tube to match your drain configuration using a hacksaw. Attach it to the disposal’s side outlet and connect to the P-trap with slip nuts. Ensure a slight downward slope for proper drainage.
- Wire the disposal. Remove the electrical cover plate. Feed the power cord through the strain relief. Connect black (hot) to black, white (neutral) to white, and green or bare (ground) to the grounding screw. Secure with wire nuts and tuck wires inside.
- Test for leaks and function. Turn water back on. Run water through the disposal and check all connections. Restore power and activate the unit. Listen for smooth operation and verify no vibrations or leaks.
Common Mistakes and How to Avoid Them
Even experienced DIYers make errors when rushing through disposal installations. These pitfalls can lead to leaks, motor burnout, or electrical hazards.
| Mistake | Consequence | How to Prevent |
|---|---|---|
| Skipping the air gap for dishwasher line | Backflow contamination | Install an air gap or use a high-loop under the sink |
| Overtightening mounting bolts | Cracked flange or misalignment | Tighten gradually in a star pattern |
| Incorrect wire connections | Short circuit or fire risk | Double-check polarity and use wire nuts |
| Ignoring reset button after installation | Unit won’t start | Press the red reset button on the bottom before powering on |
“Improper sealing at the sink flange causes 70% of post-installation leaks. Take time to apply putty correctly and let it set.” — Carlos Mendez, Master Plumber & HVAC Contractor
Checklist: Final Verification Before Use
Use this checklist to ensure your installation meets professional standards:
- ✅ Power is disconnected during installation
- ✅ Sink flange is sealed with fresh plumber’s putty
- ✅ Mounting assembly is tight and level
- ✅ Discharge pipe slopes downward toward drain
- ✅ All slip joints are hand-tightened (no leaks when tested)
- ✅ Electrical wires are securely connected and grounded
- ✅ Reset button on disposal is pressed before startup
- ✅ Unit runs smoothly without unusual noise or vibration
- ✅ No water drips at any connection point after 5-minute test
Real-World Example: Sarah’s Kitchen Upgrade
Sarah, a homeowner in Portland, replaced her 12-year-old disposal after recurring jams and slow drainage. She purchased an InSinkerator Evolution Excel, known for its sound insulation and multi-stage grinding. Following this guide, she discovered her old P-trap was corroded and replaced it with a PVC version. During wiring, she initially connected the ground wire incorrectly, causing the disposal to hum but not spin. After consulting the manual and verifying connections, she corrected the error. The unit now operates silently and handles chicken bones and fibrous peels effortlessly. “I saved $200 on labor,” she said. “And I feel more confident tackling other home projects.”
Frequently Asked Questions
Can I install an InSinkerator without prior plumbing experience?
Yes, if you follow manufacturer instructions and safety protocols. Most models include detailed manuals and universal mounting systems. Just take your time, double-check connections, and never rush electrical work.
Do I need a dedicated circuit for my garbage disposal?
While not always required by code, a dedicated 15-amp circuit prevents tripped breakers when running high-draw appliances simultaneously. If your disposal shares a circuit with a dishwasher or microwave, consider upgrading for reliability.
Why does my new disposal smell after installation?
New units may emit a rubber or plastic odor during the first few uses due to manufacturing residues. Run ice cubes and citrus peels through it for 30 seconds to eliminate odors naturally.
Final Tips for Long-Term Performance
Your InSinkerator will last 10–15 years with proper care. Avoid putting grease, coffee grounds, or non-food items down the drain. Run cold water for 15 seconds before and after each use to flush debris. Grind small amounts at a time, and never use the disposal as a trash can.
Take Control of Your Kitchen’s Efficiency
Installing an InSinkerator garbage disposal isn’t just about convenience—it’s about reclaiming time, reducing mess, and improving hygiene. With the right approach, any homeowner can execute this project safely and effectively. You don’t need a contractor’s license to achieve a pro-grade result. You only need attention to detail, patience, and this guide. Now that you’ve mastered the process, share your success story or help a neighbor tackle their next DIY plumbing task.


 浙公网安备
33010002000092号
浙公网安备
33010002000092号 浙B2-20120091-4
Comments
No comments yet. Why don't you start the discussion?